
Related Manuals for RainPoint ITV101P


Summary of Contents for RainPoint ITV101P
- Page 1 Digital Faucet Timer with 3 Watering Plans U SER M ANU AL ITV101P EN - 1 DE - 19 FR - 36 IT - 53 ES - 71...
- Page 2 - 2 -...
-
Page 3: Important! Please Read
IMPORTANT! PLEASE READ! • PLEASE ACTIVATE THE VALVE BEFORE USE IF YOU ARE USING IT FOR THE FIRST TIME OR AFTER A PERIOD OF IDLENESS TO ENSURE YOU CAN USE IT PROPERLY: PRESS AND HOLD THE OK BUTTON FOR 5S THEN RELEASE IT AND REPEAT 3-5 TIMES. -
Page 4: Product Overview
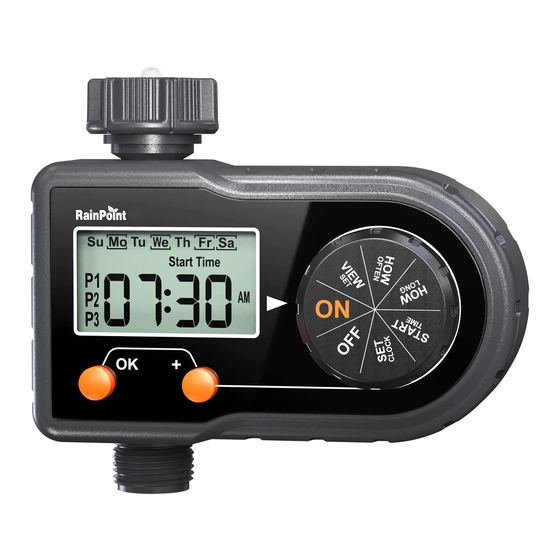
PRODUCT OVERVIEW At A GLANCE FILTER HOSE TAP CONNECTION BIG LCD SCREEN BUTTON + BUTTON DIAL OUTLET DIAL—Rotate the dial to set your watering schedule and confirm the change. OK BUTTON—Press to confirm or cancel time and system setup. + BUTTON —Press to adjust time and system setup. LCD SCREEN Low battery indicator Flashing during watering... - Page 5 DIAL POSITION FUNCTION SET CLOCK Set your local current time START TIME Set the start watering time (Every watering plan has its own start time) HOW LONG Set watering duration from 1 minute to 3 hours 59 minutes.(Every watering plan has its own watering duration) HOW OFTEN Set watering frequency of the week or every few days (3 watering plans...
-
Page 6: Product Installation
PRODUCT INSTALLATION INSTALLING THE BATTERIES 1) Remove the battery compartment on back of the timer. 2) Install 2 new AA (1.5V) alkaline batteries (not included). 3) Firmly reinstall the battery compartment back into the timer. Note: Firmly restore the battery compartment to ensure water resistance. -
Page 7: Installing The Timer
INSTALLING THE TIMER 1) Attach the timer inlet to the outdoor faucet ( hand tighten only). From the timer outlet connect a drip irrigation system or a garden hose. Inlet 2) Please turn on the tap after programming the timer. Outlet Note: •... -
Page 8: Set Clock
PROGRAMMING YOUR TIMER STEP 1: SET CLOCK 1) Turn dial to SET CLOCK. 2) Hold the "OK" button to switch time display of 12H or 24H mode. 12H mode: with "AM" and "PM" 24H mode: without "AM" and "PM" 3) " "... -
Page 9: Start Time
STEP 2: START TIME 1) Turn the dial to START TIME. 2) Using the"+" button to set the start time and press "OK" to confirm. 3) After confirm the previous plan, press "OK" again to switch to the next plan. 4) Turn dial to confirm the changes. - Page 10 STEP 3: HOW LONG 1) Turn the dial to HOW LONG. ( will display on the screen) 2) Using the"+" button to set the watering duration, press "OK" to confirm. (Watering Duration: 0 hour 01minute to 3 hour 59 minutes) 3) After confirming the previous plan, press “OK”...
-
Page 11: How Often
STEP 4: HOW OFTEN - 11 -... - Page 12 STEP 5: VIEW SET 1) Turn the dial to VIEW SET. 2) Press "OK" button to check the START TIME, HOW LONG and HOW OFTEN settings of the 3 watering plans. (The start time of P1) (The watering duration of P1) (Watering frequency) - 12 -...
- Page 13 STEP 6: AUTO WATERING 1) Turn the dial to ON. (All watering plans being set will run automatically) 2) During watering: a. Display the remaining watering time and will flash. b. Press the "+" button, and then the current day and time will be displayed. 3) When not watering: a.
-
Page 14: Additional Features
ADDITIONAL FEATURES MANUAL/HAND WATER This feature allows you to water without interrupting your set watering schedule. Please follow the steps below to start manual watering. 1) While the dial is in the "ON" position and hold the "OK" button to start watering manually. The duration of manual watering is default to 10 minutes. -
Page 15: Off Mode
OFF MODE 1) If you wish to stop all 3 watering plans for an extended period, turn the dial to OFF. (Your settings will be saved) 2) The timer will not run automatically while in OFF mode. (The screen will display OFF ) 3) To start watering again, turn the dial back to ON to resume your programmed watering schedule. -
Page 16: Troubleshooting
3. Install a booster pump or other booster pressurizing equipment. If your Rainpoint product does not operate properly after trying the troubleshooting steps, please contact us by phone or email : 1-833-3815659 | service@rainpointus.com - 16 -... -
Page 17: Warranty
YouTube by searching Rainpoint. If you can’t find what you need in this user manual, or you need other help of the product, please check the LOT NO. of your device and contact us before returning the Rainpoint products to the store. - Page 18 Scan the QR code to vist the setup video Need Help? Call 1-833 3815659 Or email to service@rainpointus.com - 18 -...
- Page 19 Digitale Wasserhahn-Zeitschaltuhr mit 3 Bewässerungsplänen BENUTZERHANDBUCH ITV101P - 19 -...
- Page 20 PRODUKTÜBERSICHT Auf einen Blick FILTER HOSE TAP CONNECTION BIG LCD SCREEN BUTTON + BUTTON DIAL OUTLET DIAL—Drehen Sie den Drehknopf, um Ihren Bewässerungsplan einzustellen und die Änderung zu bestätigen. OK BUTTON—Drücken Sie , um die Zeit- und Systemeinstellung zu bestätigen oder abzubrechen.
- Page 21 LCD-BILDSCHIRM Anzeige für schwache Batterie Blinken während der Bewässerung Der ausgewählte Tag der Woche Every _ Days Intervall Bewässerungstage Next Die verbleibende Zeit bis zur nächsten Bewässerung Start Time Die Startzeit der Bewässerung P1/P2/P3 Bewässerungspläne für einen Tag WÄHLSCHEIBENFUNKTION SET CLOCK Einstellen der aktuellen Ortszeit START TIME Stellen Sie die Startzeit für die...
- Page 22 SPEZIFIKATION Min/Max Betriebsdruck 0.5bar-8bar (7.25 psi-116 psi) Maximale Durchflussmenge 10 Gal/Min (35L/Min) 3℃-50℃ 37.4℉-122.4℉ Arbeitstemperatur Wasserdicht IP54 Macht durch 2 AA (1.5 V) Alkalibatterien (nicht enthalten) NH(US) für 3/4" Wasserhahn / Schlauch Thema SP(EU) für 3/4" oder 1" Wasserhahn / Schlauch Bewässerungszeiten pro Tag 1 bis 3 Mal pro Tag (bis zu 3 Bewässerungspläne pro Tag) Bewässerungstage...
-
Page 23: Einsetzen Der Batterien
PRODUKTINSTALLATION EINSETZEN DER BATTERIEN 1) Entfernen Sie das Batteriefach auf der Rückseite der Zeitschaltuhr. 2) Legen Sie 2 neue AA-Alkalibatterien (1,5 V) ein (nicht im Lieferumfang enthalten). 3) Setzen Sie das Batteriefach wieder fest in die Zeitschaltuhr ein. Note: Setzen Sie das Batteriefach wieder fest ein, um die Wasserfestigkeit zu gewährleisten. - Page 24 INSTALLATION DER ZEITSCHALTUHR 1) Befestigen Sie den Timer-Einlass am Außenwasserhahn (nur hand nur handfest anziehen). Am Ausgang der Zeitschaltuhr schließen Sie ein Tropfbewässerungssystem oder einen Inlet Gartenschlauch 2) Bitte drehen Sie den Wasserhahn auf, nachdem Sie den Timer programmiert haben. Outlet Hinweis: •...
- Page 25 PROGRAMMIERUNG DER ZEITSCHALTUHR SCHRITT 1: SET CLOCK 1) Drehen Sie das Rad auf SET CLOCK. 2) Halten Sie die Taste "OK" gedrückt, um die Zeitanzeige auf 12 Stunden oder 24 Stunden umzuschalten. 12H-Modus: mit "AM" und "PM" 24H mode: without "AM" and "PM" 3) "...
- Page 26 START TIME SCHRITT 2: 1) Drehen Sie das Rad auf START TIME. 2) Stellen Sie mit der "+"-Taste die Startzeit ein und drücken Sie zur Bestätigung "OK". 3) Nachdem Sie den vorherigen Plan bestätigt haben, drücken Sie erneut "OK", um zum nächsten Plan zu wechseln.
- Page 27 SCHRITT 3: HOW LONG 1) Drehen Sie den Regler auf ( wird auf dem Bildschirm angezeigt) 2) Stellen Sie mit der "+"-Taste die Bewässerungsdauer ein und drücken Sie zur Bestätigung auf "OK". (Bewässerungsdauer: 0 Stunde 01Minute bis 3 Stunde 59 Minuten) 3) Nachdem Sie den vorherigen Plan bestätigt haben, drücken Sie erneut "OK", um den nächsten Plan einzustellen.
- Page 28 SCHRITT 4: HOW OFTEN - 28 -...
- Page 29 SCHRITT 5: VIEW SET 1) Drehen Sie das Rad auf VIEW SET. 2) Drücken Sie die Taste "OK", um die Einstellungen STARTZEIT, WIE LANG und WIE OFT Einstellungen der 3 Bewässerungspläne zu überprüfen. (Die Startzeit von P1) (Die Bewässerungsdauer von P1) (Bewässerungshäufigkeit) - 29 -...
- Page 30 AUTO WATERING SCHRITT 6: 1) Drehen Sie den Schalter auf ON. (Alle eingestellten Bewässerungspläne werden automatisch ausgeführt) 2) Während der Bewässerung: a. Die verbleibende Bewässerungszeit wird angezeigt und blinkt. b. Drücken Sie die "+"-Taste, dann werden der aktuelle Tag und die Uhrzeit angezeigt. 3) Wenn nicht bewässert wird: a.
- Page 31 ZUSÄTZLICHE EIGENSCHAFTEN MANUELL/HÄNDISCH BEWÄSSERT Mit dieser Funktion können Sie die Bewässerung ohne Unterbrechung den eingestellten Bewässerungszeitplan. Bitte folgen Sie den nachstehenden Schritten, um die manuelle Bewässerung zu starten. 1) Halten Sie die "OK"-Taste gedrückt, während der Regler auf "ON" steht, um die manuelle Bewässerung zu starten.
- Page 32 OFF MODE 1) Wenn Sie alle 3 Bewässerungspläne für einen längeren Zeitraum stoppen möchten, drehen Sie den Schalter auf OFF. (Ihre Einstellungen werden gespeichert) 2) Der Timer läuft nicht automatisch, wenn er sich im OFF-Modus befindet. (Auf dem Bildschirm wird OFF angezeigt) 3) Um die Bewässerung wieder zu starten, drehen Sie den Drehknopf wieder auf ON, um Ihren programmierten Bewässerungsplan fortzusetzen.
-
Page 33: Fehlersuche
Kreuzgewinde. 3. Installieren Sie eine D ruckerhöhungspumpe oder eine andere Druckerhöhungsanlage. Wenn Ihr Rainpoint-Produkt nach dem Ausprobieren der Fehlerbehebungsschritte nicht richtig funktioniert nicht funktioniert, kontaktieren Sie uns bitte per Telefon oder E-Mail : 1-833-3815659 | service@rainpointus.com - 33 -... -
Page 34: Garantie
Stromschlags. Stromquellen gelangt. Tauchen Sie das Gerät niemals in Wasser ein. GARANTIE Rainpoint gewährt für dieses Produkt eine 1-jährige beschränkte Garantie gegen Material- und Verarbeitungsfehler. 1) Garantieleistungen können nur von unserem autorisierten Service-Center durchgeführt werden. Der datierte Original-Kaufbeleg muss uns auf Anfrage als Kaufnachweis vorgelegt werden, oder unserem autorisierten Service-Center vorgelegt werden. - Page 35 YouTube by searching Rainpoint. If you can’t find what you need in this user manual, or you need other help of the product, please check the LOT NO. of your device and contact us before returning the Rainpoint products to the store.
Need help?
Do you have a question about the ITV101P and is the answer not in the manual?
Questions and answers