
Subscribe to Our Youtube Channel
Related Manuals for Avaya J159


Summary of Contents for Avaya J159
- Page 1 Using Avaya J159 SIP IP Phone in Avaya ™ Cloud Office Release 11.0 Issue 2 January 2024...
- Page 2 Avaya can be a criminal, as well as a civil offense or offered within them. Avaya does not guarantee that these links will under the applicable law.
- Page 3 (or such successor site equipment according to the instruction manual. as designated by Avaya), scroll to the bottom of the page, and select Contact Avaya Support. Note Using a cell, mobile, or GSM phone, or a two-way radio in close proximity to an Avaya IP telephone might cause interference.
- Page 4 ™ The Bluetooth word mark and logos are registered trademarks owned by Bluetooth SIG, Inc. and any use of such marks by Avaya • Increase the separation between the equipment and receiver. LLC is under license. • Connect the equipment into an outlet on a circuit different from that to which the receiver is connected.
-
Page 5: Table Of Contents
....................... 32 Combining contacts ........................ 32 Deleting a contact .................... 33 Assigning a ringtone to a contact Chapter 8: Recents......................... 34 .......................... 34 Recents ™ January 2024 Using Avaya J159 SIP IP Phone in Avaya Cloud Office Comments on this document? infodev@avaya.com... - Page 6 Auto intercom feature with Multiple Device Access .......... 54 Auto-answer an auto intercom call with Multiple Device Access ...................... 54 Centralized call logs ™ January 2024 Using Avaya J159 SIP IP Phone in Avaya Cloud Office Comments on this document? infodev@avaya.com...
- Page 7 Restoring customized keys to default .......................... 74 Applications ............... 74 Enabling or disabling Prompt direct number ...................... 74 Enabling call history ® ................ 75 Microsoft Exchange account integration ™ January 2024 Using Avaya J159 SIP IP Phone in Avaya Cloud Office Comments on this document? infodev@avaya.com...
- Page 8 Limited access during failover ...................... 94 Viewing the product ID ...................... 94 Viewing the device type Chapter 15: Resources...................... 95 ........................ 95 Documentation .......................... 95 Support ™ January 2024 Using Avaya J159 SIP IP Phone in Avaya Cloud Office Comments on this document? infodev@avaya.com...
-
Page 9: Chapter 1: Purpose
This document describes how to use the phone's features in an Avaya Cloud Office environment. This document is intended for people who want to learn how to use Avaya J159 IP Phone features and capabilities. Installation of the phone is as simple as unpacking and connecting your phone to the network and powering on the phone. -
Page 10: Chapter 2: Phone Overview
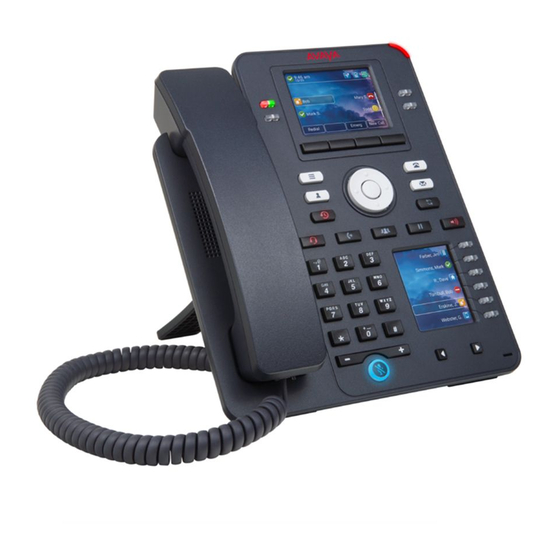
Chapter 2: Phone overview Avaya J159 IP Phone is intended to be used in business communications. The phone supports up to two call appearances with two lines of call display. Avaya J159 IP Phone has two color display. ™ In Avaya Cloud Office environment, your phone is plug and play, so you do not need to perform phone provisioning. - Page 11 Physical layout of a J159 IP Phone on page 12 Connection jacks of a J159 IP Phone on page 14 Optional components on page 16 ™ January 2024 Using Avaya J159 SIP IP Phone in Avaya Cloud Office Comments on this document? infodev@avaya.com...
-
Page 12: Physical Layout Of A J159 Ip Phone
Physical layout of a J159 IP Phone Name Description Beacon LED Provides visual alerts for the following: • Incoming call • Voice mail Table continues… ™ January 2024 Using Avaya J159 SIP IP Phone in Avaya Cloud Office Comments on this document? infodev@avaya.com... - Page 13 Left, Right keys Used to navigate on the Secondary Display screen. Mute Used to mute and unmute the outgoing audio. Table continues… ™ January 2024 Using Avaya J159 SIP IP Phone in Avaya Cloud Office Comments on this document? infodev@avaya.com...
-
Page 14: Connection Jacks Of A J159 Ip Phone
10 Connection jacks of a J159 IP Phone The following image illustrates the connection jacks that are present on the back panel of Avaya J159 IP Phone. The image schematically describes which device to connect to which jack. - Page 15 PC port is disabled when a Wi-Fi network is used. Headset Jack To connect the headset. Handset Jack To connect the handset. Table continues… ™ January 2024 Using Avaya J159 SIP IP Phone in Avaya Cloud Office Comments on this document? infodev@avaya.com...
-
Page 16: Optional Components
• Handset adapter. Note: Avaya does not supply USB devices. Avaya does not supply the handset adapter. Related links Phone overview on page 10 ™ January 2024 Using Avaya J159 SIP IP Phone in Avaya Cloud Office Comments on this document? infodev@avaya.com... -
Page 17: Chapter 3: Navigation
Chapter 3: Navigation Main menu The following table lists the Main menu icons used in Avaya J159 IP Phone: Icons Name Description Features To access administrator activated features. Applications To access phone applications such as Contacts, Recents, and activate screen saver. - Page 18 Indicates that you have missed a call. The + in the icon indicates that the number of missed calls are more than 9. Autodialing feature ™ January 2024 Using Avaya J159 SIP IP Phone in Avaya Cloud Office Comments on this document? infodev@avaya.com...
-
Page 19: Bluetooth Icons
Bluetooth icons Bluetooth icons The following table lists the Bluetooth icons used in the Avaya J159 IP Phone: Icon Description Indicates the Bluetooth feature is on. Default Bluetooth headset. Unpaired Bluetooth headset. Bluetooth headset is disconnected, but headset is paired. -
Page 20: Chapter 4: Handling Incoming Calls
On the Incoming call screen, press one of the following: • Ignore soft key • + volume button • - volume button The phone turns off the audio alert. ™ January 2024 Using Avaya J159 SIP IP Phone in Avaya Cloud Office Comments on this document? infodev@avaya.com... -
Page 21: Declining A Call
You have declined the call. The caller receives one of the following alerts: • An audio message alert • A busy tone alert ™ January 2024 Using Avaya J159 SIP IP Phone in Avaya Cloud Office Comments on this document? infodev@avaya.com... -
Page 22: Chapter 5: Handling Outgoing Calls
Ensure that the call history is not empty. Procedure 1. Press Redial soft key or Redial button. The phone dials the most recently dialed number. Or ™ January 2024 Using Avaya J159 SIP IP Phone in Avaya Cloud Office Comments on this document? infodev@avaya.com... -
Page 23: Making A Call From The Local Сontacts List
For example press the 7 key four times for the letter S or 76484 to search for someone named Smith. ™ January 2024 Using Avaya J159 SIP IP Phone in Avaya Cloud Office Comments on this document? infodev@avaya.com... -
Page 24: Hotline
• Going off-hook when a call is on hold When the Hotline feature is active, the phone disables the Call on off-hook feature. ™ January 2024 Using Avaya J159 SIP IP Phone in Avaya Cloud Office Comments on this document? infodev@avaya.com... -
Page 25: Chapter 6: Call Related Features
You can hold an active call or resume the most recent held call from any screen by pressing the Hold button. ™ January 2024 Using Avaya J159 SIP IP Phone in Avaya Cloud Office Comments on this document? infodev@avaya.com... - Page 26 1. To put an active call on hold, press Hold soft key. 2. To resume the held call, press Resume soft key. ™ January 2024 Using Avaya J159 SIP IP Phone in Avaya Cloud Office Comments on this document? infodev@avaya.com...
-
Page 27: Chapter 7: Contacts
You can select an Company directory as your contact search source to enable searching from the Contacts application. This selection disables other available search sources for the Contacts application. ™ January 2024 Using Avaya J159 SIP IP Phone in Avaya Cloud Office Comments on this document? infodev@avaya.com... -
Page 28: Searching Company Directory Contacts
No contacts in the group. 4. Press Search. 5. Scroll to the Search type option and toggle between Starts with and Contains. ™ January 2024 Using Avaya J159 SIP IP Phone in Avaya Cloud Office Comments on this document? infodev@avaya.com... -
Page 29: Adding A New Contact To Personal Contacts
• To enter a symbol, press More > Symbol. Use the navigation arrows to highlight the symbol that you want to enter, and press Insert. ™ January 2024 Using Avaya J159 SIP IP Phone in Avaya Cloud Office Comments on this document? infodev@avaya.com... -
Page 30: Adding A Contact From The Recents List
5. Scroll to the field to edit. 6. Use the dial pad and soft keys to change the contact information. 7. Press Save. ™ January 2024 Using Avaya J159 SIP IP Phone in Avaya Cloud Office Comments on this document? infodev@avaya.com... -
Page 31: Doing A Quick Search For A Contact
Personal contacts details ™ In the Avaya Cloud Office environment, the following personal contacts details are available: • First name • Last name ™ January 2024 Using Avaya J159 SIP IP Phone in Avaya Cloud Office Comments on this document? infodev@avaya.com... -
Page 32: Combining Contacts
The current contact is deleted from the Contacts list and merged with the local contact. Deleting a contact Procedure 1. Press Contacts. ™ January 2024 Using Avaya J159 SIP IP Phone in Avaya Cloud Office Comments on this document? infodev@avaya.com... -
Page 33: Assigning A Ringtone To A Contact
5. Scroll down to the ringtone that you want to assign, and press Select. 6. (Optional) To play the ringtone, press Play. 7. Press Save. ™ January 2024 Using Avaya J159 SIP IP Phone in Avaya Cloud Office Comments on this document? infodev@avaya.com... -
Page 34: Chapter 8: Recents
Recents and press Select. The Recents screen displays all calls. 3. Select a number that you want to delete. 4. Press Details. ™ January 2024 Using Avaya J159 SIP IP Phone in Avaya Cloud Office Comments on this document? infodev@avaya.com... -
Page 35: Clearing The Recents List
4. Select one of the following when the phone prompts for confirmation: • Delete: To delete all entries. • Cancel: To cancel and return to the previous menu. ™ January 2024 Using Avaya J159 SIP IP Phone in Avaya Cloud Office Comments on this document? infodev@avaya.com... -
Page 36: Chapter 9: Do Not Disturb And Call Forward
Related links DND icons on page 36 DND icons The following table displays the DND icons for the Avaya J100 Series IP Phones. State Phone icons Related links Do not disturb on page 36... -
Page 37: Call Forward Icons
Forwarding call when busy on page 37 Forwarding unanswered calls on page 38 Call Forward icons The following table displays the Call forward icons for the Avaya J100 Series IP Phones. State Phone and expansion module icons Call forward Related links... -
Page 38: Forwarding Unanswered Calls
3. Scroll to the Call forward-NA feature, and press one of the following: • Config • OK 4. Configure the following fields: • Destination: Enter the call forwarding number. ™ January 2024 Using Avaya J159 SIP IP Phone in Avaya Cloud Office Comments on this document? infodev@avaya.com... - Page 39 • Number of rings: Enter the number of rings after which the call is forwarded. 5. Press Save. 6. Press Enable. Related links Call forwarding on page 36 ™ January 2024 Using Avaya J159 SIP IP Phone in Avaya Cloud Office Comments on this document? infodev@avaya.com...
-
Page 40: Chapter 10: Conference Calls
4. Select the call on hold that you want to add to the conference. 5. Press one of the following: • Join • OK ™ January 2024 Using Avaya J159 SIP IP Phone in Avaya Cloud Office Comments on this document? infodev@avaya.com... -
Page 41: Putting A Conference Call On Hold And Resuming A Call
Ensure that your administrator has configured the Details softkey. 3. Select the person you want to drop. 4. Press Drop soft key. ™ January 2024 Using Avaya J159 SIP IP Phone in Avaya Cloud Office Comments on this document? infodev@avaya.com... -
Page 42: Chapter 11: Calendar
4. Scroll to Exchange credentials and press Select. 5. (Optional) Press Toggle to change between OAuth and Basic authentication methods. • When the authentication method is OAuth, press Connect. ™ January 2024 Using Avaya J159 SIP IP Phone in Avaya Cloud Office Comments on this document? infodev@avaya.com... -
Page 43: Accessing Calendar
If you are accessing the calendar for the first time, the phone displays the Exchange ® credentials screen to access your Microsoft Exchange Server. Related links Calendar on page 42 ™ January 2024 Using Avaya J159 SIP IP Phone in Avaya Cloud Office Comments on this document? infodev@avaya.com... -
Page 44: Reviewing Your Calendar Event
• Today: To view calendar events of the current date. • Day: To view calendar events of the selected day. Related links Calendar on page 42 ™ January 2024 Using Avaya J159 SIP IP Phone in Avaya Cloud Office Comments on this document? infodev@avaya.com... -
Page 45: Chapter 12: Advanced Features
Activating the screen saver Procedure 1. Press Main Menu. 2. Press Applications. 3. Scroll down to Activate screen saver, and press Select. ™ January 2024 Using Avaya J159 SIP IP Phone in Avaya Cloud Office Comments on this document? infodev@avaya.com... -
Page 46: Presence
If the line is already highlighted, use the Ok button on the phone to perform the action of the left-most soft key. Presence icons and visual LED indication The following table displays the Presence state icons and LED indicators for the Avaya J100 Series IP Phones. State... -
Page 47: Customizing Presence Or Blf Parked Call Indication
6. Scroll to Parked indication, and select one of the following: • None: To set the BLF parked call indication to none. ™ January 2024 Using Avaya J159 SIP IP Phone in Avaya Cloud Office Comments on this document? infodev@avaya.com... -
Page 48: Customizing The Ring Tone
Alternatively, you can press the corresponding Presence line key if your system administrator has configured it to perform the action of the left-most soft key on the phone screen. ™ January 2024 Using Avaya J159 SIP IP Phone in Avaya Cloud Office Comments on this document? infodev@avaya.com... -
Page 49: Picking Up An Incoming Call
LED. Before you begin Ensure that your system administrator activates the Call Retrieve feature. ™ January 2024 Using Avaya J159 SIP IP Phone in Avaya Cloud Office Comments on this document? infodev@avaya.com... -
Page 50: Call Transfer
You must configure the team button to use as your target selection. 3. To initiate a consultative transfer, press Talk. The call transfer recipient’s phone starts ringing. ™ January 2024 Using Avaya J159 SIP IP Phone in Avaya Cloud Office Comments on this document? infodev@avaya.com... -
Page 51: Making A Blind Transfer
The phone displays incoming call screen, plays incoming call ringtone, and the beacon LED flashes. Enabling and disabling the Call Waiting feature Procedure 1. Press Main menu: 2. Scroll to Features, and press Select. ™ January 2024 Using Avaya J159 SIP IP Phone in Avaya Cloud Office Comments on this document? infodev@avaya.com... -
Page 52: Intercom
Contact your administrator to enable the Auto-answer, auto intercom call, and Auto-mute features. ™ January 2024 Using Avaya J159 SIP IP Phone in Avaya Cloud Office Comments on this document? infodev@avaya.com... -
Page 53: Auto Intercom Feature With Multiple Device Access
ON until the call ends. You can end the auto intercom call from the MDA device that receives the call. ™ January 2024 Using Avaya J159 SIP IP Phone in Avaya Cloud Office Comments on this document? infodev@avaya.com... -
Page 54: Auto-Answer An Auto Intercom Call With Multiple Device Access
With the Park and Page feature, you can park active calls and announce the parked call to the other users with an audio alert. Park and page use a set of park slot numbers configured by your ™ January 2024 Using Avaya J159 SIP IP Phone in Avaya Cloud Office Comments on this document? infodev@avaya.com... -
Page 55: Parking And Paging An Active Call
You cannot use the following features on a paged call: • Conference • Hold • Transfer • Private Hold ™ January 2024 Using Avaya J159 SIP IP Phone in Avaya Cloud Office Comments on this document? infodev@avaya.com... -
Page 56: Retrieving A Parked Call
Long-term acoustic exposure protection Avaya J100 Series IP Phones have the long-term acoustic exposure protection to prevent the users from getting acoustic shocks. This feature reduces the loud volume of the conversations on the phone call to permissible acoustic limits. The user can set the permissible acoustic limit to dynamic or predefined static values. -
Page 57: Configuring Long Term Acoustic Protection
The Bridged Call appearance (BCA) feature accommodates a Boss/Assistant scenario. With the feature, users can distribute incoming calls between a group of several phones that share the same lines. ™ January 2024 Using Avaya J159 SIP IP Phone in Avaya Cloud Office Comments on this document? infodev@avaya.com... -
Page 58: Bridged Call Appearance Icons And Visual Led Indication
Bridged Call appearance icons and visual LED indication The following table displays the BCA state icons and LED indicators for the Avaya J100 Series IP Phones. State... -
Page 59: Dnd Presence State In Bca Group
If you perform any call-initiating action and the default call appearance line is available, the phone initiates the call using default line. ™ January 2024 Using Avaya J159 SIP IP Phone in Avaya Cloud Office Comments on this document? infodev@avaya.com... -
Page 60: Selecting A Bridge Line For A Conference Call
4. (Optional) From the secondary display, press the line key associated with the bridge line appearance. 5. (Optional) On a connected Avaya J100 Expansion Module, press the line key associated with the bridge line appearance. 6. Press Call soft key. -
Page 61: Customizing Ringtones For The Bridged Call Appearance Extension
4. (Optional) From the secondary display, press the line key associated with the bridge line appearance. 5. (Optional) On a connected Avaya J100 Expansion Module, press the line key associated with the bridge line appearance. 6. To initiate a consultative transfer, press Talk. -
Page 62: Customizing Incoming Call Alerts For Shared Lines
3. Scroll to Shared lines and press Select. 4. Scroll to the shared line you want to set up and press Select ™ January 2024 Using Avaya J159 SIP IP Phone in Avaya Cloud Office Comments on this document? infodev@avaya.com... -
Page 63: Retrieving A Call From Remote Hold
• Obtain the user ID and password of your voicemail from your system administrator. Procedure 1. To log in to your voicemail, press the Message button. ™ January 2024 Using Avaya J159 SIP IP Phone in Avaya Cloud Office Comments on this document? infodev@avaya.com... -
Page 64: Shared Control
™ You can enable pairing of the soft client and the phone from the Avaya Cloud Office application. For more information about pairing the device and using the soft client for call operations, see ™... -
Page 65: Sending A Multicast Page
Use Avaya Cloud Office Service Web to manage Visual Voicemail. For more information about Service Web, see Service Description at https://download.avaya.com/css/public/ documents/2556540. ™ January 2024 Using Avaya J159 SIP IP Phone in Avaya Cloud Office Comments on this document? infodev@avaya.com... -
Page 66: Accessing Visual Voicemail Messages
The phone displays the list of voice messages. Unread messages are marked with a red dot. 4. Scroll to the voicemail you want to play and press Play. ™ January 2024 Using Avaya J159 SIP IP Phone in Avaya Cloud Office Comments on this document? infodev@avaya.com... -
Page 67: Reading A Visual Voicemail Text Transcript
• Scroll to the voicemail whose sender you want to call back and press the Call back soft key. • Scroll to the voicemail whose sender you want to call back and select Option > Call Back. ™ January 2024 Using Avaya J159 SIP IP Phone in Avaya Cloud Office Comments on this document? infodev@avaya.com... -
Page 68: Deleting A Visual Voicemail Message
When it is toggled on, the Message hard key is used to directly access your Visual voicemail inbox. 3. Press Save to save your changes. ™ January 2024 Using Avaya J159 SIP IP Phone in Avaya Cloud Office Comments on this document? infodev@avaya.com... -
Page 69: Chapter 13: Customization
4. Use the Down Arrow key to go to the Display call timers. 5. Press Toggle to activate or deactivate the call timers. 6. Press Save. ™ January 2024 Using Avaya J159 SIP IP Phone in Avaya Cloud Office Comments on this document? infodev@avaya.com... -
Page 70: Setting Key Repeat Delay
• List: To see a list of the last eight numbers. 6. Press Save. Related links Redialing a number on page 22 ™ January 2024 Using Avaya J159 SIP IP Phone in Avaya Cloud Office Comments on this document? infodev@avaya.com... -
Page 71: Setting The Audio Button
• Visual: The phone displays a mute icon on the top bar of the screen. • Both: The phone beeps and displays a mute icon. • None: The phone disables the mute alert. 6. Press Save. ™ January 2024 Using Avaya J159 SIP IP Phone in Avaya Cloud Office Comments on this document? infodev@avaya.com... -
Page 72: Setting Visual Alerting
The customization menu is not available in the Blocked mode. 5. Press the Customize key. 6. Use the Navigation keys to select the line key. ™ January 2024 Using Avaya J159 SIP IP Phone in Avaya Cloud Office Comments on this document? infodev@avaya.com... -
Page 73: Restoring Customized Keys To Default
4. Scroll to Phone keys customization and press Select. 5. Scroll to Restore and press Select. 6. In the confirmation window, press Restore. ™ January 2024 Using Avaya J159 SIP IP Phone in Avaya Cloud Office Comments on this document? infodev@avaya.com... -
Page 74: Applications
About this task Enable the Prompt direct number feature if you want the phone to always prompt you to select an Avaya Spaces direct number when you place a call to join a meeting on Avaya Spaces. Before you begin Ensure that your administrator enables the Avaya Spaces feature. -
Page 75: Microsoft ® Exchange Account Integration
Toggle. 7. Press Save. Result After successful authentication, your phone synchronizes the calendar and contacts with your ® Microsoft Exchange account. ™ January 2024 Using Avaya J159 SIP IP Phone in Avaya Cloud Office Comments on this document? infodev@avaya.com... -
Page 76: Using Oauth Authentication For Microsoft ® Exchange Integration
If you want to use Basic authentication, please contact your administrator. Before you begin Ensure that you have valid exchange credentials. Procedure 1. Press Main Menu. ™ January 2024 Using Avaya J159 SIP IP Phone in Avaya Cloud Office Comments on this document? infodev@avaya.com... - Page 77 1. Press Main Menu. 2. Scroll to Settings and press Select. 3. Scroll to Applications and press Select. 4. Scroll to Calendar and press Select. ™ January 2024 Using Avaya J159 SIP IP Phone in Avaya Cloud Office Comments on this document? infodev@avaya.com...
- Page 78 Setting a day of the week for calendar reminder Procedure 1. Press Main Menu. 2. Scroll to Settings and press Select. 3. Scroll to Applications and press Select. ™ January 2024 Using Avaya J159 SIP IP Phone in Avaya Cloud Office Comments on this document? infodev@avaya.com...
-
Page 79: Audio
Use this procedure to adjust the audio output level for better quality audio. Procedure 1. Press Main Menu. 2. Scroll to Settings and press Select. 3. Scroll to Audio settings and press Select. ™ January 2024 Using Avaya J159 SIP IP Phone in Avaya Cloud Office Comments on this document? infodev@avaya.com... -
Page 80: Selecting Audio Path
4. Scroll to Bluetooth headset and press one of the following: • Toggle: To enable or disable Bluetooth. • Right Arrow key: To enable Bluetooth. • Left Arrow key: To disable Bluetooth. ™ January 2024 Using Avaya J159 SIP IP Phone in Avaya Cloud Office Comments on this document? infodev@avaya.com... -
Page 81: Pairing A Bluetooth Enabled Headset With Your Phone
4. Use the Down Arrow key to go to the Button clicks screen. 5. Press Toggle to turn the audio on or off. 6. Press Save. ™ January 2024 Using Avaya J159 SIP IP Phone in Avaya Cloud Office Comments on this document? infodev@avaya.com... -
Page 82: Turning Error Tones On And Off
6. Press Save. Configuring hearing aid compatibility Procedure 1. Press Main Menu. ™ January 2024 Using Avaya J159 SIP IP Phone in Avaya Cloud Office Comments on this document? infodev@avaya.com... -
Page 83: Setting A Headset Profile
Use this procedure to adjust the best headset performance. Before you begin • Ensure that you are on a call and the caller’s audio level is at 50%. ™ January 2024 Using Avaya J159 SIP IP Phone in Avaya Cloud Office Comments on this document? infodev@avaya.com... - Page 84 • DW Pro1/DW Pro2 SD Pro1/SD Pro2 (CEHS-AV03/AV04) • DW Office, SD Office (CEHS-AV03/AV04) Related links Setting headset mic level on page 83 ™ January 2024 Using Avaya J159 SIP IP Phone in Avaya Cloud Office Comments on this document? infodev@avaya.com...
-
Page 85: Setting A Personalized Ringtone
3. Scroll to Display and press Select. 4. Scroll to Background and press Select. 5. Scroll to Primary display and press Select. ™ January 2024 Using Avaya J159 SIP IP Phone in Avaya Cloud Office Comments on this document? infodev@avaya.com... -
Page 86: Changing The Screen Saver
You can enter any value from 0 to 999. 6. To enable clock on the screen saver, scroll to Clock and press Toggle. 7. Press Save. ™ January 2024 Using Avaya J159 SIP IP Phone in Avaya Cloud Office Comments on this document? infodev@avaya.com... -
Page 87: Adjusting The Brightness Of A Phone Screen
3. Scroll to Display and press Select. 4. Scroll to Backlight timer and enter the number of minutes. The range is 0 to 999. 5. Press Save. ™ January 2024 Using Avaya J159 SIP IP Phone in Avaya Cloud Office Comments on this document? infodev@avaya.com... -
Page 88: Setting The Time Format
• mm.dd • dd.mm • mm-dd • dd-mm • mmm dd 5. To select one of the options, press Toggle. 6. Press Save. ™ January 2024 Using Avaya J159 SIP IP Phone in Avaya Cloud Office Comments on this document? infodev@avaya.com... -
Page 89: Setting The Text Size
• Wi-Fi: To connect phone to a Wi-Fi network. 5. Press one of the following: • Toggle • Right Arrow key • Left Arrow key ™ January 2024 Using Avaya J159 SIP IP Phone in Avaya Cloud Office Comments on this document? infodev@avaya.com... -
Page 90: Connecting To A Wi-Fi Network
6. To restart the phone, press OK. 7. If the security is WEP or WPA/WPA2 PSK, in Password, enter the password for the Wi-Fi network. ™ January 2024 Using Avaya J159 SIP IP Phone in Avaya Cloud Office Comments on this document? infodev@avaya.com... -
Page 91: Setting The Network Configuration
• Auto: To automatically connect a network. • Manual: To manually connect to a network. 5. Press one of the following: • Toggle • Right arrow key ™ January 2024 Using Avaya J159 SIP IP Phone in Avaya Cloud Office Comments on this document? infodev@avaya.com... - Page 92 Related links Setting the network mode on page 89 ™ January 2024 Using Avaya J159 SIP IP Phone in Avaya Cloud Office Comments on this document? infodev@avaya.com...
-
Page 93: Chapter 14: Troubleshooting
• The Message Waiting Indicator is cleared, but voice mail might still be available if the voice mail server to which calls are being sent is not in failover. ™ January 2024 Using Avaya J159 SIP IP Phone in Avaya Cloud Office Comments on this document? infodev@avaya.com... -
Page 94: Viewing The Product Id
Viewing the device type About this task View your device type when your system administrator asks you to provide your device type information. The device type can be either Avaya SIP or Open SIP. Procedure 1. Press Main Menu. 2. Scroll to Network information and press Select. -
Page 95: Chapter 15: Resources
Chat with live agents to get answers to questions, or request an agent to connect you to a support team if an issue requires additional expertise. ™ January 2024 Using Avaya J159 SIP IP Phone in Avaya Cloud Office Comments on this document? infodev@avaya.com... - Page 96 ............... setting DND presence state ..........59 enabling ................ BLF ................46, calling blind transfer ................ company directory ............Bluetooth dial pad ................. ™ January 2024 Using Avaya J159 SIP IP Phone in Avaya Cloud Office Comments on this document? infodev@avaya.com...
- Page 97 ............45 customizing advanced ..............ringtone, BCA extension ..........61 call forward ............. 37, call waiting ..............Default SIP line setting ............deleting ™ January 2024 Using Avaya J159 SIP IP Phone in Avaya Cloud Office Comments on this document? infodev@avaya.com...
- Page 98 Avaya Cloud office ............64 calls ................shared control ...............64 outbound ...............24 phone settings audio button ..............71 call history ..............74 listening call timers ..............™ January 2024 Using Avaya J159 SIP IP Phone in Avaya Cloud Office Comments on this document? infodev@avaya.com...
- Page 99 ............security WEP, WPA/WPA2 PSK, 802.1x EAP ......90 select bridge line for call transfer ..............60 for conference call ............setting network mode ™ January 2024 Using Avaya J159 SIP IP Phone in Avaya Cloud Office Comments on this document? infodev@avaya.com...
Need help?
Do you have a question about the J159 and is the answer not in the manual?
Questions and answers