Table of Contents
Advertisement
Advertisement
Table of Contents

Related Manuals for Avaya J159


Summary of Contents for Avaya J159
- Page 1 Using Avaya J159 IP Phone H.323 Release 6.8.5 Issue 1 November 2020...
- Page 2 RESERVES THE RIGHT TO TAKE LEGAL ACTION AGAINST YOU the express behalf of Avaya. End User agrees to indemnify and hold AND ANYONE ELSE USING OR SELLING THE SOFTWARE harmless Avaya, Avaya's agents, servants and employees against all WITHOUT A LICENSE.
- Page 3 MAY BE OBTAINED FROM MPEG LA, L.L.C. SEE HTTP:// written consent of Avaya can be a criminal, as well as a civil offense WWW.MPEGLA.COM. under the applicable law. Compliance with Laws...
- Page 4 • Please only use the connecting cables, power cord, and U.S. Federal Communications Commission (FCC) Statements AC adapters shipped with the equipment or specified by Compliance Statement Avaya to be used with the equipment. If you use any other equipment, it may cause failures, malfunctioning, or fire.
- Page 5 Device Usage Consent interference by one or more of the following measures: By using the Avaya device you agree that Avaya, from time to time, • Reorient or relocate the receiving antenna. may collect network and device data from your device and may use such data in order to validate your eligibility to use the device.
-
Page 6: Table Of Contents
Deleting a contact ...................... 28 Editing a contact .................... 28 Viewing the contact details .................... 28 Searching for a contact ........................... 29 Call History .................... 29 Viewing the call history November 2020 Using Avaya J159 IP Phone H.323 Comments on this document? infodev@avaya.com... - Page 7 ...................... 51 Administrative messages Chapter 8: Troubleshooting.................... 52 .................... 52 Limited access during failover Chapter 9: Resources...................... 54 ........................ 54 Documentation .................... 54 Viewing Avaya Mentor videos .......................... 55 Support November 2020 Using Avaya J159 IP Phone H.323 Comments on this document? infodev@avaya.com...
-
Page 8: Chapter 1: Purpose
Chapter 1: Purpose This document describes the features of the Avaya J159 IP Phone and provides instructions on how to use this phone. It is intended for the end user. November 2020 Using Avaya J159 IP Phone H.323 Comments on this document? infodev@avaya.com... -
Page 9: Chapter 2: Phone Overview
Chapter 2: Phone overview Avaya J159 IP Phone is intended to be used in business communications. The phone supports up to four call appearances with two lines of call display. Avaya J159 IP Phone has two color display. Physical specifications •... - Page 10 - Headset - Message - Recents Related links Physical layout on page 11 Connection jacks on page 13 Secondary display on page 15 Optional components on page 15 November 2020 Using Avaya J159 IP Phone H.323 Comments on this document? infodev@avaya.com...
-
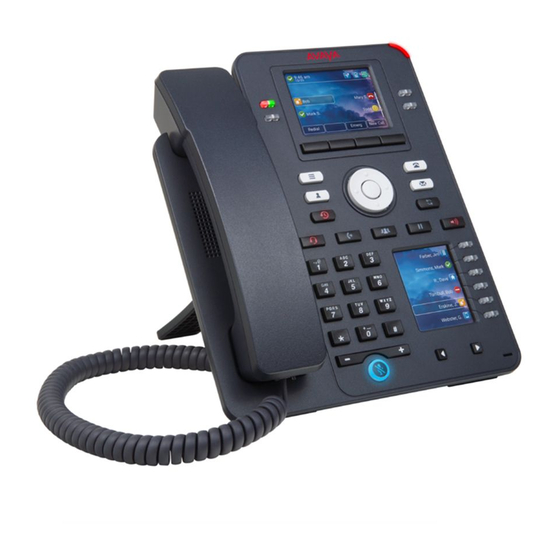
Page 11: Physical Layout
Physical layout Physical layout Figure 1: J159 IP Phone Following table lists the physical layout of Avaya J159 IP Phone. 5, 15, 16, and 17 are application keys which provides direct access to the corresponding applications. Name Description Beacon LED Provides visual alerts for the following: •... - Page 12 Left, Right keys Used to navigate on the Secondary Display screen towards Right and Left. Mute Button Used to mute and unmute the outgoing audio. Table continues… November 2020 Using Avaya J159 IP Phone H.323 Comments on this document? infodev@avaya.com...
-
Page 13: Connection Jacks
Phone overview on page 9 Connection jacks The following image illustrates the connection jacks on the back panel of Avaya J159 IP Phone. It describes which device to connect to which jack. Back panel of J159 IP Phone: November 2020 Using Avaya J159 IP Phone H.323... - Page 14 Headset Jack Connect to your headset. Handset Jack Connect to your handset. Wi-Fi card Reserved for Wi-Fi card. H.323 release 6.8.5 firmware does not support Wi-Fi. Table continues… November 2020 Using Avaya J159 IP Phone H.323 Comments on this document? infodev@avaya.com...
-
Page 15: Secondary Display
9 Secondary display Avaya J159 IP Phone has a secondary display that is located at the lower right corner. It provides additional call appearances and feature or application display. Secondary display has four pages with six lines per page, displaying 24 additional lines of information for incoming calls, outgoing calls, auto-dialing, and calling features. -
Page 16: Chapter 3: Getting Started
Identifying the device type during phone boot-up About this task Avaya J100 Series IP Phones displays the device type on the primary screen while the phone boots up. You can configure your phone according to the device type while the phone boots up. -
Page 17: Unlocking Your Phone
To unlock the phone, press Unlock and enter the PIN or password. November 2020 Using Avaya J159 IP Phone H.323 Comments on this document? infodev@avaya.com... -
Page 18: Chapter 4: Navigation
Menu options The following image shows the menu options that are available to view the current settings and configure the required parameters on the Avaya J159 IP Phone: November 2020 Using Avaya J159 IP Phone H.323... -
Page 19: Main Menu
Note: The options displayed on your deskphone are determined by the options configured for your extension by your administrator. Main menu The following table lists the Main menu icons used in Avaya J159 IP Phone: Name Description Options & Settings... -
Page 20: Accessing The Features Screen
On the Phone screen, use the right navigation button to gain access to the Features screen. To return to the main Phone screen, press Phone or scroll to the left. November 2020 Using Avaya J159 IP Phone H.323 Comments on this document? infodev@avaya.com... -
Page 21: Chapter 5: Call Operations
This will move the call appearance list to the top of your screen. Note: Set the Phone Screen on Ringing option to Yes to automatically display the phone screen when you receive a call. November 2020 Using Avaya J159 IP Phone H.323 Comments on this document? infodev@avaya.com... -
Page 22: Making Calls
Use the dialpad keys to enter the first few letters of the name, and the screen displays the first match in your list. Procedure 1. Press Contacts. November 2020 Using Avaya J159 IP Phone H.323 Comments on this document? infodev@avaya.com... -
Page 23: Calling A Person From The Call History
1. On the Phone screen, enter the number you want to call. 2. To edit the number, press Bksp to erase one character at a time. 3. To remove the entire number, press Clear 4. Press Call. November 2020 Using Avaya J159 IP Phone H.323 Comments on this document? infodev@avaya.com... -
Page 24: Calling A Person From The Directory
Press Clear to erase all dialed digits and enter a new number. Note: You can clear a number by using the backspace button only if you have enabled the Edit Dialing feature on your deskphone. November 2020 Using Avaya J159 IP Phone H.323 Comments on this document? infodev@avaya.com... -
Page 25: Transferring A Call
1. Press Phone to view the main Phone screen. 2. Select the active line you want to put on hold. 3. Press Hold soft key or Hold button. November 2020 Using Avaya J159 IP Phone H.323 Comments on this document? infodev@avaya.com... -
Page 26: Contacts
• If the characters are on the same key, pause before entering the next character. • To enter a space, press 0. • Enter remaining letters or numbers. • To delete the last character, press the Bksp softkey. November 2020 Using Avaya J159 IP Phone H.323 Comments on this document? infodev@avaya.com... -
Page 27: Deleting A Contact
1. Press Contacts. 2. Select the contact you want to delete. 3. Press one of the following: • Delete: To delete the contact. • Cancel: To cancel the action. November 2020 Using Avaya J159 IP Phone H.323 Comments on this document? infodev@avaya.com... -
Page 28: Editing A Contact
D, E, F or 3 depending on how you set up your contacts and how many times you press 3 in succession. Procedure 1. Press Contacts. 2. Using the dial pad, start typing the name which you want to search. November 2020 Using Avaya J159 IP Phone H.323 Comments on this document? infodev@avaya.com... -
Page 29: Call History
CALL FOR: (calls made to the bridged line) or CALLED FROM: (calls made from the bridged line) preceding the applicable number. 4. To return to the list view, press Back . November 2020 Using Avaya J159 IP Phone H.323 Comments on this document? infodev@avaya.com... -
Page 30: Adding An Entry From The Call History To Your Contacts List
Use this task to turn History on or off. If you have bridged call appearances on your phone, you can choose whether or not to include calls to your bridged lines in your call history log. Procedure 1. Press Home. November 2020 Using Avaya J159 IP Phone H.323 Comments on this document? infodev@avaya.com... -
Page 31: Conferences
• Redial the last dialed number by using the Redial softkey or Redial button. 3. When the third participant answers the call, press the Join softkey. 4. To add another person, press Add and repeat Step 2 and 3. November 2020 Using Avaya J159 IP Phone H.323 Comments on this document? infodev@avaya.com... -
Page 32: Adding A Person On Hold To A Conference Call
You will see the More soft key. 2. Press End Call when the conference is active. Result The participant who was added last gets disconnected from the conference. November 2020 Using Avaya J159 IP Phone H.323 Comments on this document? infodev@avaya.com... -
Page 33: Putting A Conference Call On Hold And Resuming A Call
The Message button and the Message Wait indicator at the upper right corner glows red to indicate that you have a message. Procedure Press the Message button to access your voice messages. November 2020 Using Avaya J159 IP Phone H.323 Comments on this document? infodev@avaya.com... - Page 34 Use this procedure to listen to your voicemail messages.. Few voicemail configuration has the web interface to access it, please contact your administrator for more information. For more details on using your voicemail services see, Avaya OneCloud-ReadyNow Messaging Service User Guide.
-
Page 35: Chapter 6: Advance Features
When Send All Calls (SAC) feature is on, your incoming calls go directly to a predefined coverage number, typically your voice mail. Incoming calls ring once at your extension and then go directly November 2020 Using Avaya J159 IP Phone H.323 Comments on this document? infodev@avaya.com... -
Page 36: Activating Ec500 For Simultaneous Ringing On Multiple Phones
The system administrator has to add your cell phone number and program the desk phone. Procedure 1. From the Phone screen, go to the Features screen. 2. Scroll to EC500, and press Select. November 2020 Using Avaya J159 IP Phone H.323 Comments on this document? infodev@avaya.com... -
Page 37: Bridged Call Appearances
Recents list or select the Redial softkey or Redial button. Joining a call on a bridged line About this task Use this task to join an existing call on a bridged line. November 2020 Using Avaya J159 IP Phone H.323 Comments on this document? infodev@avaya.com... - Page 38 • Abbreviated: The phone plays a single beep to indicate a call on the bridged appearance. Note: For multiple call appearance alerting, the phone highlights the call appearance with the most recent incoming call. November 2020 Using Avaya J159 IP Phone H.323 Comments on this document? infodev@avaya.com...
-
Page 39: Chapter 7: Customization
You can configure the Go to Phone Screen on Calling option to Yes to automatically display the Phone screen when you make a call. Procedure 1. Press Main menu > Options & Settings. 2. Press Select or OK. 3. Select Call Settings. November 2020 Using Avaya J159 IP Phone H.323 Comments on this document? infodev@avaya.com... - Page 40 4. Press Select or OK. 5. Select Go to Phone Screen on Answer. 6. Press Change or OK to set the option to Yes or No, depending on the current setting. November 2020 Using Avaya J159 IP Phone H.323 Comments on this document? infodev@avaya.com...
- Page 41 Use this task to cause the LED in the top right corner of the phone to flash when the phone gets incoming calls. Procedure 1. Press Main Menu. November 2020 Using Avaya J159 IP Phone H.323 Comments on this document? infodev@avaya.com...
- Page 42 7. Select Pair Contacts to Calls. 8. Press Change or OK to change the setting to On or Off. 9. Press Save. Related links Options & Settings on page 39 November 2020 Using Avaya J159 IP Phone H.323 Comments on this document? infodev@avaya.com...
- Page 43 • Switchhook only: The phone does not send the ringing tone to the headset. The headset switch-hook button is non functional. 5. Press Save. Related links Options & Settings on page 39 November 2020 Using Avaya J159 IP Phone H.323 Comments on this document? infodev@avaya.com...
-
Page 44: Application Settings
The phones sets the option to No by default. Press Change to change the setting to Yes. 6. Press Save to save the change. Related links Options & Settings on page 39 November 2020 Using Avaya J159 IP Phone H.323 Comments on this document? infodev@avaya.com... -
Page 45: Screen And Sound Options
Related links Options & Settings on page 39 Screen and Sound Options Adjusting the brightness of the display Procedure 1. Press Main menu. 2. Select Options & Settings. November 2020 Using Avaya J159 IP Phone H.323 Comments on this document? infodev@avaya.com... - Page 46 2. Press Select to select Options & Settings > Screen & Sound Options > Error Tones. 3. Press Change to turn error tones on or off. 4. Press Save. Related links Options & Settings on page 39 November 2020 Using Avaya J159 IP Phone H.323 Comments on this document? infodev@avaya.com...
- Page 47 The phone plays the ring tones once through the speaker as you scroll through the list. 6. Press Save to save your selection. The phone takes you to the Call Settings menu. November 2020 Using Avaya J159 IP Phone H.323 Comments on this document? infodev@avaya.com...
-
Page 48: Advanced Options
When the restore is in progress, the phone displays Retrieval in progress. When the restore is complete, the phone displays either Retrieval successful or Retrieval failed. Related links Options & Settings on page 39 November 2020 Using Avaya J159 IP Phone H.323 Comments on this document? infodev@avaya.com... - Page 49 • HAC Opt.— Setting delivers “Hearing Aid Compatibility” performance. • Amplified— Setting allows users to reset the volume level to nominal between calls. 7. Press Save. Related links Options & Settings on page 39 November 2020 Using Avaya J159 IP Phone H.323 Comments on this document? infodev@avaya.com...
- Page 50 Customization Acoustic Protection Avaya J100 Series IP Phones have the acoustic exposure protection, to protect the user’s ears from the acoustic shocks. This feature reduces the loud volume of the conversations on the phone call to permissible acoustic limit. The user can set the permissible acoustic limit to dynamic or predefined static values.
-
Page 51: Administrative Messages
While receiving an audible alert, you can change between the speaker, handset, and headset, can stop the transmission of pushed audio content by going on-hook, and can adjust the volume, as you normally do during a call. November 2020 Using Avaya J159 IP Phone H.323 Comments on this document? infodev@avaya.com... -
Page 52: Chapter 8: Troubleshooting
Incoming calls might not reach you and can go to voice mail. • Emergency calls might or might not work, depending on the stage of failover and the functionality available on the alternate server. November 2020 Using Avaya J159 IP Phone H.323 Comments on this document? infodev@avaya.com... - Page 53 • The Message Waiting Indicator is cleared, but voice mail might still be available if the voice mail server to which calls are being sent is not in failover. Transitions back to the normal server will restore all original functionality. November 2020 Using Avaya J159 IP Phone H.323 Comments on this document? infodev@avaya.com...
-
Page 54: Chapter 9: Resources
Avaya Mentor videos provide technical content on how to install, configure, and troubleshoot Avaya products. About this task Videos are available on the Avaya Support website, listed under the video document type, and on the Avaya-run channel on YouTube. • To find videos on the Avaya Support website, go to https://support.avaya.com/... -
Page 55: Support
For example, Contact Centers. Note: Videos are not available for all products. Support Go to the Avaya Support website at https://support.avaya.com for the most up-to-date documentation, product notices, and knowledge articles. You can also search for release notes, downloads, and resolutions to issues. Use the online service request system to create a service request. - Page 56 Conference Calls Go to Phone Screen Options on ringing adding a person on hold ..........setting ................dropping a person ............32 configuring ..............18, connection jacks ..............contacts November 2020 Using Avaya J159 IP Phone H.323 Comments on this document? infodev@avaya.com...
- Page 57 Ring Pattern changing ............... navigation arrows right and left ..............18 screen width .................47 up and down ..............SENDALL ................navigation tips ..............18 settings screen width ..............Speaker ................November 2020 Using Avaya J159 IP Phone H.323 Comments on this document? infodev@avaya.com...
- Page 58 Index support .................55 Transfer ................25 unlockPIN password ..............videos .................. Visual Alerts configuring ..............November 2020 Using Avaya J159 IP Phone H.323 Comments on this document? infodev@avaya.com...
Need help?
Do you have a question about the J159 and is the answer not in the manual?
Questions and answers