urmet domus iPercom MIKRA2 1060 Installation And Configuration Manual
Kit ip e ipercom 7” basic, kit ip with and basic 7” ipercom
Hide thumbs
Also See for iPercom MIKRA2 1060:
- Installation handbook (28 pages) ,
- Installation and use booklet (32 pages)
Table of Contents
Advertisement
Available languages
Available languages
Quick Links
Advertisement
Chapters
Table of Contents

Subscribe to Our Youtube Channel
Related Manuals for urmet domus iPercom MIKRA2 1060


Summary of Contents for urmet domus iPercom MIKRA2 1060
- Page 1 Mod. 1060 DS 1060-179 LBT 21026 KIT IP MIKRA2 E IPERCOM 7” BASIC KIT IP WITH MIKRA2 AND BASIC 7” IPERCOM Sch./Ref. 1060/634 IP55 IK07 LIBRETTO INSTALLAZIONE E CONFIGURAZIONE INSTALLATION AND CONFIGURATION MANUAL...
-
Page 2: Table Of Contents
ITALIANO INDICE DESCRIZIONE GENERALE ........................................2 COMPOSIZIONE DEL KIT ........................................3 DISPOSITIVI ACCESSORI ........................................4 SCHEMI A BLOCCHI DI COLLEGAMENTO ..................................5 IMPIANTO MONOFAMILIARE BASE ..................................5 DISTANZE MASSIME E SEZIONI CAVI ..................................5 AVVERTENZE PER L’INSTALLATORE ....................................6 CONFIGURAZIONE ALL’AVVIO DEL SISTEMA ..................................6 OPERAZIONI PRELIMINARI .......................................6 SELEZIONE DELLA LINGUA ......................................7 ACCESSO ALLA MODALITA’... -
Page 3: Composizione Del Kit
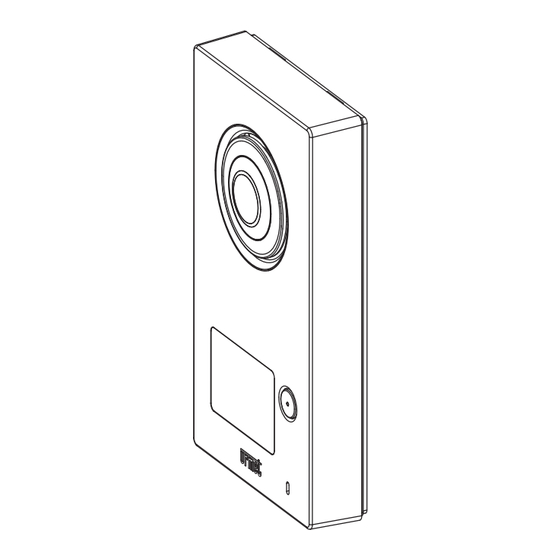
2 COMPOSIZIONE DEL KIT DESCRIZIONE N° Posto esterno Mikra IP Viti per fissaggio a parete Tasselli per fissaggio a parete Ø 5mm Postazione di chiamata Sch. 1060/21 Inserto per cacciavite Cartellino portanome Vite a brugola di scorta per chiusura della postazione di chiamata Posto interno videocitofonico con staffa di fissaggio Videocitofono Ipercom Basic Sch. -
Page 4: Dispositivi Accessori
3 DISPOSITIVI ACCESSORI DESCRIZIONE Postazione di chiamata supplementare Sch. 1060/21 Serratura elettrica 12 V~, 15 VA Scatola incasso per pulsantiere Mod. Mikra2 Sch. 1723/50 Predisposizione per attivazione apriporta passo carraio Pulsante per azionamento serratura elettrica pedonale Videocitofono Ipercom 7” Basic supplementare Sch. -
Page 5: Schemi A Blocchi Di Collegamento
4 SCHEMA A BLOCCHI DI COLLEGAMENTO 4.1 IMPIANTO MONOFAMILIARE BASE Appartamento 01 Internet OP10 OP10 110-230 V~ 110-230 V~ Luce 01 Luce 02 o rt s 110-230 V~ RE L. D EC SP EC IF IC IA L A SP D EC EC IA FO R... -
Page 6: Avvertenze Per L'installatore
5 AVVERTENZE PER L’INSTALLATORE Leggere attentamente le avvertenze contenute nel presente documento in quanto forniscono importanti indicazioni riguardanti la sicurezza di installazione, uso e manutenzione. • I dispositivi facenti parte del kit dovranno essere destinati solo all’uso per il quale sono stati espressamente concepiti. Ogni altro uso è da considerarsi improprio. -
Page 7: Selezione Della Lingua
6.2 SELEZIONE DELLA LINGUA La prima operazione da effettuare nella schermata di avvio è la selezione della lingua di sistema, tramite pressione del pulsante LANGUAGE. Nella finestra che viene mostrata occorre selezionare la lingua desiderata. Figura 2: Selezione della lingua di sistema Selezionando la lingua italiana, la schermata di avvio verrà... -
Page 8: Creazione Della Configurazione
Una volta inserita la password e premuto il pulsante CONFERMA, si entrerà in modalità di configurazione. La prima schermata che appare è quella di selezione della data e dell’ora corrente, passaggio fondamentale per la corretta configurazione del sistema. Figura 5: Impostazione di data e ora Agendo sulle colonne anno, mese, giorno, ora e minuti e premendo il pulsante CONFERMA, il sistema acquisisce la data e l’ora corrette. -
Page 9: Impostazione Dei Parametri Di Base
Verrà mostrata la schermata seguente: Figura 8: Creazione di una nuova configurazione 6.4.1 IMPOSTAZIONE DEI PARAMETRI DI BASE Nella schermata di creazione della configurazione, occorre selezionare il tipo di progetto Kit Villa (monofamiliare), quindi assegnare un nome significativo al progetto e una password installatore. Figura 9: Impostazione della nuova configurazione Per consentire modifiche future della configurazione creata, si raccomanda di prendere nota della password installatore e di conservarla in un luogo sicuro. -
Page 10: Impostazione Dei Videocitofono
6.4.2 IMPOSTAZIONE DEL VIDEOCITOFONO Assicurarsi che nel modulo di navigazione venga selezionato l’appartamento, ovvero sia premuto il pulsante App 01, come mostrato in figura: Figura 11: Selezione dell’appartamento dal modulo di navigazione Per aggiungere il videocitofono all’appartamento, occorre premere il pulsante Aggiungi nuovo dispositivo: apparirà la seguente schermata Figura 12: Selezione del dispositivo da inserire nell’appartamento Selezionare quindi la voce Posti interni e successivamente premere sulla voce Videocitofono 7”... - Page 11 Assegnare un nome al dispositivo tramite il campo Nome, quindi premere il pulsante in corrispondenza del campo Indirizzo MAC: verrà mostrata una nuova finestra, come mostrato nella figura seguente: Figura 14: Selezione Indirizzo MAC Premendo il pulsante Questo Dispositivo verrà automaticamente compilato il campo Indirizzo MAC e l’impostazione del dispositivo sarà completata. Figura 15: Completamento dell’impostazione del videocitofono Premere OK per confermare i parametri inseriti: il dispositivo verrà...
-
Page 12: Impostazione Del Posto Esterno
6.4.3 IMPOSTAZIONE DEL POSTO ESTERNO Tramite il modulo di navigazione, posizionarsi sul piano premendo il pulsante Piano 01, come mostrato in figura: Figura 17: Selezione del piano dal modulo di navigazione Per aggiungere il posto esterno occorre premere il pulsante Aggiungi nuovo dispositivo: apparirà la seguente schermata: Figura 18: Selezione del dispositivo da inserire sul piano Selezionare quindi la voce Postazioni di Chiamata e successivamente premere sulla voce Posto Esterno 1060/21 per aprire la schermata di impostazione del posto esterno. - Page 13 Assegnare un nome al dispositivo tramite il campo Nome, quindi premere il pulsante in corrispondenza del campo Indirizzo MAC: verrà mostrata una nuova finestra, come mostrato nella figura seguente: Figura 20: Selezione Indirizzo MAC Premere il pulsante Scansiona per identificare il posto esterno installato: verrà mostrata una nuova finestra con il dispositivo trovato. Figura 21: Selezione del posto esterno identificato Selezionare l’elemento visualizzato e premere il pulsante OK: il campo Indirizzo MAC verrà...
-
Page 14: Applicazione Della Configurazione
Nella sezione Tasti di chiamata premere il tasto Popola per permettere l’associazione automatica tra il videocitofono e il tasto del posto esterno. Figura 23: Completamento dell’impostazione del posto esterno 2 Premere OK per confermare i parametri inseriti: il dispositivo verrà aggiunto sul piano, come mostrato nella figura seguente: Figura 24: Posto Esterno aggiunto sul piano 6.5 APPLICAZIONE DELLA CONFIGURAZIONE Con l’impostazione dei dispositivi la configurazione si può... - Page 15 Premendo il pulsante Applica, verrà chiesto se si intende applicare la configurazione al sistema. Figura 26: Conferma di applicazione della configurazione Una volta confermata l’operazione premendo OK, verrà aperta una finestra sullo stato di distribuzione della configurazione sull’intero sistema. Figura 27: Distribuzione della configurazione sul sistema Non appena l’operazione sarà...
-
Page 16: Messa In Sicurezza Del Sistema
6.6 MESSA IN SICUREZZA DEL SISTEMA Una volta completata la distribuzione della configurazione occorre proteggere il sistema con una password amministratore: in tali condizioni il sistema si definirà bloccato. Per effettuare tale operazione, chiusa la finestra di stato precedentemente aperta, dal menu occorre selezionare la voce Gestione password, mostrata nella figura seguente: Figura 29: Gestione password Nel sottomenu che si apre, selezionare la voce Blocca impianto, come mostrato in figura:... - Page 17 Per consentire in futuro l’accesso alla configurazione del sistema, si raccomanda di prendere nota della password amministratore e di conservarla in un luogo sicuro. Una volta confermata l’impostazione premendo CONFERMA, verrà aperta una finestra sullo stato di distribuzione della password sull’intero sistema. Figura 32: Distribuzione della password sul sistema Non appena l’operazione sarà terminata, verrà mostrato un messaggio di Distribuzione completata nel titolo della finestra aperta. Figura 33: Completamento della distribuzione della password DS1060-179...
-
Page 18: Operazioni Finali E Future Espansioni
6.7 OPERAZIONI FINALI E FUTURE ESPANSIONI Completata la configurazione ed effettuato il blocco del sistema, occorre premere il pulsante HOME presente nella barra inferiore. Figura 34: Pulsante HOME Verrà così mostrata la schermata di videocitofonia, dove sarà possibile vedere alcune impostazioni effettuate nella configurazione, come mostrato in figura: Figura 35: Videocitofonia Nella lista delle camere è... -
Page 19: Impostazione Dell'inoltro Di Chiamata Su Smartphone/Tablet
6.8 IMPOSTAZIONE DELL’INOLTRO DI CHIAMATA SU SMARTPHONE/TABLET La prestazione di inoltro di chiamata permette il rinvio di una chiamata audio-video oppure solo audio verso uno smartphone con sistema operativo Android oppure IOS. ATTENZIONE! Lo smartphone/tablet impiegato deve essere provvisto di Google Service per poter scaricare e utilizzare l’app Urmet CallMe. Per utilizzare il rinvio (o inoltro) di chiamata su smartphone/tablet occorre: Abilitare la funzionalità... - Page 20 Premendo il pulsante Registrati si aprirà una nuova schermata in cui inserire i dati per la creazione del nuovo account Urmet Cloud. Figura 39: Creazione di un account Urmet Cloud Inserire il nome e cognome (es. Mario Rossi), la password, ripetere la password per conferma, indicare un indirizzo e-mail valido e scegliere la nazionalità. Abilitare con la spunta le caselle di accettazione dei termini di servizio.
- Page 21 A tale scopo occorre aprire la schermata delle impostazioni della videocitofonia e selezionare la voce Impostazioni Modalità di Funzionamento, come mostrato nella figura seguente: Figura 41: Impostazioni della videocitofonia Successivamente premere sulla voce Impostazioni Inoltro di Chiamata per configurare la prestazione. Figura 42: Impostazioni Modalità...
- Page 22 Premere sulla voce “Attiva/Verifica il servizio di Inoltro di Chiamata”. Figura 44: Attivazione servizio CallMe Sullo smartphone in cui è presente l’App CallMe premere il pulsante: “Impostazioni” --> “Gestione servizio” --> “I miei dispositivi” --> “Aggiungi”. Viene avviata l’applicazione QR Code reader presente sul proprio smartphone. Scansionare con lo smartphone il QR Code visualizzato sul display del videocitofono.
- Page 23 Una volta terminata l’impostazione e tornati nella schermata principale dalla videocitofonia, premere il pulsante di stato del videocitofono presente in basso a destra, come indicato in figura. Figura 47: Pulsante di stato della videocitofonia Nella barra che si apre, selezionare l’opzione REMOTO, in modo da abilitare l’inoltro di chiamata. Da questo momento ogni chiamata in arrivo sul videocitofono dal posto esterno verrà...
-
Page 24: Installazione Dello Switch Poe
7 INSTALLAZIONE DELLO SWITCH POE Lo switch può essere installato ad appoggio tavolo, mediante gli appositi piedini forniti a corredo, oppure fissato a parete con le viti e i tasselli non forniti a corredo prodotto. 7.1 FUNZIONAMENTO STATO LED LED PWR ALIMENTAZIONE Acceso Verde Lo switch è... -
Page 25: Schema Di Collegamento
10 SCHEMA DI COLLEGAMENTO COLLEGAMENTO DELL’IMPIANTO CON UN ROUTER ADDIZIONALE SV124-1349A Sch./Ref.1741/1 CAT5 OP10 LINEA~ LINE~ ALIMENTATORE PORT5 PORT6 PORT7 PORT8 PORTS Sch./Ref. 1039/44 51Vdc Sch./Ref.1741/1 POE PORTS ADAPTER PORT1 PORT2 PORT3 PORT4 (VX.008) LINEA~ LINE~ CAT5 OP10 CAT5 CAT5 CAT5 Luce / Light 01 Sch./Ref.1060/21... -
Page 26: English
ENGLISH CONTENTS GENERAL DESCRIPTION ........................................26 KIT COMPOSITION ..........................................27 ACCESSORY DEVICES ........................................28 CONNECTION BLOCK CHARTS ......................................29 SINGLE-FAMILY SYSTEM ......................................29 DISTANCES ..........................................29 WARNINGS FOR INSTALLERS ......................................30 CONFIGURATION OF SYSTEM START-UP ..................................30 PRELIMINARY OPERATIONS ....................................30 SELECTING LANGUAGES .......................................31 ACCESSING THE CONFIGURATION MODE AND SETTING THE DATE AND TIME ....................31 CREATING THE CONFIGURATION ..................................32 6.4.1 SETTING THE BASE PARAMETERS ................................33... -
Page 27: Kit Composition
2 KIT COMPOSITION DESCRIPTION N° Mikra IP door unit Screws for fixing to wall Anchor bolts for fastening to wall Ø 5mm Calling station Ref. 1060/21 Screwdriver insert Name tag Spare Allen screw for closing the door unit Apartment station video door phone with fastening bracket Basic Video door phone 7”... -
Page 28: Accessory Devices
3 ACCESSORY DEVICES DESCRIPTION Supplementary call station Ref. 1060/21 Electric lock 12 V~ 15 VA Mikra2 panel flush-mounting box Ref. 1723/50 Setup for activating garage gate door opener Button for activating pedestrian gate electric lock Supplementary Basic video door phone 7” Ipercom Ref. -
Page 29: Connection Block Charts
4 CONNECTION BLOCK CHARTS 4.1 SINGLE-FAMILY SYSTEM Apartment 01 Internet OP10 OP10 110-230 V~ 110-230 V~ Light 01 Light 02 o rt s 110-230 V~ RE L. D EC SP EC IF IC IA L A SP D EC EC IA PE R FO R C AT... -
Page 30: Warnings For Installers
5 WARNINGS FOR INSTALLERS Read the notes in this manual carefully. This manual contains important information on safe installation, use and maintenance. • This devices in the kit must only be put to the use for which they were intended. All other use is improper. The manufacturer cannot be held responsible for damage deriving from improper, incorrect or unreasonable use. -
Page 31: Selecting Languages
6.2 SELECTING LANGUAGES The first operation to be carried out in the home page is to select the system language by pressing the LANGUAGE button. Select the desired language in the window that opens. Figure 2: Selecting the system language By selecting the desired language, the startup screen will immediately be displayed in the selected language. -
Page 32: Creating The Configuration
Entering the password and pressing the CONFIRM button allows access to the configuration mode. The first page that appears is the one for selecting the current date and time, a fundamental step for correctly configuring the system. Figure 5: Setting the date and time By entering data into the year, month, day, hour, and minute columns and then pressing the CONFIRM button, the system acquires the correct date and time. -
Page 33: Setting The Base Parameters
The following page will appear: Figure 8: Creating a new configuration 6.4.1 SETTING THE BASE PARAMETERS On the create configuration page, select the type of Villa Kit project (single family) and then assign a meaningful name to the project and an installer’s password. -
Page 34: Setting The Video Door Phone
6.4.2 SETTING THE VIDEO DOOR PHONE Ensure that the apartment is selected in the navigation module, or that the App 01 button is pressed as shown in the figure. Figure 11: Selecting the apartment from the navigation module To add the video door phone to the apartment, first press the Add new device button: the following page will appear: Figure 12: Selecting the device to be added to the apartment Then select the item Apartment Station and then press on the item Video door phone 7 “Basic 1741 / 1-2 to open the setting screen of the video door phone. - Page 35 Assign a name to the device using the Name field, then press the button in correspondence or the MAC Address: a new window will appear, as illustrated in the figure below. Figure 14: Selecting the MAC address By pressing the This Device button, the MAC Address field will be filled in automatically and the device setting will be completed. Figure 15: Completing the video door phone Settings Press OK to confirm the parameters entered: the device will be added to the apartment, as illustrated in the figure below.
-
Page 36: Setting The Door Unit
6.4.3 SETTING THE DOOR UNIT Use the navigation model to position the cursor on the floor, pressing the Floor 01 button as illustrated in the figure. Figure 17: Selecting the floor from the navigation module To add the Door Unit, first press the Add new device button: the following page will appear. Figure 18: Selecting the device to be added to the floor Then select the Calling Stations item and then press the Entry panel 1060/21 item to open the setting screen of the external panel. - Page 37 Assign a name to the device using the Name field, then press the button in correspondence or the MAC Address: a new window will appear, as illustrated in the figure below. Figure 20: Selecting the MAC address Press the Scan button to identify the Door Unit installed: a new window will appear specifying the device found. Figure 21: Selecting the Door Unit identified Select the element visualized and press the OK button: the MAC Address field will be automatically filled in.
-
Page 38: Applying The Configuration
In the Call Buttons section, press the Populate button to allow automatic association between the video door phone and the door unit button. Figure 23: Completing the Door Unit Setting 2 Press OK to confirm the parameters entered: the device will be added to the floor, as illustrated in the figure below. Figure 24: Door unit added to the floor 6.5 APPLYING THE CONFIGURATION With the device setting, the configuration can be considered completed and can therefore be applied to the system. - Page 39 Press the Apply button and a dialogue window will ask if the user wants to apply the configuration to the system. Figure 26: Confirming application of the configuration Once the operation is confirmed by pressing OK, a window will open on the distribution status of the configuration on the system as a whole. Figure 27: Distributing the configuration on the system As soon as the operation has finished, a message saying Distribution completed will appear in the title of the open window.
-
Page 40: Ensuring System Security
6.6 ENSURING SYSTEM SECURITY Once distribution of the configuration is completed, the system must be protected with an administrator password: under these conditions the system will define itself blocked. To carry out this operation, the status window that was opened previously closes, then select Password Management from the window, as illustrated in the figure below. - Page 41 To allow future access to the system configuration, it is recommended that the administrator password be noted and saved in a safe place. Once the setting is confirmed by pressing CONFIRM, a window will open on the distribution status of the password on the system as a whole. Figure 32: Distributing the password on the system As soon as the operation is concluded, a message saying Distribution completed will appear in the title of the open window. Figure 33: Completing the distribution of the password DS1060-179...
-
Page 42: Final Operations And Future Expansions
6.7 FINAL OPERATIONS AND FUTURE EXPANSIONS Complete the configuration and once the system is blocked, press the HOME button on the bar at the bottom. Figure 34: HOME Button In this way, the video door phone screen appears, where it is possible to see some of the setting made in the configuration, as illustrated in figure. Figure 35: Video door phone systems In the rooms list, it is possible to see the Door Unit set previously. -
Page 43: Call Forward Setting On Smartphone / Tablet
6.8 CALL FORWARD SETTING ON SMARTPHONE / TABLET The call forwarding function can be used to send an audio-video or an audio-only call to an Android or iOS smartphone. IMPORTANT! The smartphone/tablet must have Google Service to be able to download and use the Urmet CallMe app. To use the call sending (or forwarding) on a smartphone/tablet, it is necessary to: Enable the function in the system configuration;... - Page 44 Pressing the Register button will open a new screen where you can enter the data for the creation of the new Urmet Cloud account. Figure 39: Creating an account Urmet Cloud Enter your desired user name (e.g. Williams), password, re-enter the password for confirmation and indicate a valid email address. Select the boxes to accept the terms of service.
- Page 45 To do so, it is necessary to open the video door phone settings page and select the item Device mode settings, as illustrated in the figure below. Figure 41: Video door phone settings Then press on the Call Forwarding Settings item to configure the feature. Figure 42: Device Mode Settings The following function settings screen will now open.
- Page 46 Press “Activate/Verify Call Forwarding Service”. Figura 44: CallMe service activation On the smartphone where the CallMe App is installed press the button: “Settings” → “Service Management” → “My Devices” → “Add”. The QR Code reader application on your smartphone is launched. Use your smartphone to scan the QR code displayed on the video door phone. My devices Do you want to activate call forwarding service?
- Page 47 Once the settings are completed and the video door phone home page has returned, press the video door phone status button located at the bottom right, as indicated in the figure. Figure 47: Video door phone status button In the bar that opens, select the REMOTE option to enable the call forwarding. From this moment on, every incoming call on the video door phone from the Door Unit will also be forwarded to a smartphone/tablet: on the generic remote device a screen similar to this one below will appear.
-
Page 48: Installing The Poe Switch
7 INSTALLING THE POE SWITCH The switch can be installed on the table-top by using the special feet provided or fastened to the wall using the screws and anchor not supplied with the product. 7.1 LED OPERATING STATE PWR-POWER LED INDICATION On green The switch is powered Switch is not powered... -
Page 49: Wiring Diagram
10 WIRING DIAGRAM CONNECTION OF THE SYSTEM TO AN ADDITIONAL ROUTER SV124-1349A Ref.1741/1 CAT5 OP10 LINE~ PORT5 PORT6 PORT7 PORT8 PORTS Ref. 1039/44 51Vdc Ref.1741/1 POE PORTS ADAPTER PORT1 PORT2 PORT3 PORT4 (VX.008) LINE~ CAT5 OP10 CAT5 CAT5 CAT5 Light 01 Ref.1060/21 LINE ~ Ref.1060/84... - Page 50 ITALIANO DIRETTIVA 2012/19/UE DEL PARLAMENTO EUROPEO E DEL CONSIGLIO del 4 luglio 2012 sui rifiuti di apparecchiature elettriche ed elettroniche (RAEE) Il simbolo del cassonetto barrato riportato sull’apparecchiatura o sulla sua confezione indica che il prodotto alla fine della propria vita utile deve essere raccolto separatamente dagli altri rifiuti.
- Page 51 DS1060-179...
- Page 52 DS 1060-179 LBT 21026 URMET S.p.A. Area tecnica 10154 TORINO (ITALY) servizio clienti +39 011.23.39.810 VIA BOLOGNA 188/C http://www.urmet.com Telef. +39 011.24.00.000 (RIC. AUT.) e-mail: info@urmet.com +39 011.24.00.300 - 323 MADE IN CHINA...
Need help?
Do you have a question about the iPercom MIKRA2 1060 and is the answer not in the manual?
Questions and answers