
Related Manuals for Harvest TEC 744


Summary of Contents for Harvest TEC 744
- Page 1 Installation Manual Model 744, 745, 750 & 751 25 & 55 gallon Automatic Preservative Applicator Forage Harvester 744-745-750-751-24-INST-Imp&Metric 2/24...
- Page 2 European Parliment and the Council of 17 May 2006 and other applicable European Directives including Directive 2004/108/EC on the Electromagnetic compatability. The application of preservatives for hay Harvest Tec system will be turned on after being installed on a farm press has been declard in conformity with the Machinery Directive.
-
Page 3: Table Of Contents
Harvest Tec 744, 745, 750 & 751 Installation Table of Contents Page Introduction, Model Reference, & Tools Needed Installation of Applicator 5-23 Installation of mounting brackets, tank, pump manifold and hose manifold 5-10 Model 744 744 Pump Manifold Installation Model 745... -
Page 4: Introduction, Model Reference, & Tools Needed
Read this manual carefully to ensure correct steps are done to attach the applicator to the baler. This applicator is designed to apply Harvest Tec buffered propionic acid. Use of alternative products may cause complications and voids warranty. Complications may include inaccurate readings from the flow meter and damage to system components. -
Page 5: Installation Of Applicator
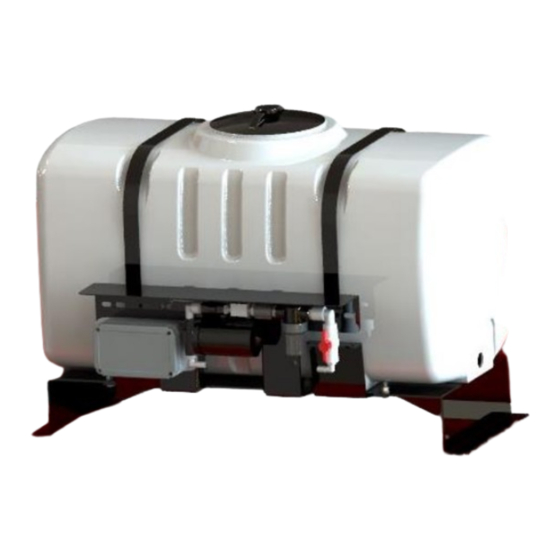
Installation of Applicator Installation of Mounting Brackets, Tank, Pump Manifold & Hose Manifold Model 744 Tank legs will be mounted to the back side of baler behind knotters and before the bale tensioner (Figure1). Using Figure 2 as a reference, mark the two holes on each side of bale chamber that need to be drilled. Line up saddle leg on each side to verify holes before drilling (Figure 3). - Page 6 Model 744 (continued) Saddle & Tank Mount tank saddle (001-4703X) onto tank legs as shown in figure 5. Bolts are pre-installed on saddle, secure with 1/2” locks, washers, and nuts. Figure 5 Massey 1800 Series Side Mount Tank Mounting Instructions 1.
-
Page 7: 744 Pump Manifold Installation
Model 744 (continued) 744 Pump Manifold Locate parts bag 8. Using two 3/8” x 1/4” bolts, locks, washers, and nuts. Mount the U-shaped pump plate mount 001-4647 (right) onto the tank saddle in the mounting holes located between the strap brackets on back of saddle (figure 7). -
Page 8: Model 745
Model 745 The tank saddle assembly mounts to the baler by sliding over base bracket 001-4406 (Figure 11). Base bracket (001-4406) mounts to the baler’s diagonal frame behind the twine box using base clamp (001-4406) and u-bolts (001-4406A), similar to Figure 12. Secure the tank saddle assembly to stub pipe bracket by placing a 1/2"... -
Page 9: Model 750
Model 750 Locate parts bag 7. Attach legs part (001-4703B) to the tank saddle with 3/8” x 1” bolts, flat and lock washers. The legs will attach on top of the bale chamber in front of the hydraulic compression area shown in Figures 1 & 2. -
Page 10: Model 751
Model 751 Locate parts bag 12. Mount the two long strap bases (001-4703CD) to the bottom side of the saddle (001- 4703C) front edge. Note: This is the side that has a 2” (5 cm) diameter hole in one of the sides. Use four 3/8” x 1-1/4”... - Page 11 Model 751 (continued) Mount the tank as shown below on the right side of the baler. The side tank fitting will be facing the right side of the baler. The pump plate assembly will be at the back of the baler. Place the tank on top of the baler and open the front access door (Figure 1).
-
Page 12: Installation Of Drain Fill Kit Models 744, 750 & 751
Installation of Drain Fill Kit (Models 744, 750 & 751) Model 744 Using parts bag 1, locate the pre-drilled hole at the front of the bale chamber (Figure 1). Secure valve assembly to baler using 5/16” x 3/4” carriage bolts (Figure 2). Thread 3/4” (19mm) elbow fitting into tank, cut hose to correct length and connect to valve assembly. -
Page 13: Placement Of Spray Nozzle Assembly
Placement of Spray Nozzle Assembly Install Kit 4409C 1. Mount the left-hand nozzle strap (it has an elbow fitting and a silver tip) so that it is approximately 80% across the width of the pick-up head. Example: if the head is 60” wide, locate the nozzle 48”... -
Page 14: Install Kit 4415C
Install Kit 4415C Locate the hay guard directly above the bale chamber. This install can be done with the hay guard in the baler, but it is recommended removing it for ease of installation. Consult your dealer for guidance. Installation of Spray Shield 1. - Page 15 Install Kit 4415C (continued) 9. Secure hoses on the end of spray shield with two jiffy clips (008-9014) and 1/4" x 1/2" round head screw. 10. Secure the hose to the bracket with two jiffy clips (008-9014) and 1/4" flange bolts and nuts. Keep the hose in the center of the bracket.
-
Page 16: Install Kit 4416C, 4417C, 4418C & 4485C
Install Kit 4416C, 4417C, 4418C & 4485C On baler tongue above center of the baler (Figure 1), install spray shield holders (001-4424B) on both sides of tongue using pre-drilled holes (Figure 2). Securing each with one 3/8” bolt. Do not tighten bolts. Place the spray shield (001-4424A2) on the shield holders using two 3/8”... -
Page 17: Install Kit 4502C & 4506C
Install Kit 4502C The shield for your baler will mount in the throat of the baler as shown above. Remove nut and bolt on both sides of baler, shown below. Install shield holders (001-4703I) with 1/2 x 2” bolts, nuts, locks and flat washers. Do not tighten these bolts until the shield is properly aimed. -
Page 18: Install Kit 4507C
Install Kit 4507C The shield for your baler will mount on the wrap guard as shown in the picture above. Remove the two outside bolts on each side of the wrapper guard. Place bracket 001-4703G so pins are facing up and bolt through with 3/8 x 1-1/2"... -
Page 19: Installation Of End Of Bale Sensor
Connect moisture harness to star wheels and run the harness along the baler frame towards the ISO Pump Module (IPM) controller harness. Model 751 Model 744, 745 & 750... -
Page 20: Tractor Setup
Tractor Setup The general tractor setup of the 700 Series applicator can be seen above. The main harness of interest is the tractor power/communication harness (006-765IC). This harness will connect at the tractor battery, to the ISO Communication Module (ICM) mounted in the cab, a keyed power connection point, and connect at the hitch area to the baler power/communication harness (006-765B). -
Page 21: Display Options
Optional Harvest Tec Display The 700 series Harvest Tec Display will allow you to set your real time baling parameters to ensure the most precise application to every bale. This is done by utilizing the improved touch technology to select objects, enter data, and swipe through operational screens. -
Page 22: Wiring Diagram
Wiring Diagram – 744, 745, 750, 751 Series 1. Connect the power harness (006-765IC) to the tractor battery (12 volt) using the red wire with fuse to the positive side and the black wire to the negative. A. The power harness must be connected to the battery! CONTACT HARVEST TEC BEFORE MODIFICATIONS. -
Page 23: Pin Outs
Pin Outs Integrated Control Module (ICM) on Tractor Harness 006-765IC (Deutsch Plug Number: DTM06-12SA) Pin 1 +12V from ECU Pin 2 Purple Signal Wire Pin 3 Red/White +12V CAN X Pin 4 Black/White Ground CAN X Pin 5 Orange CAN X Hi Pin 6 Blue CAN X Lo... - Page 24 Pin Outs (continued) Power / Communication Baler Harness 006-765B at Baler Hitch IPM (Deutsch Plug Number: HDP26-24-18SN) Pin 1 Not Used ---- Pin 2 Yellow ISO CAN Hi Pin 3 Green ISO CAN Lo Pin 4 +12V Power to ECU Pin 5 Black Ground to ECU...
- Page 25 Pin Outs (continued) CAN / IDM on Baler Harness 006-765B (Deutsch Plug Number: DT06-4S) Pin 1 +12V to Solenoid 2 Pin 2 Yellow ISO CAN Hi Pin 3 Green ISO CAN Lo Pin 4 Black Ground to Solenoid 2 End of Bale Sensor Plug on Baler Harness 006-765B (Deutsch Plug Number: DT06-3S) Pin 1 Orange/White...
-
Page 26: Parts Breakdown
001-4402 Pump Plate Mount 001-4647 Tank Saddle 001-4703X Tank Saddle Kit (1-5) 030-0432-TK 4647 Mount Kit (6) PMP-4647MT Model 744 Base Kit-Side Mount (4417C & 4418C Install Kits) Ref# Description Part # Ref# Description Part # Tank 005-9203SQ Support Bracket... -
Page 27: Model 745 & 750 Base Kits
Model 745 Base Kit Tank Assembly Ref Description Part # Tank Cap 005-9022C Tank Cap Gasket 005-9022CG Tank Strap 001-4402 Stub Pipe 001-4403 Tank* 005-9022 Saddle 001-4401 Tank Fitting 005-9100 Pump Plate Mounting Bracket 001-4647 Tank Saddle Kit 030-0441-TK *25-Gal Tank Includes Bottom Fitting Only Model 750 Base Kit Ref# Description Part # Ref# Description... -
Page 28: Model 751 Base Kit
Model 751 Base Kit Tank Assembly Ref# Description Part # Ref# Description Part # Tank 005-9203SQ Mounting Bracket 001-4647 Tank Saddle 001-4703C Door Latch 001-4703CL Tank Straps 001-4402 Tank Lid 005-9022H Short Strap Base 001-4703CC Long Strap Base 001-4703CD Tank fitting 005-9100 *Tank Includes Cap, Bottom &... -
Page 29: Pump Assembly
Parts Breakdown for Pump Assembly 006-4724A 001-4648X Part# Description Part# Description 3/8”MPT X 1/2"HB Elbow 003-EL3812 003-M1212 1/2" Union 007-4120DE 300 Series Pump 002-4315-100 1/2" Line Strainer-100 Mesh 3/8” x 3/8” Union 003-M3838 003-SE12 1/2" Street Elbow 3/8” Street Elbow 003-SE38 002-2212 1/2"... -
Page 30: Star Wheel Sensors, Moisture Harness, Hoses
030-4642U (w/o Encoder) 7-11,13 Moisture Harness & Hoses Description Part # Moisture Harness 006-7307EM2 Description Part # (744, 745, 750 Kits) Moisture Harness 006-7307EM3 1/2” Hose 002-9001 15ft (751 Kit) Long Harness (Tank to Solenoid) 1/4" Hose 002-9016 (Solenoid to Tips) 3/4"... -
Page 31: Control Box And Harnesses
Control Box and Wiring Harnesses Ref Description Part# Ref Description Part# Power Lead Baler 20’ 006-762B 120 Ohn Resistor 006-700R* Power Lead Tractor 006-765IC Dust Plug Kit 006-765DP Key Switch Wire 006-765CPH Lightning to USB-A Cable 006-6672USBC ISO Pump Module 006-7671SS Optional USB-C to USB-A 006-6672USBX... -
Page 32: Solenoid Packages
700 Solenoid Packages 1A or 1B Solenoid Package A (for 751 Kit) and Solenoid Package B (for 744, 745, 750 Kits) Ref Description Part # Description Part # Solenoid Harness (5’) 006-3650-S1 1/4" Female Disconnect 004-1207H Solenoid Harness (10’) 006-3650-S2... -
Page 33: Parts Bags And Misc
Parts Bag Packages and Misc. PBA-1 PBP-16 Ref Description Part # Description Part # 3/4" Ball Valve 002-2200 Valve Decal DCL-8004 Valve Holder 001-6702H Hazard Decal DCL-8001 Female Coupler 002-2204A 3/4" x 1/2" Elbow 003-EL3412 Male Shut-Off Plug 002-2205G 3/4" Jiffy Clip 008-9010 3/4”... -
Page 34: Optional Stroke Counter Kit
Optional Stroke Counter Kit 030-0700SCK Ref Description Part # Description Part # 10’ EXT HARNESS 006-7401EXT SC BRACKET INLINE SSQ 001-4648SI SENSOR W/DEUTSCH 006-7401 BALE SENSOR BKT 001-4648RB PLUG... -
Page 35: Optional Ipad Display Kit
Optional iPad Display Kit Description Part # iPad Mini 4 (Refurbished) 006-4670IP Complete iPad Mini Kit 030-4670DK Suction Cup Mount 001-2012SCM (Includes 1-5 and Comm. Cable) Ram Mount 001-2012H Spring Load Cradle 001-2012SLC Mounting Kit Only 030-2014MK (Includes all parts except iPad Mini 4) iPad Mini 4 Case 001-2012C4 Lightning Comm. -
Page 36: Optional Android Display Kit
Optional Android Display Kit (030-1670DK) Description Part # Suction Cup Mount 001-2012SCM Ram Mount 001-2012H Spring Load Cradle 001-2012SLC Android Case 001-2012A1 Android Tablet 006-1670AT Installation Instructions 1. Assemble Cradle (001-2012SLC) 2. Attach round base from ram mount to cradle 3. -
Page 37: Optional Vt Terminal Display
Installation Instructions Identify 006-765GH harness connection to 006-765IC tractor harness. 2. Connect harness to the Harvest Tec Display before tightening into place. 3. Tighten the mounting and display. Streamline harness, as necessary. 4. Once connected, power cycle system and ensure display is working properly. -
Page 38: Installation Kits
Model 4409C Installation Kit Ref Description Part # Description Part # Nozzle Holder 001-4215 1/4" Tee Sq 003-TT14SQ Reach Rod – Outside 1/4" Hose 003-9016 001-4404 Reach Rode – Inside Mini Hose Clamp 003-9002 001-4405 1/2" x 4” U-Bolt 1/4" x 1/4" Straight Fitting 003-A1414 001-4406A 1/4”... -
Page 39: 4410C Install Kit
Model 4410C Installation Kit Ref Description Part # Description Part # Tip – Pink 1/4" Hex Plug 003-F14 004-T6501-PT Tip – Grey Shield Manifold Block 001-4435NSB 004-T6504-PT Reach Rod – Outside Nozzle Holder SS Block 001-4426A 001-4404 Reach Rode – Inside 1/4"... -
Page 40: 4412C Install Kit
Model 4412C Installation Kit Ref Description Part # Description Part # Tip – Pink Left Mounting Bracket 001-4436DL 004-T6501-PT Tip –Grey Right Mounting Bracket 001-4436DR 004-T6504-PT 3/16” Lynch Pin 1/4" Hose 002-9016 008-4576 Reach Rod – Outside Mini Hose Clamp 003-9002 001-4404 Reach Rode –... -
Page 41: 4415C Install Kit
Model 4415C Installation Kit Ref Description Part # Description Part # Tip – Low Output Hose Support 001-4425B 004-11001-SS Tip – High Output 1/4" Hose 002-9016 004-11004-SS Y Fitting 003-Y1414 1/4" Drill Guide 003-M3814NB 1/4" Nozzle Body Elbow 003-EL3814NB Nozzle Cap 003-BC12 Hay Guard Shield 001-4425C... -
Page 42: 4416C Install Kit
Model 4416C Installation Kit Description Part # Description Part# Spray Shield Holders 001-4424B 1/4" Tee 003-T1414 Spray Shield 001-4424A2 Tip - Pink 004-T6501-PT 1/4" Straight Fitting 003-A1414 Tip - Grey 004-T6504-PT 1/2” Otiker Clamp 003-9008 Mini Hose Clamps 003-9002 1/4" Hose 002-9016 Saddle Legs 001-4703Q... -
Page 43: 4417C Install Kit
Model 4417C Installation Kit Description Part # Description Part# Spray Shield Holders 001-4424B 1/4" Tee 003-T1414 Spray Shield 001-4424A2 Tip - Pink 004-T6501-PT 1/4" Straight Fitting 003-A1414 Tip - Grey 004-T6504-PT 1/2” Otiker Clamp 003-9008 Mini Hose Clamps 003-9002 1/4" Hose 002-9016 Support Bracket 001-4703QU... -
Page 44: 4418C Install Kit
Model 4418C Installation Kit Description Part # Description Part# Spray Shield Holders 001-4424B 1/4" Tee 003-T1414 Spray Shield 001-4424A2 Tip - Pink 004-T6501-PT 1/4" Straight Fitting 003-A1414 Tip - Grey 004-T6504-PT 1/2” Otiker Clamp 003-9008 Mini Hose Clamps 003-9002 1/4" Hose 002-9016 Support Bracket 001-4703QT... -
Page 45: 4485C Install Kit
Model 4485C Installation Kit Ref Description Part # Description Part # Spray Shield Holders 001-4424B 1/4" Tee 003-T1414 Spray Shield 001-4424A2 Tip - Pink 004-T6501-PT 1/4" Straight Fitting 003-A1414 Tip - Grey 004-T6504-PT 1/2” Otiker Clamp 003-9008 Mini Hose Clamps 003-9002 1/4"... -
Page 46: 4502C Install Kit
Model 4502C Installation Kit Ref Description Part # Description Part # 3/16” Lynch Pin 008-4576 Shield Holder 001-4703I Mini Hose Clamp 003-9002 Spray Shield 001-4703G Tip – Pink 1/4" x 1/4" Elbow 003-EL1414 004-T6501-PT Tip – Grey 1/4" Tee Sq 003-TT14SQ 004-T6504-PT 1/4"... -
Page 47: 4506C Install Kit
Model 4506C Installation Kit Ref Description Part # Description Part # 3/16” Lynch Pin 008-4576 Shield Holder 001-4703H Mini Hose Clamp 003-9002 Spray Shield 001-4703G Tip – Pink 1/4" x 1/4" Elbow 003-EL1414 004-T6501-PT Tip – Grey 1/4" Tee Sq 003-TT14SQ 004-T6504-PT 1/4"... -
Page 48: 4507C Install Kit
Model 4507C Installation Kit Ref Description Part # Description Part # Lynch Pin 008-4576 Spray Shield 001-4703G Tip – Pink Mini Hose Clamp 003-9002 004-T6501-PT Tip – Grey 1/4" x 1/4" Elbow 003-EL1414 004-T6504-PT 1/4" Tee Sq 003-TT14SQ Shield Holder 001-4703J 1/4"... -
Page 49: Star Wheel Template
Star Wheel Installation Guide *Star wheel style may vary from shown- New blocks do not have gap between block and star It may be necessary to make a notch for the Star Wheel on some balers. *This guide is to be used as a visual aid for star wheel installation. -
Page 51: Warranty Statement
Harvest Tec, LLC. within 30 days of the failure. If it is determined that a non-Harvest Tec branded hay preservative has been used inside the Harvest Tec applicator system where the failure occurred, then Harvest Tec reserves the right to deny the warranty request at their discretion. - Page 52 HARVEST TEC, LLC. P.O. BOX 63 2821 HARVEY STREET HUDSON, WI 54016 USA Phone: 715-386-9100 1-800-635-7468 Fax: 715-381-1792 Email: info@harvesttec.com...
Need help?
Do you have a question about the 744 and is the answer not in the manual?
Questions and answers