Advertisement
Available languages
Available languages
Quick Links
Advertisement

Related Manuals for Bort CoxaPro


Summary of Contents for Bort CoxaPro
- Page 1 BORT CoxaPro Hüftorthese Gebrauchsanweisung BORT. Das Plus an Ihrer Seite. 201 400...
- Page 2 Sprachen Languages Deutsch Gebrauchsanweisung English Instructions for use Français Mode d‘emploi Español Instrucciones de uso Italiano Instruzioni per l’uso Nederlands Gebruiksaanwijzing Čeština Návod k použití PDF: ga.bort.com...
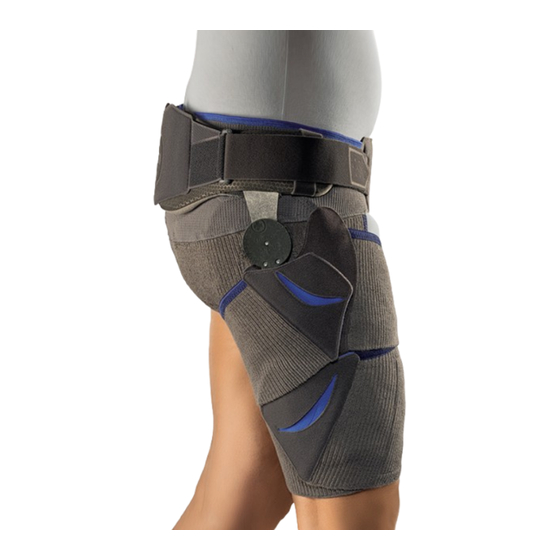
- Page 3 BORT CoxaPro Hüftorthese Vielen Dank für das Vertrauen in ein Medizinprodukt der BORT GmbH. Bitte lesen Sie die vorliegende Gebrauchsanweisung sorgfältig durch. Bei Fragen wenden Sie sich an Ihren Arzt oder Fachhandel von dem Sie dieses Medizinprodukt erhalten haben. Zweckbestimmung Bei diesem Produkt handelt es sich um eine Orthese zur Mobilisierung des Hüftgelenks mit einstellbarer...
- Page 4 Anziehanleitung für den Anwender: Positionieren der Pelotten: Trochanter-Pelotte Platzieren Sie die mitgelieferte Trochanter-Pelotte im inneren Bereich der Orthese auf der vorgesehenen Klettfläche (siehe Bild). Zubehör Piriformis-Pelotte 911 126 (nicht im Lieferumfang enthalten) Wenn bereits eine Trochanter-Pelotte im vorgesehenen Bereich angebracht ist, müssen Sie diese zunächst entfernen, indem Sie vorsichtig den Klettverschluss lösen.
- Page 5 Legen Sie die geöffnete Orthese um die Hüfte und Achten Sie darauf, dass das Gelenk der Orthese platzieren sie mittig auf dem Becken. Der obere seitlich am Oberschenkel auf Höhe des Rand (Einnähetikett) darf den oberen Beckenkamm Hüftgelenks 2 positioniert ist, also ca. 3 – 4 cm nicht überragen bzw.
- Page 6 Beachten Sie, dass beim Schließen der beiden Greifen Sie mit der Hand der betroffenen elastischen Zügel im weiteren Anlegevorgang die Hüftseite in die vorgesehene Fingerlasche an der Beine zur Laufrichtung in einer neutralen Stellung Orthesenseite. positioniert werden. Anschließend führen Sie mit der anderen Hand die Finger in die Führungslasche des breiten unteren Zügels ein und ziehen diesen gleichmäßig um den Oberschenkel, um Faltenbildung zu vermeiden.
- Page 7 Anleitung für das Entfernen von Beckenspange und Gelenk vor dem Waschvorgang Bitte berücksichtigen Sie, dass vor dem Waschen die Beckenspange 1 mit dem Gelenk 2 entfernt werden muss, um mögliche Schäden sowohl an den Wäschestücken als auch am Orthesengelenk zu vermeiden. Beginnen Sie damit, die unteren Gelenkschenkel 2 vom Klettverschlussbereich der Oberschenkelmanschette abzulösen.
- Page 8 Um die Beugung und Streckung einzustellen, verwenden Sie den Keil mit der entsprechenden Kennzeichnung „A“ oder „B“. Diese Kennzeichnung entspricht der Kennzeichnung auf der Gelenkkappe. Platzieren Sie ihn unter der Kennzeichnung für Beugung „FLE“ um die Beugung und unter die Kennzeichnung „EXT“...
- Page 9 Danach können Sie die Umlenklasche 6 von der Beckenspange abziehen. Lösen Sie nun die Beckenspange von der Klettverbindung des Gestricks. Die Umlenklasche 6 wird dann direkt auf dem Velours befestigt, welcher sich auf dem Gestrick der Orthese befindet. Um die Orthese ohne Beckenspange und Gelenk zu verwenden, fädeln Sie die schmalen Gurte 3 erneut durch die Umlenkschlaufen 4 an der Umlenklasche 6 , in Richtung des Bauchsegels am vorderen Verschluss.
- Page 10 Gesundheitszustandes, dann melden Sie dies ihrem Fachhändler oder dem Hersteller sowie dem BfArM (Bundesinstitut für Arzneimittel und Medizinprodukte). Die Kontaktdaten der zuständigen nationalen Behörde Ihres Landes finden Sie unter folgendem Link: www.bort.com/md-eu-kontakt. Entsorgung Nach Nutzungsende muss das Produkt entsprechend örtlicher Vorgaben entsorgt werden.
- Page 11 BORT CoxaPro hip brace Many thanks for placing your trust in a medical device from BORT GmbH. Please read the existing instructions for use carefully. If you have any questions, please refer to your physician or the specialist retailer from whom you purchased this medical device.
- Page 12 Fitting instructions for the user: Positioning the pads: Trochanter pad Place the trochanter pad provided on the intended Velcro surface in the inner area of the brace (see image). Piriformis pad accessory 911 126 (not included in the scope of delivery) If a trochanter pad is already attached in the intended area, you must first remove it by loosening the Velcro fastener cautiously.
- Page 13 Place the opened brace around the hip and then Ensure that the brace joint is positioned on the side centrally on the pelvis. The upper edge (sewn-in of the thigh at the height of the hip joint 2 , that is label) may neither be higher than the upper iliac to say approx.
- Page 14 Observe that, when closing both elastic restraints, Take hold of the affected side of the hip using the the legs are positioned neutrally to the direction of designated finger flap on the side of the brace. movement during the further fitting process. Then, use your other hand to guide your fingers into the guide flap of the wide lower restraint and pull it evenly around the thigh to avoid the formation of creases.
- Page 15 Instructions for the removal of the pelvis buckle and joint before the washing process Please take into account that the pelvis buckle 1 with the joint 2 must be removed prior to washing in order to avoid possible damages both to the items of clothing and the brace joint.
- Page 16 For setting flexion and extension, use the wedge with the respective marking “A” or “B”. This marking is equivalent to the marking on the joint cap. Place it beneath the marking for flexion “FLE” in order to restrict flexion and under the marking ”EXT” to restrict extension. Flexion and extension positions can be restricted to Additionally, the joint can be freely positioned on 0°, 15°, 30°, 45°, 60°, 75°...
- Page 17 After this, you can remove the guide flap 6 from the pelvis buckle. Then, remove the pelvis buckle from the knitted fabric Velcro connection. The guide flap 6 is then attached directly to the velour which is on the brace’s knitted fabric. In order to use the brace without the pelvis buckle and joint, thread the narrow straps 3 through the guide loops 4 on the guide flap 6 towards the “bulging sail”...
- Page 18 Agency (MHRA). You can find the contact information for the national authority responsible for your country under the following link: www.bort.com/md-eu-contact. Disposal Upon the termination of use, the product must be disposed of in accordance with the corresponding local requirements.
- Page 19 Nous vous remercions de la confiance que vous accordez à l’un des dispositifs médicaux de la société BORT GmbH. Veuillez lire attentivement l'intégralité du présent mode d'emploi. En cas de question, consultez votre médecin ou le magasin spécialisé qui vous a fourni ce dispositif médical.
- Page 20 Instruction d'application destinée à l'utilisateur : Positionnement des pelotes : Pelote du trochanter Placez la pelote du trochanter fournie à l'intérieur de l'orthèse sur la surface auto-agrippante prévue à cet effet (voir image). Accessoire Pelote du piriforme 911 126 (non fourni) Retirez d'abord la pelote du trochanter si elle a déjà...
- Page 21 Posez maintenant l'orthèse ouverte autour de Veillez à ce que l'articulation de l'orthèse soit la hanche et placez-la au milieu sur le bassin. positionnée sur le côté de la cuisse, à la hauteur Le bord supérieur (étiquette cousue) ne doit pas de l'articulation de la hanche 2 , à...
- Page 22 Veillez à ce que les jambes soient positionnées Avec la main du côté de la hanche concerné, de façon neutre par rapport au sens de la saisissez la languette prévue sur le côté de marche pour la suite de la pose au moment de la l'orthèse.
- Page 23 Instructions pour le retrait de la barrette de bassin et de l'articulation avant le lavage Veuillez prendre en compte le fait qu'avant le lavage, la barrette de bassin 1 doit être retirée avec l'articulation 2 afin d'éviter d'éventuels dommages sur les vêtements et sur l'articulation de l'orthèse. Commencez par détacher la branche de l'articulation inférieure 2 de la zone de la fermeture Velcro du brassard de cuisse.
- Page 24 Pour régler la flexion et l'extension, utilisez la cale avec le repère correspondant « A » ou « B ». Ce repère correspond à celui figurant sur le cache de l'articulation. Placez-la sous le repère de flexion « FLE » afin de limiter la flexion et sous le repère «...
-
Page 25: Garantie
boucles de passage 5 de la barrette de bassin les sangles étroites 3 passant autour de la barrette de bassin. Vous pouvez ensuite détacher la languette de renvoi 6 de la barrette de bassin. Détachez maintenant la barrette de bassin de la liaison Velcro du tricot. La languette de renvoi 6 est ensuite fixée directement sur le velours figurant sur le tricot de l'orthèse. - Page 26 (Agence nationale de sécurité du médicament et des produits de santé). Vous trouverez les coordonnées de l'autorité nationale compétente de votre pays à l’adresse suivante : www.bort.com/md-eu-contact. Élimination Le produit doit être éliminé après son utilisation conformément aux dispositions locales.
- Page 27 BORT CoxaPro Órtesis de cadera Muchas gracias por confiar en un producto sanitario de BORT GmbH. Lea atentamente estas instrucciones de uso. Si le surge cualquier duda, consulte a su médico o al distribuidor especializado en el que ha adquirido este producto sanitario.
- Page 28 Instrucciones de colocación para el usuario: Colocación de las almohadillas: Almohadilla del trocánter Coloque la almohadilla del trocánter incluida con el producto en la superficie de velcro prevista a tal efecto de la parte interior de la órtesis (véase imagen). Accesorio: almohadilla piriforme 911 126 (no incluida en el volumen de suministro) Si ya tiene colocada una almohadilla del trocánter en la zona prevista a tal efecto, retire esta primero...
- Page 29 Coloque la órtesis abierta alrededor de las caderas Asegúrese de que la articulación de la órtesis y centrada sobre la pelvis. El borde superior (la quede colocada en el lateral del muslo a la altura etiqueta cosida) no debe sobrepasar la cresta de la articulación de la cadera 2 , es decir, a unos ilíaca superior ni llegar hasta la cintura.
- Page 30 Tenga en cuenta que, al cerrar las dos tiras Coloque la mano del lado afectado de la cadera en durante el proceso de colocación, las piernas la abertura prevista para los dedos del lateral de la deben estar colocadas en una posición neutra órtesis para sujetarla.
- Page 31 Instrucciones para retirar el cierre de la pelvis y la articulación antes de lavar la órtesis Tenga en cuenta que, antes de lavar la órtesis, es necesario retirar el cierre de la pelvis 1 con la articulación 2 para no dañar otras prendas ni la articulación de la órtesis.
- Page 32 Para ajustar la flexión y la extensión, utilice la cuña con las marcas correspondientes «A» o «B», que corresponden a la identificación que incluye la tapa de la articulación. Coloque la cuña debajo de la marca de flexión «FLE» para limitar la flexión, y debajo de la marca «EXT» para limitar la extensión. Las posiciones de flexión y extensión pueden limitarse Asimismo, la articulación puede colocarse en 0°, 15°, 30°, 45°, 60°, 75°...
- Page 33 A continuación, puede retirar la solapa 6 del cierre de la pelvis. Separe ahora el cierre de la pelvis del cierre de velcro del tejido. La solapa 6 se sujeta directamente a la parte aterciopelada que se encuentra en el tejido de la órtesis. Para utilizar la órtesis sin el cierre de la pelvis y la articulación, vuelva a introducir las correas estrechas 3 por los pasadores 4 de la solapa 6 , en la dirección de la solapa abdominal del cierre delantero, pues así...
- Page 34 AEMPS (Agencia Española de Medicamentos y Productos Sanitarios). Para conocer los datos de contacto de la autoridad nacional competente, visite el siguiente enlace: www.bort.com/md-eu-contact. Eliminación Al final de la vida útil, el producto debe eliminarse de acuerdo con las normativas locales.
- Page 35 BORT CoxaPro Ortesi per anca La ringraziamo per aver preferito un dispositivo medico di BORT GmbH. Leggere attentamente le presenti istruzioni per l'uso. In caso di domande, contattare il medico o il rivenditore specializzato da cui è stato ricevuto questo dispositivo medico.
- Page 36 Istruzioni per indossare l'articolo: Posizionamento delle pelotte: Pelotta trocanterica Posizionare la pelotta trocanterica in dotazione nella parte interna dell'ortesi sull'apposita superficie in velcro (cfr. figura). Accessorio pelotta per piriforme 911 126 (non inclusa) Se nell'area prevista è già presente una pelotta trocanterica, è necessario rimuoverla allentando con attenzione la chiusura in velcro.
- Page 37 Posizionare l'ortesi aperta intorno all'anca e Assicurarsi che lo snodo dell'ortesi sia posizionato centrarla sul bacino. Il bordo superiore (etichetta lateralmente alla parte superiore della gamba a cucita) non deve superare la cresta iliaca superiore livello dell'articolazione dell'anca 2 , cioè circa o raggiungere la vita.
- Page 38 Si noti che quando le due briglie elastiche vengono Afferrare con la mano dal lato interessato dell'anca chiuse nell'ulteriore processo di aggancio, le la linguetta per le dita presente sul lato dell'ortesi. gambe si trovano in posizione neutra rispetto alla direzione di scorrimento.
- Page 39 Istruzioni per rimuovere il tutore pelvico e lo snodo prima del lavaggio Tenere presente che il tutore pelvico 1 con lo snodo 2 deve essere rimosso prima del lavaggio per evitare di danneggiare sia i capi di biancheria sia lo snodo dell'ortesi. Iniziare staccando il braccio snodato inferiore 2 dalla zona in velcro del gambale.
- Page 40 Per regolare la flessione e l'estensione, utilizzare il cuneo con la marcatura corrispondente "A" o "B". Questa marcatura corrisponde a quella presente sulla calotta dello snodo. Posizionarlo sotto la marcatura per la flessione "FLE" per limitare la flessione e sotto la marcatura "EXT" per limitare l'estensione. Le posizioni di flessione ed estensione possono Inoltre lo snodo può...
- Page 41 Quindi è possibile rimuovere la piastra di regolazione 6 dal tutore pelvico. A questo punto, staccare il tutore pelvico dalla giunzione in velcro del tessuto a maglia. La piastra di regolazione 6 viene quindi fissata direttamente al velour, che si trova sul tessuto a maglia dell'ortesi. Per utilizzare l'ortesi senza tutore pelvico e snodo, infilare nuovamente le cinghie sottili 3 nei passanti d'inversione 4 sulla piastra di regolazione 6 , in direzione del segmento addominale sulla chiusura anteriore.
- Page 42 Dichiarazione di conformità Si dichiara che questo prodotto è conforme ai requisiti del REGOLAMENTO (UE) 2017/745 DEL PARLAMENTO EUROPEO E DEL CONSIGLIO. La dichiarazione di conformità aggiornata si trova al seguente link: www.bort.com/conformity Aggiornato al: 09.2023 Dispositivo medico | Singolo paziente – uso multiplo...
- Page 43 BORT CoxaPro-heuporthese Hartelijk dank voor uw vertrouwen in een medisch hulpmiddel van BORT GmbH. Lees deze gebruiksaanwijzing aandachtig door. Als u vragen hebt, raadpleeg dan uw arts of de vakhandel waar u dit medische hulpmiddel gekocht hebt. Beoogd gebruik Dit product is een orthese voor mobilisatie van het heupgewricht met instelbare bewegingsbeperking in één vlak voor het beperken en stabiliseren van de bewegingsuitslag van de heup bij extensie en flexie.
- Page 44 Aanwijzingen voor het aantrekken voor de gebruiker: Positioneren van de pelotten: Trochanterpelotte Plak de bijgeleverde trochanterpelotte aan de binnenkant van de orthese op het daarvoor bestemde klittenbandvlakje (zie afbeelding). Accessoire piriformispelotte 911 126 (niet bij levering inbegrepen) Als er al een trochanterpelotte op het daarvoor bestemde vlakje is aangebracht, moet u deze eerst verwijderen waarbij u de pelotte voorzichtig van het klittenband afhaalt.
- Page 45 Leg de geopende orthese rondom de heupen Let erop dat het scharnier van de orthese zich aan en positioneer hem midden op het bekken. De de zijkant van het bovenbeen ter hoogte van het bovenste rand (met het ingenaaide label) mag heupgewricht 2 bevindt, dus ongeveer 3 –...
- Page 46 Let er bij het sluiten van de beide elastische Pak met de hand van de aangedane heupkant de trekbanden bij het verder aanleggen op dat de hiervoor bestemde vingerlus aan de zijkant van de benen voor de looprichting in een neutrale houding orthese vast.
- Page 47 Instructies voor het afnemen van de bekkenspalk en het scharnier voorafgaand aan het wassen Onthoud dat voorafgaand aan het wassen de bekkenspalk 1 met het scharnier 2 verwijderd moet worden om mogelijke schade aan zowel andere was als aan het orthesescharnier te voorkomen. Maak om te beginnen het onderste scharnier 2 los van de klittenbandsluiting van de bovenbeenmanchet.
- Page 48 Voor het instellen van de flexie en de extensie gebruikt u de wig met de betreffende aanduiding 'A' of 'B'. Deze aanduiding hoort bij de aanduiding op de scharnierkap. Zet deze onder de aanduiding voor flexie 'FLE' om de flexie en onder de aanduiding 'EXT' om de extensie te beperken. Flexie- en extensieposities kunnen beperkt worden Bovendien kan het scharnier vrij met het op 0°, 15°, 30°, 45°, 60°, 75°...
- Page 49 Daarna kunt u het keerlipje 6 van de bekkenspalk afhalen. Haal nu de bekkenspalk van de klittenbandsluiting van het tricot af. Het keerlipje 6 wordt dan direct bevestigd op het velours dat zich op het tricot van de orthese bevindt. Om de orthese zonder bekkenspalk en scharnier te gebruiken, voert u de smalle banden 3 weer door de keerlussen 4 op het keerlipje 6 , in de richting van het buikgedeelte op de sluiting aan de voorkant.
- Page 50 IGJ (Inspectie Gezondheidszorg en Jeugd). De contactgegevens van de verantwoordelijke nationale instantie van uw land vindt u via de volgende link: www.bort.com/md-eu-contact. Weggooien Wanneer de levensduur van het hulpmiddel is verstreken, moet dit hulpmiddel conform de plaatselijke voorschriften worden weggegooid.
- Page 51 BORT CoxaPro Ortéza kyčelního kloubu Velice děkujeme za důvěru ve zdravotnický prostředek od společnosti BORT GmbH. Přečtěte si pečlivě tento návod k použití. Máte-li dotazy, obraťte se na svého lékaře nebo specializovaného prodejce, od kterého jste tento zdravotnický prostředek obdrželi.
- Page 52 Návod k navlečení pro uživatele: Polohování pelot: Pelota trochanteru Dodanou pelotu trochanteru umístěte do vnitřní části ortézy na určenou plochu se suchým zipem (viz obrázek). Příslušenství k pelotě piriformis 911 126 (není součástí dodávky) Pokud je pelota trochanteru v určené oblasti již připevněna, musíte ji nejprve odstranit opatrným rozepnutím uzávěru se suchým zipem.
- Page 53 Otevřenou ortézu položte kolem kyčle a umístěte Ujistěte se, že je kloub ortézy umístěn na straně do středu na pánev. Horní okraj (všitá etiketa) stehna ve výšce kyčelního kloubu 2 , tj. cca nesmí přesahovat horní část hřebene kosti kyčelní, 3 až...
- Page 54 Dbejte, aby při uzavírání obou elastických tažných Rukou na postižené straně kyčle uchopte určené prvků v dalším postupu přikládání byly nohy poutko na prsty na straně ortézy. umístěny v neutrální poloze vůči směru pohybu. Poté druhou rukou zasuňte prsty do vodicího jazyka širokého spodního tažného prvku a rovnoměrně jej stáhněte kolem stehna, aby nedošlo k tvorbě...
- Page 55 Návod k odstranění pánevní spony a kloubu před praním Vezměte prosím na vědomí, že pánevní sponu 1 s kloubem 2 je třeba před praním odstranit, aby nedošlo k možnému poškození kusů prádla ani kloubu ortézy. Začněte tím, že oddělíte spodní rameno kloubu 2 od oblasti uzávěru se suchým zipem stehenní...
- Page 56 Pro nastavení ohybu a natažení použijte klín s odpovídajícím označením „A“ nebo „B“. Toto označení odpovídá označení na uzávěru kloubu. Umístěte jej pod označení pro ohyb „FLE“ pro omezení flexe a pod označení „EXT“ pro omezení extenze. Polohu flexe a extenze lze omezit na 0°, 15°, 30°, Kromě...
- Page 57 Dojde-li při používání zdravotnického prostředku k vážnému zhoršení zdravotního stavu pacienta, oznamte to svému odbornému prodejci nebo nám coby výrobci a Státnímu ústavu pro kontrolu léčiv (SÚKL). Kontaktní údaje příslušného národního úřadu ve vaší zemi naleznete pod následujícím odkazem: www.bort.com/md-eu-contact.
- Page 58 Po ukončení použití musí být výrobek zlikvidován v souladu s místními předpisy. Prohlášení o shodě Potvrzujeme, že tento výrobek splňuje požadavky NAŘÍZENÍ EVROPSKÉHO PARLAMENTU A RADY (EU) 2017/745. Aktuální prohlášení o shodě naleznete na následujícím odkazu: www.bort.com/conformity Stav: 09.2023 Zdravotnický prostředek |...
- Page 64 BORT CoxaPro Hüftorthese Gebrauchsanweisung REF/Art.-Nr. D201400 '! 0 A58GC-bidjjh! PDF: ga.bort.com BORT GmbH Am Schweizerbach 1 | D-71384 Weinstadt | www.bort.com BORT. Das Plus an Ihrer Seite.
Need help?
Do you have a question about the CoxaPro and is the answer not in the manual?
Questions and answers