Table of Contents

Related Manuals for Clarity RetCam 3


Summary of Contents for Clarity RetCam 3
- Page 1 Ophthalmic Imaging System International User Manual PN 21-100375 Rev. A For use with software version 5.1 Caution: Federal law (US) restricts this device to sale by or on the order of a physician or licensed medical practitioner.
- Page 2 Copyright © 2009 Clarity Medical Systems, Inc. All rights reserved. MediMark® Europe . 11 rue Emile Zola 38100 GRENOBLE France Tel: +33 (0)4 76 86 43 22 Fax: +33 (0)4 76 17 19 82 e-mail: info@medimark-europe.com RetCam3 User Manual PN 21-100375 Rev. A...
-
Page 3: Table Of Contents
• Important User Safety Notices ..............13 • Labels and Symbols..................14 • Product Label ......................18 2 Using the RetCam 3 ..............19 • Turning the System ON (from Stand-by Mode) ..........19 • Installing Lens Pieces ................... 21 •... - Page 4 5 Printing Images................51 • Printing Images and Reports................. 51 • Recommended Supplies ................52 6 Fluorescein Angiography Module ..........53 • Theory of Operation ..................53 • Using Fluorescein Angiography (FA) Module..........53 • Configuring the FA Module Timer ................56 7 Maintenance and Support ............
- Page 5 List of Figures Figure 1 RetCam3 Ophthalmic Imaging System front view*........... 8 Figure 2 RetCam3 Ophthalmic Imaging System rear view ............. 9 Figure 3 Handpiece and Lens piece ..................10 Figure 4 Control panel ......................20 Figure 5 Installing a lens piece on the handpiece..............20 Figure 6 Handpiece connections ..................
- Page 6 Close drawer and replace connections ..............65 Figure 53 Key Validation dialog ....................66 Figure 54 Access User Preferences ..................69 Figure 55 About Clarity software .................... 69 Figure 56 User Preferences screen ..................70 Figure 57 User Preferences: Institution .................. 71 Figure 58 User Preferences: New Exam ................
-
Page 7: Introduction
WARNING: Prior to using the system, read all user safety information. WARNING: Before using this equipment to acquire images from patient eyes, users must be trained in proper clinical technique by personnel authorized by Clarity. WARNING: The RetCam system is designed and tested as a system. Omission or substitution of RetCam components may adversely affect system performance and is strongly not recommended. -
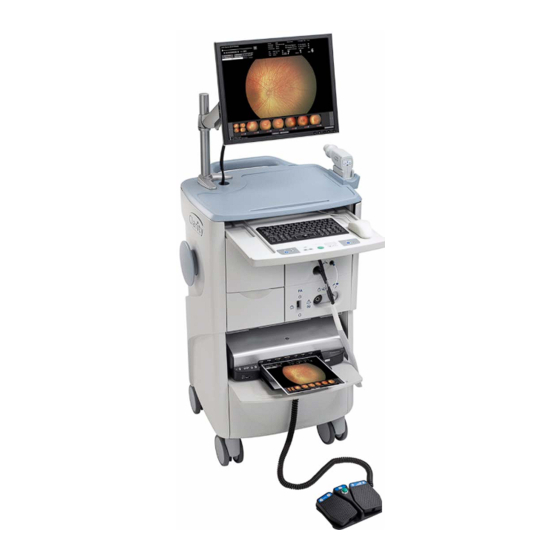
Page 8: Figure 1 Retcam3 Ophthalmic Imaging System Front View
8 Introduction Display (contains 4 USB ports) Transport Handle Handpiece with Interchangeable Input Shelf Lens Piece (extended) Holster Keyboard & Mouse Control DVD writer Panel (inside drawer) USB port Handpiece Cable Cord Wrap Post with Connectors (both sides) FA Intensity Control FA Light Connector FA Light Switch Storage... -
Page 9: Main Hardware Components
Introduction 9 Ethernet Port Product Label Main Power Switch and Power Cord Connection Figure 2 RetCam3 Ophthalmic Imaging System rear view Main Hardware Components • Display: A flat panel display is standard with the system. • Control Panel: A membrane control panel turns the system on with one button, and has controls for illumination intensity, camera focus and snap (capture an image or start/stop video recording). -
Page 10: Electrical Safety Information
10 Introduction • Chassis: Contains the control systems and connections. • Footswitch: Provides optional means to control illumination intensity, camera focus and snap. • Storage Drawers: All units have two storage drawers for lens pieces, tools and supplies. • Fluorescein Angiography Module or FA (optional): An optional blue exciter light source is available for FA digital photography. - Page 11 Introduction 11 Electromagnetic Emissions Compliance Level: Group 1, Class A Test Type Compliance Level Notes Conducted Emissions Class A The RetCam system uses RF energy for its internal CISPR 11/ function. Nearby electronic equipment may be EN 55011 affected. Radiated Emissions Class A CISPR 11/...
- Page 12 12 Introduction Electromagnetic Immunity Test Type IEC 60601-1-2 test and Electromagnetic Environment Guidance compliance level Electrostatic Discharge (ESD) ±6 kV contact Floors should be wood, concrete or ceramic EN 61000-4-2 tile. If floors are covered with synthetic ±8 kV air material, the relative humidity should be at least 30%.
-
Page 13: Important User Safety Notices
Introduction 13 WARNING: Interference may occur in the vicinity of equipment marked with the following symbol. This equipment/system may cause radio interference or may disrupt the operation of nearby equipment. It may be necessary to take mitigation measures such as: •... -
Page 14: Labels And Symbols
14 Introduction 8. The system comes protected from viruses, worms, and spyware with Microsoft’s anti-malware. Please refer to your warranty prior to adding any additional software or contact Clarity Service. Labels and Symbols System Power button Focus ... - Page 15 Introduction 15 Protective earth (ground) Alternating current (AC) System contains 2 fuses of indicated type. Do not use any other type. Backup battery Computer network Non-ionizing electromagnetic radiation FA = Fluorescein Angiography FA light Intensity, increase clockwise...
- Page 16 To prevent damage to lens piece, carefully store handpiece in holster when not in use. Clean lens piece after use Separate collection of waste at end-of-life as required by European directives. Contact Clarity for equipment disposal instructions. European conformity RetCam3 User Manual...
- Page 17 Introduction 17 North American compliance certification Serial number Date of Manufacture Keep away from the rain Go to next screen Hide image Delete image Flag or select item Reset View patient directory Utilities RetCam3 User Manual PN 21-100375 Rev. A...
-
Page 18: Product Label
18 Introduction Product Label RetCam3 User Manual PN 21-100375 Rev. A... -
Page 19: Using The Retcam 3 19
Using the RetCam 3 19 2 Using the RetCam 3 This chapter explains how to use the RetCam 3 system, after it is properly installed at your site. The activities described include: • Turning the System ON (from Stand-by Mode) on page •... -
Page 20: Figure 4 Control Panel
20 Using the RetCam 3 The membrane control panel is located at the front edge of the keyboard tray. It provides controls and indicators of system status. System Power AC/DC indicator indicator Illumination ON Relative intensity (green) (green) indicator (amber) -
Page 21: Installing Lens Pieces
Using the RetCam 3 21 Installing Lens Pieces A. Fit the lens piece on the handpiece, aligning the 3 radial pins on the front of the handpiece with the spaces between the tabs of the spring ring on the lens piece. -
Page 22: Using Hard Shutdown
22 Using the RetCam 3 1. To turn OFF the system (leaving the Stand-by Ready) hover over the red Shutdown button at the bottom of the Patients and Exams screen. Shutdown button Figure 7 Shutdown button The shutdown options screen appears. Select Shutdown Computer. -
Page 23: Turning Off The Main Power
Using the RetCam 3 23 In the event that hard shutdown is required, continuously press the System Power button on the control panel for at least 6 seconds to force the system, including the backup battery, to shut down. Turning OFF the Main Power Flip the main power switch (located on the rear of the system) to OFF. -
Page 24: Add A New Patient Record
24 Using the RetCam 3 Add a New Patient Record To create a new patient record, the following information is required: • First Name • Last Name • Date of Birth • Patient ID Patient information is repeated in several of the screens. The patient name and Patient ID are always shown in the upper left corner of every screen. -
Page 25: Finding Existing Patient Records
Using the RetCam 3 25 Figure 11 Edit Patient record screen Finding Existing Patient Records You can search the directory to locate specific patient records. Figure 12 Search buttons From the Start screen, select the icon to display the entire patient directory or... -
Page 26: Performing Exams
Figure 15 Patients and Exams screen navigation buttons Performing Exams You can use the RetCam 3 to capture still images or video after selecting a patient. Select the green arrow on the right side of a patient name, or select the New Exam button. -
Page 27: Figure 16 New Exam Configuration Screen
Using the RetCam 3 27 Figure 16 New Exam configuration screen The following Information can be defined in the Preset or Manual Configuration: Image Type Lens Retina Right (OD) Fluorescein Angiography Left (OS) Anterior Segment 1200 Unspecified Unspecified 1300 Unspecified... -
Page 28: Capturing Still Images
28 Using the RetCam 3 Capturing Still Images Figure 18 New Exam screen The recommended procedure is to capture video of the entire exam, and grab still images from the video then delete the video prior to exiting the New Exam session. -
Page 29: Capturing Video
Using the RetCam 3 29 Control Panel Press the button. Note: Saving video can take significant time and consumes a great deal of disc space. To maintain optimal system performance, select the images of interest from the video then delete the video prior to exiting Image Capture. -
Page 30: Video Playback
Once the session has been exited, the images will be saved for that session. Using Helpful Features The RetCam 3 software includes some useful features to streamline your work. Shortcut Keys An underlined letter indicates a quick key. To use a quick key, press ALT and the letter key simultaneously. -
Page 31: Figure 21 Video Thumbnails
Using the RetCam 3 31 1. Scroll through the thumbnails, using the arrows at the right and left ends of the strip at the bottom of the screen. Figure 21 Video thumbnails • Use the arrow at the right to scroll forward through the video and the arrow at the left to scroll back. -
Page 32: Changing Image Capture Options During An Exam
32 Using the RetCam 3 Changing Image Capture Options During an Exam Before you start imaging, verify that the options displayed for eye, image type and lens piece are correct. If necessary, you can edit options from the image capture screen. -
Page 33: Adding Exam Notes
Using the RetCam 3 33 Enable mouse-over image preview: Check this box to see an existing image on screen during a live imaging session. Figure 24 Enable mouse-over Adding Exam Notes When you select the Exit Exam/Add Note button at the bottom right corner of the image capture screen, the Exam Notes dialog appears. - Page 34 34 Using the RetCam 3 You can add notes also from the Review screen. Once saved, the text cannot be modified. You can append text to notes from the Review, Compare, and Image Process screens by selecting Exam Notes. Notes are identified by date/time and person creating the note.
-
Page 35: Image Review And Compare Mode
Image Review and Compare Mode 35 3 Image Review and Compare Mode Having acquired images, they are available for review and comparison This section covers the following topics: • Image Review Screen, below • Compare Mode, page Image Review Screen The Image Review screen appears optionally when you exit live imaging. - Page 36 36 Image Review and Compare Mode By default, thumbnails for all images acquired in the selected session appear along the bottom of the screen. Video playback controls appear in the upper left corner of the screen. The currently selected image (the first one by default) appears full size. Select a thumbnail to display the full resolution image.
-
Page 37: Compare Mode
Image Review and Compare Mode 37 Full Screen Click Full Screen to display a full screen view of the current image, with no thumbnails visible. Hide Thumbnails Click Hide Thumbnails to remove the thumbnail display without changing the display of the current image. Print Image Click Print Image to print the current image displayed. -
Page 38: Figure 27 Compare [Images] Screen
38 Image Review and Compare Mode Exam Selector Figure 27 Compare [Images] screen The last image displayed on the Image Review screen will appear on the left side of the Compare screen. On the right side, by default, the first image of the first session for the same patient appears. -
Page 39: Image Adjustment
Image Review and Compare Mode 39 Edit Image Click Edit Image to display the Image Adjustment window. End Compare Click End Compare to return to the display of a single image. Exam Notes Click Exam Notes to review or append text to the exam notes for that image. You cannot alter saved notes. -
Page 40: Image Adjustment Parameters
40 Image Review and Compare Mode Image Adjustment Parameters Controls to adjust the image display parameters are: • Brightness • Contrast • Red • Green • Blue All parameters have a default setting of zero (0), and range from -100 to +100. •... -
Page 41: Annotation
Image Review and Compare Mode 41 Annotation You can annotate an image by inserting graphic elements or text notes. Click to select any of the following annotation features: • Insert Point—Insert pointer and text on the image. • Insert Ellipse—Draw an ellipse on the image. •... - Page 42 42 Image Review and Compare Mode This page left intentionally blank. RetCam3 User Manual PN 21-100375 Rev. A...
-
Page 43: Import And Export Images
Import and Export Images 43 4 Import and Export Images You can import or export images: • To make RetCam data available on other RetCam stations, which include RetCam3, RetCam II and RetCam Shuttle systems, and PCs running RetCam Review Software. •... -
Page 44: Select Images For Export
44 Import and Export Images Select Images for Export 1. Go to the Patients and Exams screen and highlight the desired patient. Click the arrow on the left side to show all the exams for the selected patient. Figure 28 Select patients and exams for export 2. -
Page 45: Select Export Options
Import and Export Images 45 Note: The Minimum Required Space for Export is displayed. Verify that the export destination has sufficient free space to accept the exported files. Note Regarding File Size Capacity: We recommend that you do not export more than 2000 images in one batch, because the export will take a long time. -
Page 46: Export Image Formats
46 Import and Export Images Clarity’s proprietary encrypted data format DICOM DCM is the filename extension for patient data files that are (DCM) compatible with the DICOM (Digital Imaging and Communications in Medicine) standards for ophthalmology. Split File If you select this format, you will have additional options for the Format Export Image and Export Data formats. -
Page 47: Complete Export
Import and Export Images 47 Complete Export Select Export to initiate Exporting or Cancel. A dialog opens to show export progress. Figure 33 Export progress dialog Importing Images Except for data backup, the export destination on the network is an intermediate location. -
Page 48: Figure 34 Start Screen
48 Import and Export Images Follow these steps to import RetCam images: 1. Return to the start screen by selecting Clear from the Patients and Exams screen. Select Import. Figure 34 Start screen The Import Folder dialog appears Figure 35 Import Folder dialog By default, it shows the Source location path and all the options last used. - Page 49 Import and Export Images 49 Include subfolders check box Check if you want to import images in all subfolders of the source location. If not checked, you will import only the files found in the source location folder itself, and no images in its subfolders.
-
Page 50: Figure 36 Import Successful
50 Import and Export Images View imported data and select thumbnails you need to save. Select Import Selection. You can also select Import All to save all images. Figure 36 Import successful The system will notify you when the import is completed successfully. RetCam3 User Manual PN 21-100375 Rev. -
Page 51: Printing Images
• Patient list (or Patients and Exams screen): Print images, reports, or both The default image size is 5" x 7." For optimal resolution, Clarity recommends printing images 5" x 7" or smaller. This also avoids the rapid depletion of printer ink. -
Page 52: Recommended Supplies
Reports are formatted to fit on US letter size or A4 paper. Recommended Supplies Clarity sells printer supplies - photo paper and ink - for the printer supplied with the system. Note: Network printers used with the system must have a printer driver supported by Windows XP. -
Page 53: Fluorescein Angiography Module
Fluorescein Angiography Module 53 6 Fluorescein Angiography Module This chapter covers acquisition of still or video images using the fluorescein angiography (FA module) option. These functions are provided through the Image Capture screen. Theory of Operation A narrow-band blue excitation light centered at approximately 470 nanometers is generated from the FA module. -
Page 54: Figure 39 Barrier Filter Installation
54 Fluorescein Angiography Module Lens piece Rubber O-ring toward lens piece Barrier filter Beveled edge toward handpiece Handpiece Figure 39 Barrier filter installation Note: If lenses are exchanged during an FA imaging session, hold the camera upright to avoid having the barrier filter fall out during the exchange. 3. -
Page 55: Figure 40 Fa Timer Controls
Fluorescein Angiography Module 55 Figure 40 FA timer controls The drop-down menu offers the following timer options: • Start—Start the timer. • Pause—Pause video capture, but keep the timer running. • Restart—Restart the timer, following a stop or reset. • Reset—Set the timer to zero again. B. -
Page 56: Configuring The Fa Module Timer
56 Fluorescein Angiography Module Configuring the FA Module Timer To configure the FA timer, click Configure at the top left of the screen. You can configure the following: • Capture video and images in color or greyscale • Set the frame rate •... -
Page 57: Maintenance And Support
Maintenance and Support 57 7 Maintenance and Support This section addresses maintenance and support under the following topics: • Recommended Maintenance Schedule, below • Cleaning Procedures, below • Fuse Replacement, page • Replace Illumination Lamp/Bulb, page • Validation, page • Technical Support, page •... -
Page 58: Figure 41 Inverted Lens Piece Showing Permissible Depth Of Immersion
5. Verify that the lens surface is free of debris and coupling gel. Repeat above steps if necessary. 6. Inspect the lens for damage and clarity. Do not use the lens if there are chips, cracks, or rough edges on the lens which may injure the patient’s eye. -
Page 59: Cleaning The Rest Of The System
Disposal of Materials Dispose of waste materials according to local and national requirements. Contact Clarity Service if additional assistance is required. Fuse Replacement Locate the power entry module on the lower right side of the rear of the cart. Make sure to remove the power cord before proceeding any further. -
Page 60: Figure 44 Removing The Fuse Holder
45.) Re-insert the fuse holder. Figure 45 Fuses removed CAUTION: For continued protection against risk of fire, replace only with same type and rating fuse. Replacement fuses are available from Clarity Customer Service. RetCam3 User Manual PN 21-100375 Rev. A... -
Page 61: Replace Illumination Lamp/Bulb
WARNING: Appropriately power down and unplug the unit to allow the bulb to cool before replacing it. Replacement bulbs are available from Clarity. Follow these steps to replace the bulb: 1. If not already OFF, turn OFF the main power. -
Page 62: Figure 47 Front Panel Showing The Lamp Assembly Drawer
62 Maintenance and Support 4. Remove the two screws from the lamp assembly drawer. Remove 2 screws Lamp assembly drawer Lamp assembly drawer handle Figure 47 Front panel showing the lamp assembly drawer 5. Grip the handle on the lamp assembly drawer. Pull the drawer out slowly. Stop when the light bulb is fully exposed. -
Page 63: Figure 49 Removing The Bulb
Maintenance and Support 63 6. Push the lamp ejector as shown. Figure 49 Removing the bulb 7. Carefully slide the bulb out of the socket slots. 8. Pick up the bulb. Socket slots Figure 50 Catch the bulb RetCam3 User Manual PN 21-100375 Rev. -
Page 64: Figure 51 Place New Bulb In Socket
64 Maintenance and Support 9. Holding the new bulb only on the outside, align the two pins of the bulb with the two slots in the socket. Push it all the way in. Figure 51 Place new bulb in socket 10.Carefully push the lamp assembly drawer back. -
Page 65: Key Validation
(including software upgrade) may require you to perform the key validation process as described below. Key validation requires that you get a license key from Clarity to use the revamped system, and you cannot request this key until after installation is complete. -
Page 66: Technical Support
Awareness dialog. Figure 53 Key Validation dialog Follow the instructions on screen: Call Clarity and provide to the customer support representative the large license number in the dialog (71339298 in the example above), which is unique for your system. You will be provided in turn a unique authorization key. -
Page 67: Service Information
Service information is available separately in the RetCam3 Service Manual. RetCam3 components are typically return-to-factory components and can be repaired by only Clarity personnel and/or our qualified distributors. The Service Manual contains information on user-replaceable parts and/or instructions to remove components for return for factory repair. - Page 68 68 Maintenance and Support This page left intentionally blank. RetCam3 User Manual PN 21-100375 Rev. A...
-
Page 69: User Preferences
Select the cog icon in the lower right hand corner to access the User Preferences. Figure 54 Access User Preferences Click About to identify the RetCam software version. Click OK to exit. Figure 55 About Clarity software RetCam3 User Manual PN 21-100375 Rev. A... -
Page 70: Figure 56 User Preferences Screen
70 User Preferences Select User Preferences. Figure 56 User Preferences screen Select from the following options: Imaging Adjustment Not available Institution Add the name of the Institution, Department and Location. Live Imaging Not applicable New Exam Set the Pre-set Imaging Configurations for new exams. -
Page 71: Institution
User Preferences 71 Institution Figure 57 User Preferences: Institution New Exam Figure 58 User Preferences: New Exam Once the New Exam preset configurations are adjusted, click Apply to initiate the change or Cancel. Click OK to exit the screen. RetCam3 User Manual PN 21-100375 Rev. -
Page 72: Printers
72 User Preferences Printers Figure 59 User Preferences: Printers Select the default printers, then click Apply to initiate the change or Cancel. Click OK to exit the screen. Windows Configuration Figure 60 User Preferences: Windows Configuration Select the desired Windows configuration icon and make changes where needed. Click Apply to initiate changes or Cancel. -
Page 73: Technical Specifications
Technical Specifications 73 9 Technical Specifications Hardware Physical • 26”(660 mm) wide x 24”(610 mm) deep x 54”(1372 mm) minimum height • Approximately 200 lbs. (91 Kg) fully loaded Electrical • Ratings: 100-240 V~, 50/60 Hz, 700 VA • Fuses: 3AG 10A 250V slo-blo 5 x 20 mm •... - Page 74 74 Technical Specifications This page left intentionally blank. RetCam3 User Manual PN 21-100375 Rev. A...
-
Page 75: 10 License Agreements
This Agreement is governed in and by the laws of the State of California, U.S.A. This statement gives you specific legal rights; you may have others which vary from state to state and from country to country. Clarity Medical Systems, Inc. reserves all rights not specifically granted in this statement. - Page 76 76 License Agreements OF NEGLIGENCE) IS WITH YOU. ALSO, THERE IS NO WARRANTY AGAINST INTERFERENCE WITH YOUR USE OF THE SOFTWARE OR AGAINST INFRINGEMENT. IF YOU HAVE RECEIVED ANY WARRANTIES REGARDING THE DEVICE OR THE SOFTWARE, THOSE WARRANTIES DO NOT ORIGINATE FROM, AND ARE NOT BINDING ON, MS. •...
-
Page 77: Index
Index 77 Index Hardware Elements 9 Hide Image 36 Image Display Parameters 40 Indications for Use 7 Introduction 7 Key Validation 65 Lens Model 10 Lens Piece 10 Operating Environment 73 Backup Frequency, recommended 43 Backup Recommendation Print Images 38 CE Label 18 Record Video 29 Changing Image Type 32... - Page 78 78 Index RetCam3 User Manual PN 21-100375 Rev. A...
- Page 80 Clarity Medical Systems, Inc. 5775 W. Las Positas Blvd. Pleasanton, CA 94588 USA Phone: (925) 463-7984 Fax: (925) 251-0078 Toll free: 1-800-215-6005 RetCam3 User Manual www.claritymsi.com PN 21-100375 Rev. A...