Table of Contents
Advertisement
Quick Links
Advertisement
Table of Contents

Related Manuals for Clarity RetCam Shuttle


Summary of Contents for Clarity RetCam Shuttle
- Page 1 RetCam Shuttle Ophthalmic Imaging System User Manual and Service Instructions PN 20-000238 Rev. B For use with software version 5.2 Caution: Federal law (USA) restricts this device to sale by or on the order of a physician or licensed medical practitioner...
- Page 2 Copyright © 2009 Clarity Medical Systems, Inc. All rights reserved. European Authorized Representative address MediMark® Europe S.A.R.L. 11, rue Emile Zola 38 100 Grenoble France Tel: +33 (0) 4 76 86 43 22 Fax: +33 (0) 4 76 17 19 82 e-mail: info@medimark-europe.com...
-
Page 3: Table Of Contents
5 Import and Export Images ............41 • Backing Up Images ..................41 • Backup Recommendation: Network or Removable USB Mass Storage Device ..41 • Compatible Removable Media................. 41 RetCam Shuttle User Manual and Service Instructions PN 20-000238 Rev. B... - Page 4 • Fuse Replacement ..................60 • Replace Illumination Lamp/Bulb..............61 • Key Validation ....................65 • Technical Support ..................66 • Clarity Technical Support Contact Information ............66 9 Service..................67 • Consumables......................67 • Components ......................67 • Servicing the Cart ..................68 •...
- Page 5 List of Figures Figure 1 RetCam Shuttle Imaging System (Image representative only)......... 9 Figure 2 Handpiece and Lens Piece..................10 Figure 3 Shuttle with all items stowed .................. 11 Figure 4 Transporting the Shuttle ..................12 Figure 5 Lens installation ...................... 22 Figure 6 Tighten lens on handpiece ..................
- Page 6 Catch the bulb ......................63 Figure 52 Insert new bulb ....................... 64 Figure 53 Replace lamp assembly drawer and fiber optic cable ..........64 Figure 54 Key Validation dialog ....................65 RetCam Shuttle User Manual and Service Instructions PN 20-000238 Rev. B...
-
Page 7: Introduction
Introduction 7 1 Introduction The RetCam Shuttle Ophthalmic Imaging System (system) is designed to allow the quick and easy capture of wide field, high resolution, fully digital images and videos of the eye. Indications for Use The RetCam Ophthalmic Imaging Systems are indicated for general ophthalmic imaging including retinal, corneal, and external imaging. -
Page 8: System Hardware
System Hardware The RetCam Shuttle system consists of modules mounted in a stable, high quality integrated mobile cart for easy, safe transport from one location to another. The four casters allow for easy maneuverability and positioning. -
Page 9: Hardware Components
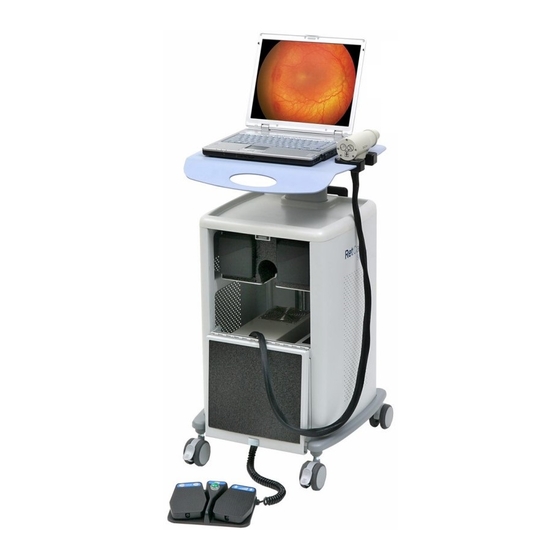
Electro-Optical (EO) box, footswitch storage Lockable front casters Footswitch Figure 1 RetCam Shuttle Imaging System (Image representative only) Hardware Components • Notebook Computer: Pre-loaded with RetCam system software. The notebook computer includes a DVD/R/RW drive, integrated network adapter and USB ports. -
Page 10: Figure 2 Handpiece And Lens Piece
Lens piece Handpiece Handpiece Interconnected Harness Figure 2 Handpiece and Lens Piece Lens Model Application Common Field of View D1300 Premature Infant 130 Degrees B1200 Standard Baby 120 Degrees RetCam Shuttle User Manual and Service Instructions PN 20-000238 Rev. B... -
Page 11: Storage
3. Carefully remove the lens and store it in the lens box. Secure the handpiece and footswitch in their storage compartments in the cart. RetCam Shuttle User Manual and Service Instructions PN 20-000238 Rev. B... -
Page 12: Electrical Safety Information
WARNING: This equipment should be connected using the power cord supplied by Clarity. WARNING: To avoid risk of electric shock, this equipment must be connected to a supply mains with protective earth. RetCam Shuttle User Manual and Service Instructions PN 20-000238 Rev. B... -
Page 13: Electromagnetic Emissions
Power Frequency (50/60) 3A/m Power frequency magnetic fields should be Hz magnetic field at levels characteristic of a typical location in a typical commercial or hospital EN 61000-4-8 environment. RetCam Shuttle User Manual and Service Instructions PN 20-000238 Rev. B... - Page 14 It may be necessary to take mitigation measures such as: • Reorient or relocate the receiving device. • Increase the separation between the equipment. RetCam Shuttle User Manual and Service Instructions PN 20-000238 Rev. B...
-
Page 15: Important User Safety Notices
Notebook computer for a few seconds until the system powers down, then press the power button ON again to power the Notebook back ON. This does not present a safety risk to the patient, user, or environment. RetCam Shuttle User Manual and Service Instructions PN 20-000238 Rev. B... -
Page 16: Labels And Symbols
Do not look directly into light source Protective earth (ground) Alternating current (AC) System contains fuse of indicated type. Do not use any other type. Non-ionizing radiation Read accompanying user documentation Fragile contents RetCam Shuttle User Manual and Service Instructions PN 20-000238 Rev. B... - Page 17 Separate collection of waste at end-of-life as required by European directives. Contact Clarity for equipment disposal instructions. European conformity North American compliance certification Serial number Manufacturer Keep away from the rain RetCam Shuttle User Manual and Service Instructions PN 20-000238 Rev. B...
- Page 18 18 Introduction Go to next screen Hide image Delete image Flag or select item Reset View patient directory Utilities RetCam Shuttle User Manual and Service Instructions PN 20-000238 Rev. B...
-
Page 19: Label
Introduction 19 Label RetCam Shuttle User Manual and Service Instructions PN 20-000238 Rev. B... - Page 20 20 Introduction This page intentionally left blank. RetCam Shuttle User Manual and Service Instructions PN 20-000238 Rev. B...
-
Page 21: System Functions
WARNING: Carefully inspect the lens and clean the lens piece before each use. DO NOT use if the lens piece has nicks, breaks, scratches, or rough surfaces that may damage the eye. RetCam Shuttle User Manual and Service Instructions PN 20-000238 Rev. B... -
Page 22: Lens Installation
Note: We strongly suggest that you backup and store your data prior to turning OFF the system. 1. Select the red shutdown icon at the bottom right corner of the screen. RetCam Shuttle User Manual and Service Instructions PN 20-000238 Rev. B... -
Page 23: Hard Shutdown
OFF the EO box only. This will help preserve the illumination lamp. Note: These actions will remove power from the entire system except the notebook computer. RetCam Shuttle User Manual and Service Instructions PN 20-000238 Rev. B... - Page 24 24 System Functions This page intentionally left blank. RetCam Shuttle User Manual and Service Instructions PN 20-000238 Rev. B...
-
Page 25: Using The Retcam System
• Patient ID Patient information is repeated in several of the screens. The patient name and Patient ID are always shown in the upper left corner of every screen. RetCam Shuttle User Manual and Service Instructions PN 20-000238 Rev. B... -
Page 26: Editing A Patient Record
• First Name • Last Name • Gender (Male, Female, Other, or Unknown) • Date of Birth • Weight (in grams) Note: Any fields on the Edit Patient Screen are editable. RetCam Shuttle User Manual and Service Instructions PN 20-000238 Rev. B... -
Page 27: Finding Existing Patient Records
Figure 11 Patient search options Select Clear to clear all search fields. Search Results When you select the to display the entire patient directory, the results are displayed as shown in Figure RetCam Shuttle User Manual and Service Instructions PN 20-000238 Rev. B... -
Page 28: Performing Exams
Select the green arrow on the right side of a patient name, or select the New Exam button. To start an exam, you can select a Preset Configuration, which can be easily edited, or Manual Configuration. RetCam Shuttle User Manual and Service Instructions PN 20-000238 Rev. B... -
Page 29: Capturing Still Images
Once the new exam is configured, select the green arrow to the right to enter the New Exam screen. Capturing Still Images In the New Exam screen, you can add the name of the Imaging Technician in the upper right corner of the screen. RetCam Shuttle User Manual and Service Instructions PN 20-000238 Rev. B... -
Page 30: Capturing Video
Notebook computer to Start and Pause Recording. Note: You can capture still images by depressing the button during video recording. 4. Select the Stop Recording button to STOP recording video. RetCam Shuttle User Manual and Service Instructions PN 20-000238 Rev. B... -
Page 31: Recommended Procedure
4. In the New Exam Screen, the viewed video is marked for deletion (unless you saved the video as shown in Figure 16). View the exam thumbnails and select any other images for deletion. RetCam Shuttle User Manual and Service Instructions PN 20-000238 Rev. B... -
Page 32: Video Playback
An underlined letter indicates a quick key. To use a quick key, press ALT and the letter key simultaneously. Note: Do not use Windows shortcut keys, for example Copy (Ctrl+C), Paste (Ctrl+V), Undo (Ctrl+Z), and others. RetCam Shuttle User Manual and Service Instructions PN 20-000238 Rev. B... -
Page 33: Changing Image Capture Options During An Exam
Enable mouse-over image preview: When hovering over thumbnail images, a larger image will appear. By default, this feature is selected on and may be turned off. Figure 20 Enable mouse-over RetCam Shuttle User Manual and Service Instructions PN 20-000238 Rev. B... -
Page 34: Adding Exam Notes
You can append text to notes from the Review, Compare, and Image Process screens by selecting Exam Notes. Notes are identified by date/time and person creating the note. RetCam Shuttle User Manual and Service Instructions PN 20-000238 Rev. B... -
Page 35: Image Review And Compare Mode
When you access the Image Review Screen by other means, it displays the images for the last patient and session you selected. To review exams for a different patient, exit to the Patients and Exams screen, and select another patient. RetCam Shuttle User Manual and Service Instructions PN 20-000238 Rev. B... - Page 36 A small red flag appears at the top left corner of the thumbnail. To unflag an image, click the icon again. The icon toggles between flagged and unflagged. RetCam Shuttle User Manual and Service Instructions PN 20-000238 Rev. B...
-
Page 37: Compare Mode
The Compare screen appears when you click Compare. Use the Compare screen to compare any two images. You can compare images for one or more exams for a single patient. RetCam Shuttle User Manual and Service Instructions PN 20-000238 Rev. B... -
Page 38: Figure 23 Compare [Images] Screen
Show hidden images The check box for displaying hidden images is available. Print Image Click Print Image to print the two images displayed on this screen, one above the other. RetCam Shuttle User Manual and Service Instructions PN 20-000238 Rev. B... -
Page 39: Image Adjustment
Rotate 180º Click this button to rotate the image 180º. Reset Button Click Reset to reset all display parameters to zero. Save As Select to export the image. RetCam Shuttle User Manual and Service Instructions PN 20-000238 Rev. B... -
Page 40: Annotation
Note: The original images in the database are never changed, even when you modify the image displayed on the screen. You can save processed images only outside the RetCam database and in a non-proprietary format. RetCam Shuttle User Manual and Service Instructions PN 20-000238 Rev. B... -
Page 41: Import And Export Images
CD-R, CD-RW, DVD±R nor DVD±RW. Note: From the system software, you can write (transfer) data to network folders or USB devices; you cannot write to CD-R, CD-RW, DVD±R nor DVD±RW. RetCam Shuttle User Manual and Service Instructions PN 20-000238 Rev. B... -
Page 42: Exporting Images
USB memory sticks. Some USB sticks require special formatting before use with RetCam systems and we recommend purchasing pre-formatted USB sticks directly from Clarity. Call (800) 215-6005 toll-free in the US and ask for part number 03-12-025. If you are experiencing problems with your USB stick contact Clarity Customer Support. -
Page 43: Select Export Options
Figure 26 Export dialog showing closeup of destination 2. Select Overwrite existing data. This optional feature is useful if you are refreshing backup data: 3. Select RetCam Shuttle User Manual and Service Instructions PN 20-000238 Rev. B... -
Page 44: Format Options
Note: Verify that the export destination has the required space available before continuing. Select Advanced Options The advanced features option allows you to: • Create subfolders RetCam Shuttle User Manual and Service Instructions PN 20-000238 Rev. B... -
Page 45: Figure 28 Create Subfolders Menu
Import and Export Images 45 Figure 28 Create subfolders menu • Choose a File Name Format Figure 29 File name format menu RetCam Shuttle User Manual and Service Instructions PN 20-000238 Rev. B... -
Page 46: Complete Export
RetCam system, you must use the RetCam software to import the transferred images into the target system database. WARNING: Never connect the RetCam Shuttle to a network or any externally powered devices or peripherals during imaging. Note: We recommend that you do not import more than 2000 images in one batch, because the import will take a long time. -
Page 47: Figure 31 Start Screen
3. Once the desired Source location is showing, you can select import options. 4. Select to initiate importing. 5. A Select Import Data to save dialog will appear. RetCam Shuttle User Manual and Service Instructions PN 20-000238 Rev. B... -
Page 48: Figure 33 Select Import Data Dialog
Delete source files and subfolders after import check box To manage the size of the export destination, select this check box to delete the source files and subfolders after import is complete. RetCam Shuttle User Manual and Service Instructions PN 20-000238 Rev. B... - Page 49 View imported data and select thumbnails you need to save. Select Import Selection. You can also select Import All to save all images. The system will notify you when the import is completed successfully. RetCam Shuttle User Manual and Service Instructions PN 20-000238 Rev. B...
- Page 50 50 Import and Export Images This page intentionally left blank. RetCam Shuttle User Manual and Service Instructions PN 20-000238 Rev. B...
-
Page 51: Printing Images
Note: Print is only available if there is a printer attached to the system, either directly or through the network, if so connected. WARNING: Never connect the RetCam Shuttle to a network or any externally powered devices or peripherals during imaging. -
Page 52: User Preferences
Note: Be aware that you must change the paper in the printer when switching between printing images and reports. See the User Preferences section for information on setting printer defaults. RetCam Shuttle User Manual and Service Instructions PN 20-000238 Rev. B... -
Page 53: User Preferences
Select the cog icon in the lower right hand corner to access the User Preferences. Figure 36 Access User Preferences Select About to identify the RetCam software version. Select OK to exit. Figure 37 About Clarity software RetCam Shuttle User Manual and Service Instructions PN 20-000238 Rev. B... -
Page 54: Figure 38 User Preferences Screen
Not applicable Printers Set the Default Image and Report Printer. Windows Configuration Set Date and Time, Display, Network Connections, Printers and Faxes, Region and Language, Security Center and Sound. RetCam Shuttle User Manual and Service Instructions PN 20-000238 Rev. B... -
Page 55: Institution
New Exam Figure 40 User Preferences: New Exam Once the New Exam preset configurations are adjusted, select Apply to initiate the change or Cancel. Select OK to exit the screen. RetCam Shuttle User Manual and Service Instructions PN 20-000238 Rev. B... -
Page 56: Printers
Figure 42 User Preferences: Windows Configuration Select the desired Windows configuration icon and make changes where needed. Select Apply to initiate changes or Cancel. Select OK to exit the screen. RetCam Shuttle User Manual and Service Instructions PN 20-000238 Rev. B... -
Page 57: Maintenance And Support
5. Verify that the lens surface is free of debris and coupling gel. Repeat above steps if necessary. 6. Inspect the lens for damage and clarity. Do not use the lens if there are chips, cracks, or rough edges on the lens which may injure the patient’s eye. -
Page 58: Alternate Cleaning And Disinfection
Note: Permissible immersion depth is illustrated in Figure 43 below. It is important not to immerse the joint where the polished metal tip meets the painted housing, since it is susceptible to corrosion. RetCam Shuttle User Manual and Service Instructions PN 20-000238 Rev. B... -
Page 59: Cleaning The Rest Of The System
WARNING: Always inspect the lens before use for damage such as chips, cracks or roughness that could injure the patient’s eye. Disposal of Materials Dispose of waste materials according to local and national requirements. Contact Clarity Service if additional assistance is required. RetCam Shuttle User Manual and Service Instructions PN 20-000238 Rev. B... -
Page 60: Fuse Replacement
Figure 45 Opening the fuse holder cover Remove the fuse holder. (See Figure 46.) Cover open Gently pry at edges to start removal Finish removal with fingers Figure 46 Removing the fuse holder RetCam Shuttle User Manual and Service Instructions PN 20-000238 Rev. B... -
Page 61: Replace Illumination Lamp/Bulb
CAUTION: For continued protection against risk of fire, replace only with same type and rating fuse. Replacement fuses are available from Clarity Customer Service. Replace Illumination Lamp/Bulb WARNING: Appropriately shutdown and unplug the unit to allow the bulb to cool before replacing it. -
Page 62: Figure 48 Front Panel Showing The Lamp Assembly Drawer
Figure 48 Front panel showing the lamp assembly drawer 5. Grip the handle on the lamp assembly drawer. Pull the drawer out slowly. Stop when the bulb is fully exposed. Figure 49 Open lamp assembly drawer RetCam Shuttle User Manual and Service Instructions PN 20-000238 Rev. B... -
Page 63: Figure 50 Eject The Bulb
6. Push the lamp ejector as shown. Figure 50 Eject the bulb 7. Carefully slide the bulb out of the socket slots. 8. Catch the bulb. Figure 51 Catch the bulb RetCam Shuttle User Manual and Service Instructions PN 20-000238 Rev. B... -
Page 64: Figure 52 Insert New Bulb
11. Replace the two screws on the lamp assembly drawer and replace the fiber optic cable. Figure 53 Replace lamp assembly drawer and fiber optic cable RetCam Shuttle User Manual and Service Instructions PN 20-000238 Rev. B... -
Page 65: Key Validation
Key validation requires that you get a license key from Clarity to use the revamped system, and you cannot request this key until after installation is complete. Since it may take up to two (2) business days to... -
Page 66: Technical Support
Note: Questions about products no longer under warranty and questions other than to explain ordinary use of the product may incur service charges. Please ask for an hourly quotation before incurring charges. RetCam Shuttle User Manual and Service Instructions PN 20-000238 Rev. B... -
Page 67: Service
Standard Baby Lens B1200 Premature Infant Lens D1300 High Contrast Lens E800 High Magnification lens C300 Note: Information subject to change without notice. Contact Clarity Technical Service for the latest information. RetCam Shuttle User Manual and Service Instructions PN 20-000238 Rev. B... -
Page 68: Servicing The Cart
Make note of the cable connections before removing a module. Contact Clarity Technical Service for specific procedures and help troubleshooting problems to the module level before attempting repairs. - Page 69 Is the USB cable from EO box to the notebook from footswitch connected? Verify the cables are properly plugged in. Close the RetCam Shuttle program and reboot the notebook. Images do not transfer Verify the Export path and subfolder match the intended destination.
- Page 70 70 Service This page intentionally left blank. RetCam Shuttle User Manual and Service Instructions PN 20-000238 Rev. B...
-
Page 71: 10 Technical Specifications
T2 Duo processor • 2GB Random Access Memory • 160 GB hard drive • 4 USB connections • Audio • 10/100 Ethernet Adapter Note: Specifications subject to change without notice. RetCam Shuttle User Manual and Service Instructions PN 20-000238 Rev. B... - Page 72 72 Technical Specifications This page intentionally left blank. RetCam Shuttle User Manual and Service Instructions PN 20-000238 Rev. B...
-
Page 73: 11 License Agreements
This Agreement is governed in and by the laws of the State of California, U.S.A. This statement gives you specific legal rights; you may have others which vary from state to state and from country to country. Clarity Medical Systems, Inc. reserves all rights not specifically granted in this statement. - Page 74 SOFTWARE, including the U.S. Export Administration Regulations, as well as end-use and destination restrictions issued by U.S. and other governments. For additional information see http://www.microsoft.com/exporting/. RetCam Shuttle User Manual and Service Instructions PN 20-000238 Rev. B...
-
Page 75: Index
Service Information 66 Handpiece 9 Software 71 Hardware 71 Software Overview 11 Hardware Components 9 Specifications 71 Hide Image 36 Storage 11 How to Get Support 66 System Hardware 8 RetCam Shuttle User Manual and Service Instructions PN 20-000238 Rev. B... - Page 76 UL Label 19 Technical Support Contact Information 66 Unflag Image 37 Telephone 66 Unhide Image 36 Transport 11 Transport Handle 10 Turning Off for Extended Periods 23 video clips 36 RetCam Shuttle User Manual and Service Instructions PN 20-000238 Rev. B...
- Page 78 Clarity Medical Systems, Inc. 5775 W. Las Positas Blvd. Pleasanton, CA 94588 Phone: (925) 463-7984 Fax: (925) 251-0078 Toll free: 1-800-215-6005 RetCam Shuttle User Manual and Service Instructions www.claritymsi.com PN 20-000238 Rev. B...
Need help?
Do you have a question about the RetCam Shuttle and is the answer not in the manual?
Questions and answers