Table of Contents
Advertisement
Quick Links
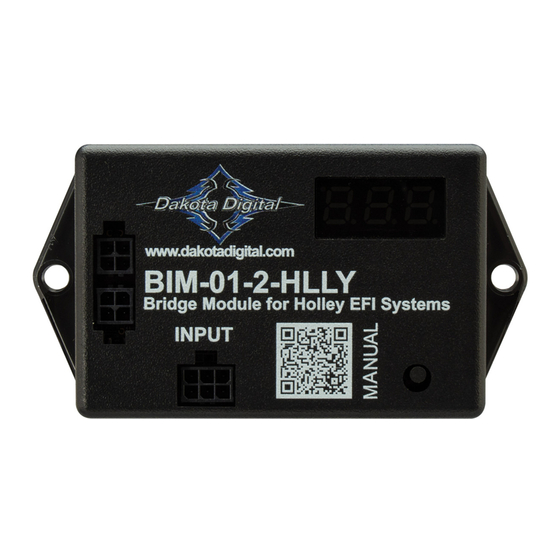
BIM-01-2-HSN2
Bus Interface Module for Holley Sniper 2
391205
394298
This Bus Interface Module is designed to read engine information from the Holley Sniper 2 kits. The module is connected
to the Holley EFI through the CAN-bus plug on the EFI harness. To connect your Sniper 2 to this product, disconnect the
4-pin threaded connector that links your throttle body to the Sniper 2 handheld. Then, connect these cables to the 391205
included in this kit. Connect the 391205 to the BIM-01-2-HLLY using the included 394298 harness.
There are two interface (I/O) ports on the BIM-01-2-HLLYmodule. Either one can be connected to the instrument system
or to another module, allowing several units to be daisy chained together.
Cannot daisy chain with GPS-50-2.
Do not connect the I/O port to anything other than a Dakota Digital control box or BIM.
Do not mount the module in the engine compartment; as it should be mounted in the vehicle's cabin.
The engine and transmission information that is available from the unit depends on the EFI kit and module programming
and add-ons. For specific data readings: see individual setups below for each version of Holley EFI system below.
Note: If you are not utilizing a Holley handheld display, you must disable the HND setting within this BIMs
setup menu (Page 9-10). With the HND setting disabled, you must unplug this BIM unit if you perform a
Holley firmware update using Holley's CAN to USB adapter.
A GPS-50-2 CANNOT be linked (daisy chained) to a BIM-01-2 with a BIM cable.
The two units cannot talk to the display control box at the same time.
[1]
MAN #650832
Advertisement
Table of Contents

Related Manuals for Dakota Digital BIM-01-2-HSN2


Summary of Contents for Dakota Digital BIM-01-2-HSN2
- Page 1 Cannot daisy chain with GPS-50-2. Do not connect the I/O port to anything other than a Dakota Digital control box or BIM. Do not mount the module in the engine compartment; as it should be mounted in the vehicle’s cabin.
-
Page 2: Table Of Contents
Table of Contents Holley EFI Setup Page 2 Display Setup Overview - VFD3 / VFD3X Setup Page 3 VHX Setup Page 4 HDX / RTX Setup Page 5 GRAFIX Setup Page 6 BIM Setup Menu Page 7 Quick Tips and Trouble Shooting Page 9 Warranty Page 10... -
Page 3: Display Setup Overview - Vfd3 / Vfd3X Setup
Display Setup VFD and VHX systems will add extra readings to the message displays under the tach. HDX and RTX need a group screen configured to show additional information such as Boost or Intake temp Setting up the display system will configure the instrument control box to read each input from either the terminals or through the BIM cable from the Bus Interface Module. -
Page 4: Vhx Setup
VHX Setup: Entering the VHX setup is done by holding SW1 (I) and turning the ignition to “on”, or “acc”. Once in setup, one can move between speed, tach, volt, water, etc…. by tapping SW1 (I) If you are setting multiple items, once done with one section you will automatically move onto the next item. Obtaining RPM from the BIM-01-2-HLLY •... -
Page 5: Hdx / Rtx Setup
HDX and RTX setup: **HDX/RTX systems can be configured with the Dakota Digital app for Apple and Android devices** HDX and RTX Operations • HDX: With the ignition key already on, press and hold both switches to enter SETUP, release when instructed. -
Page 6: Grafix Setup
GRAFIX setup: **GRAFIX systems can be configured with the Dakota Digital app for Apple and Android devices** GRAFIX Operations • With the vehicle stopped, tap the Control Knob to enter the Main Menu The Main menu can be entered with the vehicle moving, but only the speedometer ADJUST menu will be available in the SETUP menu •... -
Page 7: Bim Setup Menu
BIM setup: BIM menu table: Menu Options Default Notes For Terminator HP and Dominator systems For Sniper EFI For Terminator X and Terminator X Max ... - Page 8 BIM setup continued: Holley Handheld Most Holley systems come with a handheld display which attaches to the Holley ECU. By default, this unit is programmed to assume the Holley handheld is in use. If your Holley system does not have a Holley handheld unit attached, please change this setting to ‘NO’...
-
Page 9: Quick Tips And Trouble Shooting
Quick tips: While the BIM is operating, the dot in the upper left corner of the display will indicate the status. On steady indicates it is powered up but not receiving any BIM bus activity. Flashing indicates it is communicating on the BIM bus. If the display shows “”... -
Page 10: Warranty
This Warranty is in lieu of all other expressed warranties or liabilities. Any implied warranties, including any implied warranty of merchantability, shall be limited to the duration of this written warranty. No person or representative is authorized to assume, for Dakota Digital, any liability other than expressed herein in connection with the sale of this product.
Need help?
Do you have a question about the BIM-01-2-HSN2 and is the answer not in the manual?
Questions and answers