Table of Contents
Advertisement
Available languages
Available languages
Quick Links
hatcocorp.com
Register Online!
(see page 2)
S'inscrire en ligne!
(voir page 19)
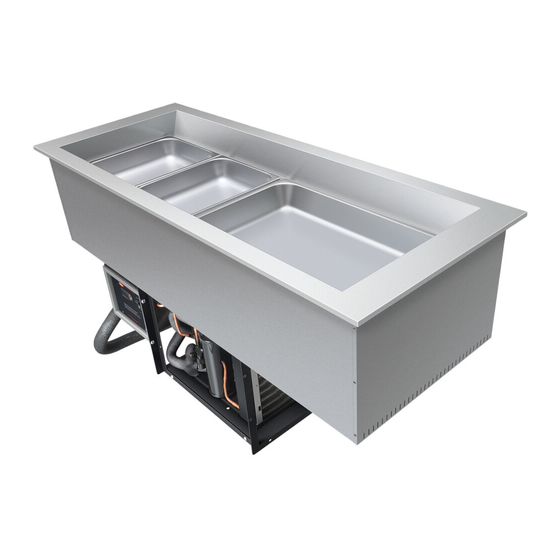
Refrigerated Drop-In Wells
Cuves réfrigérées libre service
CWBP Series • CWBP Série
Installation and Operating Manual
Manuel d'installation et d'utilisation
WARNING
Do not operate this equipment unless you
have read and understood the contents
of this manual! Failure to follow the
instructions contained in this manual
may result in serious injury or death.
This manual contains important safety
information concerning the maintenance,
use, and operation of this product. If
you're unable to understand the contents
of this manual, please bring it to the
attention of your supervisor. Keep this
manual in a safe location for future
reference.
English = p 2
P/N 07.04.1054.00
ADVERTENCIA
No opere este equipo al menos que haya
leído y comprendido el contenido de este
manual! Cualquier falla en el seguimiento
de las instrucciones contenidas en
este manual puede resultar en un serio
lesión o muerte. Este manual contiene
importante información sobre seguridad
concerniente al mantenimiento, uso y
operación de este producto. Si usted
no puede entender el contenido de
este manual por favor pregunte a su
supervisor. Almacenar este manual en
una localización segura para la referencia
futura.
AVERTISSEMENT
Ne pas utiliser cet équipement sans avoir
lu et compris le contenu de ce manuel ! Le
non-respect des instructions contenues
dans ce manuel peut entraîner de
graves blessures ou la mort. Ce manuel
contient des informations importantes
concernant l'entretien, l'utilisation et le
fonctionnement de ce produit. Si vous ne
comprenez pas le contenu de ce manuel,
veuillez le signaler à votre supérieur.
Conservez ce manuel dans un endroit
sûr pour pouvoir vous y référer plus tard.
Français = p 19
© 2023 Hatco Corporation
Advertisement
Chapters
Table of Contents

Related Manuals for Hatco CWBP Series


Summary of Contents for Hatco CWBP Series
- Page 1 Register Online! (see page 2) S’inscrire en ligne! (voir page 19) Refrigerated Drop-In Wells Cuves réfrigérées libre service CWBP Series • CWBP Série Installation and Operating Manual Manuel d’installation et d’utilisation WARNING AVERTISSEMENT ADVERTENCIA Do not operate this equipment unless you Ne pas utiliser cet équipement sans avoir...
-
Page 2: Table Of Contents
(specification Central Time (CT) label located on bottom of unit and back of control panel). Please have this information available when calling Hatco for (Summer Hours — June to September: service assistance. -
Page 3: Important Safety Information
• Do not attempt to repair or replace a damaged and sanitation is critical for food-safe operation. Refer to power cord. The cord must be replaced by Hatco, an the MAINTENANCE section for cleaning procedures. Authorized Hatco Service Agent, or a person with similar qualifications. - Page 4 IMPORTANT SAFETY INFORMATION English NOTICE CAUTION Locate unit at the proper counter height in an area that is Transport and install unit in upright position only. Failure to convenient for use. Location should be level and strong do so may result in damage to refrigeration system. enough to support weight of unit and contents.
-
Page 5: Model Description
Hatco’s commitment to improving, protecting, and preserving Hatco Refrigerated Drop-In Wells are reliable and versatile. the global environment. Hatco refrigerated units qualify for the Each unit has an insulated, stainless steel and aluminized steel ecoization logo through the use of green-friendly insulation as housing. -
Page 6: Specifications
If plug and receptacle do not Plug Configuration match, contact a qualified electrician to determine and NOTE: Receptacle not supplied by Hatco. install proper voltage and size electrical receptacle. Electrical Rating Chart Compressor... -
Page 7: Installation
INSTALLATION English General CAUTION Refrigerated Drop-In Wells are shipped from the factory completely assembled and ready for use. Use the following Locate unit at the proper counter height in an area that is information and procedures to prepare the unit and installation convenient for use. -
Page 8: Preparing The Installation Site
INSTALLATION English Preparing the Installation Site 5. Cut opening in the cabinet for access to the control panel, if necessary. Refer to the “Installing the Control Panel Survey the installation site. Take into account the need for Remotely” procedure for the cutout dimensions. louvered or grill-style openings in the cabinetry to provide proper 6. -
Page 9: Countertop Cutout Dimensions
INSTALLATION English 3. Install the control panel in the desired location. NOTE: If excessive condensation appears underneath the countertop during operation, apply polyurethane-based • The control panel can be installed on one of three sides foam sealant in the gap between the underside of the of the condensing unit support frame. -
Page 10: Installing The Remote Control Panel
INSTALLATION English Installing the Remote Control Panel b. Install the flexible duct to the duct collar on the condensing unit using the duct clamp. Use the following procedure to install the control panel remotely. c. Install the duct collar on the other end of the flexible duct using the duct clamp. -
Page 11: Operation
WARNING Use the following procedures to operate the Refrigerated Drop-In Wells. Hatco Corporation is not responsible for actual food product serving temperature. It is the responsibility of the WARNING user to ensure that food product is held and served at a safe temperature. -
Page 12: Changing The Setpoint Temperature
Setting the Auto-Defrost Cycle 7. Press the key to lock in the new setting. Hatco Refrigerated Wells are programmed at the factory with the auto-defrost cycle deactivated. Use the following procedure 8. Press and hold the key for three seconds to exit to activate the auto-defrost cycle if ambient or operational programming mode. -
Page 13: Maintenance
FIRE HAZARD: Do not use flammable cleaning solutions to clean this unit. Condenser Coil Cooling Fins This unit has no “user-serviceable” parts. If service is required on this unit, contact an Authorized Hatco Service Agent or contact the Hatco Service Department at 414-671-6350. NOTICE Clean unit daily to avoid malfunctions and maintain sanitary operation. -
Page 14: Troubleshooting Guide
Internal condensing unit malfunction. Troubleshooting Questions? If you continue to have problems resolving an issue, please contact the nearest Authorized Hatco Service Agency or Hatco for assistance. To locate the nearest Service Agency, log onto the Hatco website at www.hatcocorp.com and click on... -
Page 15: Options And Accessories
OPTIONS AND ACCESSORIES English Pan Support Bars False Bottom Accessory pan support bars are available to divide wells into False bottoms are accessories available for all models. False sections for different size pans. bottoms allow better drainage for units that hold ice. CWB12BAR .. - Page 16 OPTIONS AND ACCESSORIES English Slanted Base Option Slanted bases are options available for all models. The slanted base gives the well a 5° tilt. NOTE: Water will not drain completely from unit with slanted base installed. Slanted Base 1. Lift the unit and slanted base out of the shipping frame, and carefully lower them into the countertop cutout.
-
Page 17: Limited Warranty
Notwithstanding anything herein to the contrary, the limited warranty herein will not cover components in Seller’s sole Hatco Corporation (Seller) warrants that the products it discretion such as, but not limited to, the following: coated manufactures (Products) will be free from defects in materials... -
Page 18: Informations Importantes Pour Le Propriétaire
Heure du Centre (CT) l’appareil et à l’arrière du panneau de contrôle). Veuillez avoir (Horaires d’été : juin à septembre— cette information à portée de la main si vous appelez Hatco 7h00 à 17h00 du lundi au jeudi pour assistance. -
Page 19: Consignes De Sécurité Importantes
• Ne pas tenter de réparer ni de changer un cordon santé. Cet appareil est uniquement destiné à maintenir électrique endommagé. Ce cordon doit être changé frais des aliments préalablement réfrigérés. par Hatco, par un réparateur Hatco agréé ou par une personnes de qualifications comparables. CWBPM-0923... - Page 20 Cet appareil ne contient aucune pièce réparable par l’utilisateur. Si cet appareil doit être réparé, contacter un Maintenez l’appareil dans la position verticale lors du réparateur Hatco agréé ou le Service après-vente Hatco au transport et de l’installation. Le non-respect de cette +1-414-671-6350.
-
Page 21: Description Du Modèle
Tous les Modèles Le logo ecoization désigne les produits conçus pour refléter l’engagement d’Hatco à améliorer, protéger et préserver Les cuves réfrigérées libre service Hatco sont fiables et l’environnement. Les unités réfrigérantes Hatco bénéficient polyvalentes. Chaque appareil possède une structure isolée du logo ecoization grâce à... -
Page 22: Caractéristiques Techniques
(27″) (25-1/2″) (12″) (84″) (27″) (25-1/2″) (12″) Vue de face Vue de côté (Modèle CWBP-3) (Modèle CWBP-3) Information sur le fluide frigorigène Pour toutes les cuves réfrigérées libre service Hatco, le groupe compresseur-condenseur fonctionne avec le fluide frigorigène R-290. CWBPM-0923... -
Page 23: Installation
INSTALLATION Français Généralités AVERTISSEMENT Les cuves réfrigérées libre service sont expédiées de l’usine entièrement assemblées et prêtes à l’usage. Utilisez les DANGER D’INCENDIE: informations et procédures suivantes pour préparer le lieu • Laissez au minimum 178 mm (7″) d’espace entre les d’installation et l’appareil ainsi que pour installer l’appareil. -
Page 24: Préparer Le Lieu D'installation
INSTALLATION Français Préparer le lieu d’installation 4. Faites une ouverture dans l’armoire pour le conduit d’évacuation. Inspectez le lieu d’installation et déterminez si l’orientation et/ ou la position du groupe compresseur-condenseur ont besoin • Découpez l’ouverture de l’évacuation à 25 mm (1″) d’être réglées. -
Page 25: Installer L'appareil
INSTALLATION Français Installer l’appareil AVIS Lors de l’installation, manipulez l’appareil avec précaution et évitez au maximum de heurter les tuyaux et les conduites. La garantie ne couvre pas les éléments endommagés Serpentins du condenseur pendant l’installation. (à l’intérieur du collet de conduit) 1. -
Page 26: Installer Le Panneau De Contrôle À Distance
INSTALLATION Français NOTA: Faites appel à un plombier professionnel pour installer NOTA: Si vous utilisez une bassine pour récupérer l’eau sous le siphon et le tuyau de vidange de sorte à respecter le raccord de drain, assurez-vous qu’elle est vidée les normes de plomberie locales. -
Page 27: Mode D'emploi
à une température appropriée avant de les placer dans l’appareil. Maintenir des aliments à une température Hatco Corporation n’est pas responsable de la température inappropriée peut entraîner des risques graves pour la réelle à laquelle les aliments sont servis. Il est de la santé. -
Page 28: Programmer Le Cycle De Dégivrage Automatique
« 22 » s'affiche à l'écran, puis appuyez sur le automatique bouton. Les cuves réfrigérées libre service Hatco sont programmées à 4. Utilisez le bouton pour faire défiler les l’usine de manière à ce que le cycle de dégivrage automatique soit désactivé. -
Page 29: Maintenance
MAINTENANCE Français Généralités Nettoyage mensuel Les cuves réfrigérées libre service Hatco sont conçues pour Un technicien frigoriste doit réaliser la procédure suivante une durabilité et une performance optimales avec un minimum chaque mois pour assurer le bon fonctionnement des unités d’entretien. -
Page 30: Guide De Dépannage
Vous avez des questions en ce qui concerne les pannes? Si le problème persiste, veuillez contacter l’agence d’entretien agréée Hatco la plus proche ou Hatco pour obtenir une assistance. Pour trouver l’agence d’entretien la plus proche, rendez-vous sur le site Internet de Hatco (www.hatcocorp.com) et sélectionnez le menu déroulant Support (Assistance), puis cliquez sur «... -
Page 31: Options Et Accessoires
OPTIONS ET ACCESSOIRES Français Barres de division de bacs Doubles fonds Les barres de support de bacs optionnelles permettent de Les doubles fonds sont disponibles en option pour chaque séparer les cuves en plusieurs parties afin de disposer des modèle. Les doubles fonds permettent une vidange optimale bacs de différentes tailles. - Page 32 OPTIONS ET ACCESSOIRES Français Base inclinée en option Extension de garantie de quatre ans pour les pièces Les bases inclinées sont disponibles en option pour tous les modèles. La base inclinée permet d’incliner le puits de 5 Une extension de garantie de quatre ans pour les pièces est degrés.
-
Page 33: Garantie Limitée
GARANTIE, RECOURS EXCLUSIF : Garantie d’un (1) an pour les pièces et la main-d’œuvre, PLUS garantie de quatre (4) ans pour les pièces Hatco Corporation (le Vendeur) garantit que les produits uniquement : qu’elle fabrique (les Produits) seront exempts de défauts de Cuves 3CS et FR matériaux et de fabrication dans des conditions d’utilisation et... - Page 34 NOTES English CWBPM-0923...
- Page 35 NOTES English CWBPM-0923...
- Page 36 Duffy’s - AIS Sauquoit 800-836-1014 J.B. Brady, Inc. Syracuse 315-422-9271 Register your unit online! See IMPORTANT OWNER INFORMATION HATCO CORPORATION section for details. P.O. Box 340500 Milwaukee, WI 53234-0500 U.S.A. 414-671-6350 Enregistrez votre appareil en ligne ! partsandservice@hatcocorp.com www.hatcocorp.com Lisez la section INFORMATIONS IMPORTANTES POUR LE PROPRIETAIRE pour plus d’informations.
Need help?
Do you have a question about the CWBP Series and is the answer not in the manual?
Questions and answers