Advertisement
Flav-R-Shield™
Portable Sneeze Guards
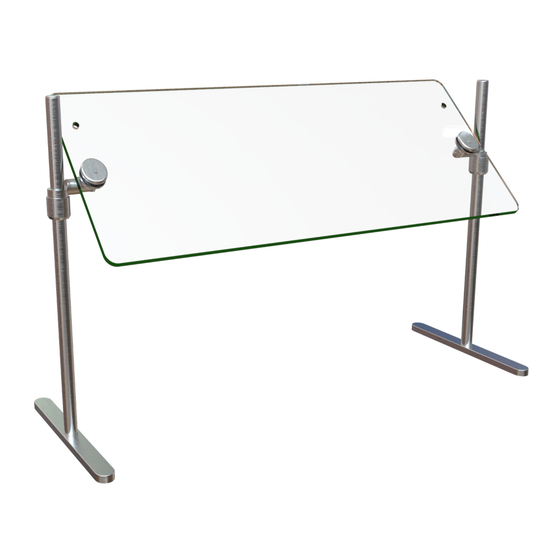
Model ORBIT-720
Model ORBIT-720 Portable Sneeze Guards are available in
four, single bay widths from 24"–60" (610–1524 mm). All of the
available widths are height adjustable up to 23" (584 mm) and
have a common base plate depth of 14" (356 mm).
For additional information regarding the ORBIT-720, scan the QR
Code below:
Important Safety Information
To avoid serious injury and damage to equipment or property, read
the following safety information before installing this equipment.
Do not attempt to assemble and install sneeze guards
alone. Installation of sneeze guards requires two or
more people, dependent upon unit.
Orbit bracket comes standard with a thumb screw to
lock the position of the bracket. For additional security
and to prevent unauthorized adjustment, a hex cap
screw is available in place of the thumb screw.
Orbit
Orbit
Bracket
Bracket
Thumb
Thumb
Screw
Screw
Hex Cap
Hex Cap
Screw
Screw
Twist-lock nut on
bracket requires a
strong twist to ensure
no movement along
post. For additional
safety and security,
and
to
prevent
u n a u t h o r i z e d
a d j u s t m e n t ,
t h e
safety set screw on the twist-lock nut must be secured.
Failure to install safety set screws properly will void
product warranty.
Always remove glass when adjusting vertical position
of sneeze guard/Orbit brackets. Website animations are
shown for demonstration of adjustment and movement
capabilities only. Hatco will not be liable for injuries or
damages due to customer failure to comply with safety
guidelines.
Always wear proper protective eye wear when handling
glass sneeze guards.
Never spray cleaners directly onto sneeze guard
surfaces. Sprayed cleaner will make vertical post
slippery and may cause a bracket failure. Spray cleaner
into non-abrasive cloth, and then wipe down surfaces.
Do not place anything on top of sneeze guard. It is not
designed to be a weight-bearing component.
© 2022 Hatco Corporation
Hex cap
Hex cap
screw
screw
installed.
installed.
Twist-Lock
Twist-Lock
Nut
Nut
Securing position of
Securing position of
Safety Set Screw
Safety Set Screw
on post.
on post.
INSTALLATION GUIDE
Use non-abrasive cleaners and cloths only. Abrasive
cleaners and cloths could scratch finish of unit, marring
its appearance and making it susceptible to soil
accumulation. Use of abrasive materials will void
warranty.
Assembly and Installation
1. Unpack all components. In addition to the appropriate glass
panel and machine screws, verify that the appropriate number
of the items below are present.
Thumb
Base
Screw
Plate
Vertical
Thumb
Screw
Post
Top Plate
Thumb
w/Nylon
Screw
Washer
2. Determine which mounting holes to use on the base plates and
the glass panel.
• Depending on the installation, the vertical posts can be
positioned in either the center or forward mounting holes of
the base plates. Additionally, the glass panel can be mounted
to the Orbit brackets using either the center or forward
mounting holes.
Post and
Post and
glass in
glass in
center
center
postions.
postions.
NOTE: The post and glass mounted in the center positions usually
is employed when there IS a tray slide in use.
NOTE: The post and glass in the front positions usually is employed
when there IS NOT a tray slide in use.
3. Install the vertical posts to
the base plates in the desired
mounting holes.
4. Slide an Orbit bracket onto
each vertical post to the desired
position.
Hand-tighten
brackets securely in place
by turning the twist-lock nut
clockwise. Tighten the safety set
screws to lock each twist-lock in
position.
1
P/N 07.14.003.00-0622 [ORBIT720_IG]
Filler Cap
Thumb
Covers
Screw
Orbit
Orbit
Bracket
Bracket
Orbit
Slotted Glass
Bracket
Bracket
Post and
Post and
glass in
glass in
forward
forward
postions.
postions.
Twist-Lock
Twist-Lock
Nut
Nut
the
Set Screw
Set Screw
Vertical
Vertical
Post
Post
continued...
Advertisement
Table of Contents

Related Manuals for Hatco Flav-R-Shield ORBIT-720


Summary of Contents for Hatco Flav-R-Shield ORBIT-720
- Page 1 Hand-tighten capabilities only. Hatco will not be liable for injuries or brackets securely in place damages due to customer failure to comply with safety by turning the twist-lock nut...
- Page 2 HATCO CORPORATION P.O. Box 340500 24 Hour 7 Day Parts and Service Milwaukee, WI 53234-0500 U.S.A. Assistance available in the United States 414-671-6350 and Canada by calling 414-671-6350. support@hatcocorp.com www.hatcocorp.com © 2022 Hatco Corporation...
Need help?
Do you have a question about the Flav-R-Shield ORBIT-720 and is the answer not in the manual?
Questions and answers