Table of Contents
Advertisement
Quick Links
Advertisement
Table of Contents

Related Manuals for golmar ART 5W/GTWIN


Summary of Contents for golmar ART 5W/GTWIN
- Page 1 TEC NOLOG ART 5W/GTWIN MONITOR TART 5W/GTWIN EN REV.0223...
-
Page 2: Table Of Contents
ART 5W/GTWIN MONITOR INTRODUCTION First of all, we thank and congratulate you for purchasing this product manufactured by Golmar. Our commitment to achieving the satisfaction of customers like you is manifested through our ISO-9001 certification and the manufacture of products like the one you have just purchased. -
Page 3: Characteristics
ART 5W/GTWIN MONITOR CHARACTERISTICS - Monitor for Gtwin installation. - 5" TFT colour screen. - Wi-Fi transmission monitor to call transfer to mobile smartphone. Only the master monitor can activate Wi-Fi transmission. ( power supply unit 1723/22 required for apartment if... -
Page 4: Description Of The Monitor
ART 5W/GTWIN MONITOR MONITOR DESCRIPTION Description of the ART 5W/Gtwin monitor Hands-free monitorfor the GTWIN system with button and coded panels. CODE 3 4 5 6 7 8 1 2 LINE LINE Speaker. 5" TFT colour screen. During call reception and communication proccesses, it enables the main lock release to be activated. -
Page 5: Description Of The Configuration Jumpers
ART 5W/GTWIN MONITOR MONITOR DESCRIPTION Description of the configuration jumpers: Monitor with JP1 jumper place to right, takes the current from system power supply (factory default). Monitor with JP1 jumper place to left, takes the current from dedicated power supply "1723/22". -
Page 6: Establishing Communication In 'Push-To-Talk' Mode
ART 5W/GTWIN MONITOR MONITOR DESCRIPTION Establishing communication in 'Push-to-talk' mode by pressing button To select this operating mode, see page to activate the "Push to talk" mode. When receiving a call, press buton to stablish communication, the notification icon of the monitor will blink (green colour);... -
Page 7: Sw1 Configuration Switch
ART 5W/GTWIN MONITOR MONITOR SETTINGS SW1 configuration switch: The SW1 configuration switch is located at the back of the monitor. CODE Dip1: Defines the WiFi operating mode on the monitor. "WiFi always active" and "WiFi SW 1 SW 2 active after call forwarding" (the GCall app will have a delay of 10 seconds for the call forwarding reception). - Page 8 ART 5W/GTWIN MONITOR MONITOR SETTINGS Continued from previous page. USER 54 USER 55 USER 56 USER 57 USER 58 USER 59 USER 60 USER 61 USER 62 USER 63 USER 64 USER 65 USER 66 USER 67 USER 68 USER 69...
-
Page 9: Jp3 End Of Line Jumper
ART 5W/GTWIN MONITOR MONITOR SETTINGS configuration switch: "INT" CODE configuration switch is located at the back of the monitor. It enables the monitor to SW 1 SW 2 be configured as master/slave. 1 2 3 4 5 6 7 8 INT: Internal code of the monitor/telephone to set as master/slave. -
Page 10: Installing The Monitor In A Wall Mounting Connector
ART 5W/GTWIN MONITOR INSTALLING THE MONITOR IN A WALL MOUNTING CONNECTOR Avoid dusty or smoky environments or locations near sources of heat. Positioning the wall mounting connector: The top of the connector must be positioned at a height of 1.60m. The minimum distance between the sides of the connector and the closest object must be 5cm. -
Page 11: Installing The Monitor In An Embedding Box
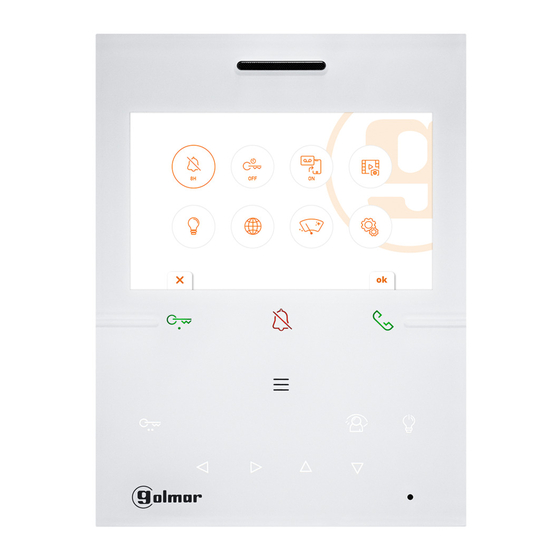
ART 5W/GTWIN MONITOR INSTALLING THE MONITOR IN AN EMBEDDING BOX Avoid dusty or smoky environments or locations near sources of heat. Location of the embedding box: Make a hole in the wall to position the top of the universal embedding box at a height of 1.60 m from the ground. The minimum distance between the sides of the embedding box and the closest object must be 5cm. - Page 12 ART 5W/GTWIN MONITOR MAIN MENU The main menu allows you to modify the monitor's default settings: Main menu Press twice to access the main menu If the device is in standby (screen switched off), to access the main menu, press...
-
Page 13: Settings Menu (Advanced Programming)
ART 5W/GTWIN MONITOR SETTINGS MENU ( ADVANCED PROGRAMMING The settings menu allows you to modify the monitor's default settings: If the equipment is in standby mode (screen off), to access the main menu, press the button twice. Use the &... - Page 14 ART 5W/GTWIN MONITOR Continued from previous page. SETTINGS MENU VIDEO: In the settings menu, select "Video" to adjust the brightness of the screen, using the buttons , press the button to access the brightness adjustment screen. Settings menu Settings menu...
- Page 15 ART 5W/GTWIN MONITOR Continued from previous page. SETTINGS MENU CONTACTS: In the settings menu, select "Contacts" to add, modify and delete a contact in the monitor directory, with the help of the buttons , press the button to access the contacts screen.
- Page 16 ART 5W/GTWIN MONITOR Continued from previous page. SETTINGS MENU In the settings menu, select "Contacts" to add, modify and delete a contact in the monitor directory, with the help of the buttons , press the button to access the contacts screen.
- Page 17 ART 5W/GTWIN MONITOR Continued from previous page. SETTINGS MENU In the settings menu, select "Contacts" to add, modify and delete a contact in the monitor directory, with the help of the buttons , press the button to access the contacts screen.
- Page 18 ART 5W/GTWIN MONITOR Continued from previous page. SETTINGS MENU In the settings menu, select "Contacts" to add, modify and delete a contact in the monitor directory, with the help of the buttons , press the button to access the contacts screen.
- Page 19 ART 5W/GTWIN MONITOR Continued from previous page. SETTINGS MENU ACTIVATIONS: No function. DATE AND TIME: In the settings menu, select "Date and time" to set/modify the date and time displayed on the saved call videos, with the help of the buttons , press the button to access the date and time screen.
- Page 20 -The call forwarding function allows sending a video and audio call to an Android or iOS smartphone. -On the smartphone, connected to the internet with its own data connection or WiFi, you must install the Golmar Gcall " app to be “...
- Page 21 When the function is active and a call is received from the panel in the apartment , it will be received by the monitor(s) and smartphones on which the Golmar Gcall App is installed and configured. Main menu Main menu...
- Page 22 The following screen will be displayed, scan the displayed QR to access the Golmar GCall app web page and access the app download for android or iOS depending on the operating system of your smartphone. Press the button to exit and return to the "call forwarding"...
- Page 23 ART 5W/GTWIN MONITOR Continued from previous page. SETTINGS MENU Maintenance (Installer) mode: Contact Golmar's technical sales department. Press the button to exit and return to the settings menu. Configure "Call Forwarding" screen Settings menu State: State: Off Off Ringtone volume...
- Page 24 ART 5W/GTWIN MONITOR Continued from previous page. SETTINGS MENU Then select the activation you wish to associate with the push button using the push buttons and press the push button to confirm your selection. Press the push button to exit and return to the settings menu.
- Page 25 ART 5W/GTWIN MONITOR Continued from previous page. SETTINGS MENU In the settings menu, select "Video messages export" with the help of the buttons , press the button to display the list of recorded video messages. Settings menu Settings menu Video messages export...
- Page 26 ART 5W/GTWIN MONITOR Continued from previous page. SETTINGS MENU Export all video messages: To export all the video messages recorded on the monitor, select the option with the help of the push button and press the push button to confirm. At the end of the configuration, press the push button to exit and return to the settings menu.
- Page 27 ART 5W/GTWIN MONITOR Continued from previous page. SETTINGS MENU Monitor information screen Monitor information screen Scan this QR code for help Scan this QR code for help. Apartment: Apartment : o Inter inal version 1.0.0_golmar-2320 Inter Versión W y FW 1.0.0_golmar-2320...
- Page 28 ART 5W/GTWIN MONITOR Continued from previous page. SETTINGS MENU Then, using the buttons you can select the option(s) of the monitor that you want to reset to factory settings. Once the selection has been made, press the push button to enable ticking /disable without ticking the reset to factory default the data on the option ticked .
-
Page 29: General Description Type Of Installation Building / Condominium (1 Building)
ART 5W/GTWIN MONITOR GENERAL DESCRIPTION TYPE OF INSTALLATION BUILDING/CONDOMINIUM BUILDING The following describes the function depending on the configuration of the jumpers JP1 , JP2 and DIP1 of the microswitch SW1 (see page 7). Installation typeTipo de instalación Buiding (Default) - Page 30 ART 5W/GTWIN MONITOR Continued from previous page. Building with 4 main accesses and maximum 4 columns (1 DPM-Gtwin panel multiplexer) LINE OUT LINE IN LINE FA-Gtwin Power supply FA-Gtwin DPM-Gtwin panel multiplexer Power supply SW1 ( ) ID = 0...
-
Page 31: System Types
INSTALLATION LIMITS OF ART 5W/GTWIN MONITOR WITH VIDEO DISTRIBUTORS The maximum number of ART 5W/GTWIN monitors in a column /riser with video distributors is described below depending on the type of installation "Building or Condominium" with the same maximum distances. - Page 32 ART 5W/GTWIN MONITOR Continued from previous page. LÍMITES DE INSTALACIÓN DEL MONITOR ART 5W/GTWIN SIN DISTRIBUIDORES DE VIDEO EN (IN-OUT) The maximum number of ART 5W/GTWIN monitors in a column /riser without video distributors i n (in-out) is described below depending on the type of installation "Building or Condominium"...
-
Page 33: Button For Receiving Calls From The Apartment Front Door
ART 5W/GTWIN MONITOR OPTIONAL CONNECTIONS Monitors in parallel (input/output) from a bypass of the D4L-Gtwin distributor: Max. connection 4 monitors in one apartment. JP3 end of line jumper, is located at the back of the monitor . Leave the JP3 jumper inserted on the left on the monitors where the bus cable end. -
Page 34: Additional Call Repeater (Sav-Gtwin)
ART 5W/GTWIN MONITOR Continued from previous page. OPTIONAL CONNECTIONS Additional call repeater (SAV-GTWIN tritonal call repeater required): /Gtwin SAV-GTWIN S+ S- S+ S- Note: If the monitor where the additional call repeater is connected has no ringtone ( "do not disturb" mode ), the call repeater will play the ringtones from “CP”... -
Page 35: Wiring Diagram
To connect the FA-Gtwin power supply to the filter and line protector, see the TGTWIN SYSTEM MANUAL, p. 44. To connect the secondary AC lock release (Golmar), see the TGTWIN SYSTEM MANUAL, p. 45. see a e p g 32) -
Page 36: Cleaning The Monitor
ART 5W/GTWIN MONITOR CLEANING THE MONITOR Do not use solvents, detergents or cleaning products that contain acids, vinegar or abrasive components. Use a soft damp lint-free cloth with water. Always wipe the monitor in the same direction, from top to bottom. - Page 37 ART 5W/GTWIN MONITOR NOT S...
- Page 38 C/ Silici, 13 08940- Cornellá de Llobregat SPAIN Golmar se reserva el derecho a cualquier modificación sin previo aviso. Golmar se réserve le droit de toute modification sans préavis. Golmar reserves the right to make any modifications without prior notice.
Need help?
Do you have a question about the ART 5W/GTWIN and is the answer not in the manual?
Questions and answers