Table of Contents
Advertisement
Quick Links
Advertisement
Table of Contents

Related Manuals for Neuation iROLL DR24


Summary of Contents for Neuation iROLL DR24
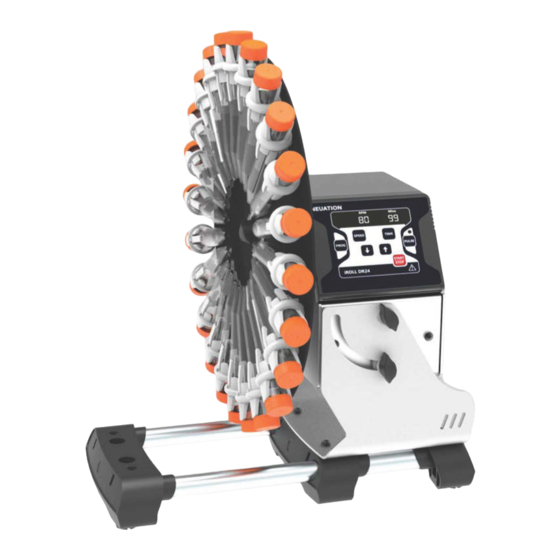
- Page 1 NEUATION iROLL DR24 PRODUCT USER MANUAL...
-
Page 2: Table Of Contents
CONTENTS Product Description Safety Precautions Installation 4. Standard Part Usting 5. User Interface and Display Removing & lnstalling Disc Plate Operation Rem oval of Tu bes from Disc Plate Maintenance & Cleaning 10. Warranty Statement 11. Product Disposal... -
Page 3: Product Description
1. PRODUCT DESCRIPTION 1.1 INTRODUCTION This digital disc rotator is equipped with a lang life BLDC motor with a small footprint. The rotating motion provides gentle rocking and offers pulse function for thorough mixing. Set up to 9 user-defined programs with the digital display for the accurate and easy setting. -
Page 4: Safety Precautions
1. PRODUCT DESCRIPTION 1.6 TECHNICAL SPECIFICATIONS Motor Type Brushless DC Motion Type Rotating Speed Range 10 to 80 RPM Speed Accuracy ±1 RPM Speed steps ±1 RPM Timer range 0 to 99 mins & infinite mode ° Disc Angle Flexible - Can be adjusted O to 90 Max Loading Capacity 2 kg Removable Disc plate... -
Page 5: Installation
2. SAFETY PRECAUTIONS • This product must be used for specified applications only. lt must not be operated in a hazardous or flammable environment and must not be used to mix explosive or highly reactive substances. • Do not place the potentially hazardous material within the clearance area/ envelope. -
Page 6: Standard Part Usting
3. INSTALLATION 3. Keep this awayfrom heat or water to avoid sample temperature issues. 4. Do not place the device in such a place that it becomes difficult to operate. 3.2 CONNECTING THE POWER ADAPTOR 1. Connect one side of the power adaptor to the rear side of device and other to the power supply as shown in the figure below. -
Page 7: User Interface And Display
5. USER INTERFACE & DISPLAY 1. Display _..,.. __ .,._ ..-- )--_-+t ---r-:::"'���----;::::::::��� 2. Speed Button 3. Time Button -- -+--"'· 8. Preg Button ,.,._-+_.__ 7. Pulse Button .,_�� - +- - - & LED Decrement---t---t"'?"'r.-L.:..J 4. lncrement Button Button 6. - Page 8 6. REMOVING & INSTALLING DISC PLATE 6.2 INSTALLING DISC PLATE Follow the exact reverse process to insert back the disc plate. Below image shows the step bystep procedure to insert the disc plate back into the unit.
-
Page 9: Operation
7. OPERATION 7.1 POWERING THE DEVICE ON Power Power Adaptor Adaptor After connecting the power adaptor to back side of the device, switch the main power supply to "ON" & then switch the device on from the rear. Make sure that tu bes are loaded properly before use. - Page 10 7. OPERATION Set required speed and total run time before activating pulse mode to guide the device to start pulse mode operation for that particular speed and total run time. Once the speed and total run time are set, press "Pulse Button" to START pulse mode operation for that particular speed and total run time.
- Page 11 7. OPERATION ..Display shows Program and setting parameter values alternatively Press the "Program" button to select any program from "Pl to P9 . Programs can also be selected by pressing "increment or decrement" button. Once the desired program is selected, press the "speed button" to select and set speed value. Press "Time" to select and set time value.
- Page 12 7. OPERATION 0 B . � L±.; � ------ Press "START" button � 't}' to start Program Mode Operation To stop operation, pres s "Stop". M�J �o EJ,p\ L±.; 1� l!.J ----- Press "STOP" button to stop Program Mode Operation To leave Program mode, hold down the "Program"...
-
Page 13: Rem Oval Of Tu Bes From Disc Plate
was 23 mins. When the power returns, the will assume its operation from 25 mins with the set RPM 7. OPERATION POWER MODE The fucntion of this particular feature is that in case of power failure, equipment saves the SPEED, Tl ME and other details as set by the user. When the power returns, equipment runs for the remaining time left with cycle time of 5 mins. -
Page 14: Product Disposal
10. WARRANTY STATEMENT upon prompt notification in compliance with the following conditions : This warranty is valid only if the product is used for its intended purpose and within the guidelines specified in this instruction manual. This warranty does not cover damage caused by accident, neglect, misuse, improper service, natural forces or other causes not arising from defects in original material or workmanship. - Page 15 11. PRODUCT DISPOSAL The disposal of electrical devices is regulated within the European Community by national regulations based on EU Directive 2012/19/EU on waste electrical and electronic equipment (WEEE). According to these regulations, any devices supplied after 13.06.05 in the business to business sphere, to which this product is assigned, may no langer be disposed off in municipal or domestic waste.
- Page 16 Accumax Lab Devices Private Limited Plot No. 15, 16 & 32 GlDC Electronic Park SEZ, Seetor 26, Gandhinagar, Gujarat, lndia - 382026. www. n euation.com Website:...
Need help?
Do you have a question about the iROLL DR24 and is the answer not in the manual?
Questions and answers