Table of Contents
Advertisement
Quick Links
Advertisement
Table of Contents

Related Manuals for Neuation iFUGE M24PR


Summary of Contents for Neuation iFUGE M24PR
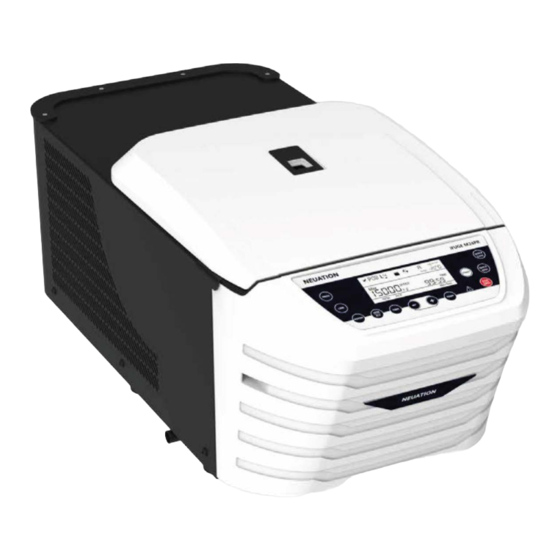
- Page 1 NEUATION iFUGE M24PR PRODUCT USER MANUAL...
-
Page 2: Table Of Contents
CONTENTS INTRODUCTION INTENDED USE SYMBOL FEATURES STANDARD ACCESSORIES TECHNICAL SPECIFICATIONS SAFET Y PRECAUTIONS INSTALLATION STANDARD PARTS USTING USER INTERFACE AND DISPLAY ROTOR INSTALLATION OPERATING THE CENTRIFUGE REMOTE OPERATION & PROGRAMMING MAINTENANCE AND CLEANING 15. TROUBLESHOOTING WARRANTY STATEMENT PRODUCT DISPOSAL 18. TRANSPORTATION & STORAGE... -
Page 3: Introduction
1. INTRODUCTION This manual provides important safety information for this centrifuge. lt should be kept near the centrifuge for quick & easy reference. This centrifuge is equipped with maintenance free brushless DC motor drive with microprocessor controlled that can speed up to 15,000 RPM and a safety feature of imbalance detection. This centrifuge °... -
Page 4: Technical Specifications
5. STANDARD ACCESSORIES • Adaptors for 0.4/0.5 ml tu bes • Adaptors for 0.1/0.2 ml tubes • Product user manual and warranty card • Power cord NOTE: Rotors has tobe ordered separately. (optional accessory) 6. T ECHNICAL SPECIFICAT IONS Motor Type Brushless DC Motor 24 x l.5/2ml tube, 44 x l.5/2ml tube, Rotor Capacity... -
Page 5: Safet Y Precautions
6. TECHNICAL SPECIFICATIONS Pollution Degree For indoor use only Environment Power Supply 230 VAC, S0Hz Power Consumption 650W Safety Fuse Rating lOAmp (* RCF varies for each rotor congregation -As mentioned in point no 11 (rotor Installation). 7. SAFET Y PRECA UTION S - --- --- --- ------ �... -
Page 6: Installation
6. TECHNICAL SPECIFICATIONS operator. • When moving the centrifuge from a cold room to a normal room, run the centrifuge for 30 minutes beforehand in the cold room to avoid condensation. Alternately, allow it to warm up in the lab for at least 3 hours before use, but do not plug in the centrifuge in order te prevent possible damage by condensation. -
Page 7: Standard Parts Usting
8. INSTALLATION ° ° 1. Ideal ambient temperature is 20 C ± S C, avoid placing the centrifuge in direct sunlight. 2. Keep clearance of at least 30-35 cm on both sides and at least 20 cm behind it to guarantee cooling efficiency. -
Page 8: User Interface And Display
10. USER INTERFACE & DISPLAY ■ �PDB L� � ROTOR ° Temp. 1cnnnSPEED TIME gg:sg 1 .=!UUUxg Min/Sec 10 9 ltem Name Function Press button to select SPEED value in rpm mode. And RPM/RCF press+/- key to set desired run RPM. Press and Hold to switch to RCF mode. - Page 9 10. USER INTERFACE & DISPLAY Ta set short spin an a set speed. Press short spin QUICK SPIN continues press for Quick spin operation. Ta select among multiple rotor listed below. ROTOR Rotor ° Temp. ., nn ns PEEO 1_11_ 1. '�UUUxg .J.J.L!L! Min/Sec...
-
Page 10: Rotor Installation
11. ROTOR I NSTALLATION ROTORS AND ACCESSORIES The table below shows rotors compatible with the centrifuge and the Max. RCF with different tu bes and adaptors. 1.5/2.0ml tubes 0.5ml Adaptor 0.1/0.2ml Adaptor PCR stri p rotor 0.2ml PCR strip 24 X 2ml rotor lstandard supplyl (Optional ! 0.1ml... - Page 11 11.ROTOR INSTALLATION 3. Put T-Allen Key into the r o t o r n u t a n d tur n clockwise to tighten and counter clockwise to loosen the rotor. 4. After properly fastening the rotor, place the rotor lid on the rotor lid nut by hand and rotate the rotor lid nutclockwise.
-
Page 12: Operating The Centrifuge
11.ROTOR INSTALLATION operation, load tu bes symmetrically & restart the centrifuge. 5. lncorrect method of loading tubes in centrifuge rotor: 12. OPERATING THE CENTRIFUGE STARTING THE CENTRIFUGE Panel a-:::llf-'C--- Fuse Box Power Cord ,...-- Power On/Off Switch After connecting the power cord, switch ON the power at the rear side of the centrifuge. -
Page 13: Remote Operation & Programming
13. REMOTE OPERATION & PROGRAMMING SWITCH ON THE CENTRIFUGE After connecting the power cord. Switch ON the main power supply & then Switch on the power switch located on the right side of the instrument. Make sure to check the rotor fitment before use. - Page 14 13. REMOTE OPERATION & PROGRAMMING QUICK COOL SETTING PRESS Quick Cool Key, indicated by (cubic rotation) on top right (lndication will be in dotted rotation in place of rotor digit indication). Du ring quick cool operation rpm: FIX 5000 & TEMP:-On set value. Press START button for centrifuge to start at FIX RPM &...
- Page 15 13. REMOTE OPERATION & PROGRAMMING Pressing the "STOP/OPEN BUTTON" will stop the operation. Once operation is stopped, press Button again to open the centrifuge lid. lf the time gets over, centrifuge will stop automatically. When the centrifuge is not running the symbol "...
- Page 16 13. REMOTE OPERATION & PROGRAMMING ■ �pni Tick ROTOR ° mark -2 0 Te mp . rnnn s P EED TIME 00,nn IUL!Llxg :J=.l•WW Mln/Sac The circle @ left to "P0l L3" will have a tick mark indicating that any one line of the specific program is filled.
-
Page 17: Maintenance And Cleaning
13. REMOTE OPERATION & PROGRAMMING off the centrifugation. The error "Err 55" will be shown on the display. First correct the imbalance load then switch OFF & switch it ON again. The values will be same as set before imbalance. The imbalance detection feature cannot be deactivated, as it is factory fitted. -
Page 18: Troubleshooting
14. MAINTENANCE AND CLEANING • After cleaning, ensure that all parts are dry before re-use. • Regularly cleaning of the rotor is important. • lf the rotor chamber needs cleaning, clean with cloth or sponge moistened with a neutral detergent solution. •... -
Page 19: Warranty Statement
15. TROUBLESHOOTING Temperature sensor Contact service representative. Error 44 failure. Turn off the centifuge, check Rotor stuck or incorrect roter fitment or apply correct Error 52 operating voltage. 230 VAC ± lOVAC operating voltage. restart unit Load roter symmetrically & Rotor not loaded Error 55 restart centrifuge. -
Page 20: Product Disposal
16. WARRANTY STATEMENT period of two (2) years from date of purchase. Your product will be duly repaired upon prompt notification in compliance with the following conditions: This warranty is valid only if the product is used for its intended purpose and within the guidelines specified in this instruction manual. -
Page 21: Transportation & Storage
17. PRODUCT DISPOSAL The disposal of electrical devices is regulated within the European Community by national regulations based an EU Directive 2012/19/EU an waste electrical and electronic equipment (WEEE). According to these regulations, any devices supplied after 13.06.05 in the business to business sphere, to which this product is assigned, may no langer be disposed off in municipal or domestic waste. - Page 22 Accumax Lab Devices Private Limited Plot No. 1S, 16 & 32 GIDC Electronic Park SEZ, Seetor 26, Gandhinagar, Gujarat, lndia - 382026. Website: www.neuation.com...
Need help?
Do you have a question about the iFUGE M24PR and is the answer not in the manual?
Questions and answers