Table of Contents
Advertisement
Quick Links
Advertisement
Table of Contents

Subscribe to Our Youtube Channel
Related Manuals for Neuation iFuge BL08 VT


Summary of Contents for Neuation iFuge BL08 VT
- Page 1 BL08 VT...
-
Page 3: Table Of Contents
User Guide Contents Standard Parts Listing Introduction Intended Use Features Specifications Standard Accessories Operating Conditions and Precautions Installation Operation 8-16 Care & Maintenance Warranty Statement 17-18 Product Disposal... -
Page 4: Standard Parts Listing
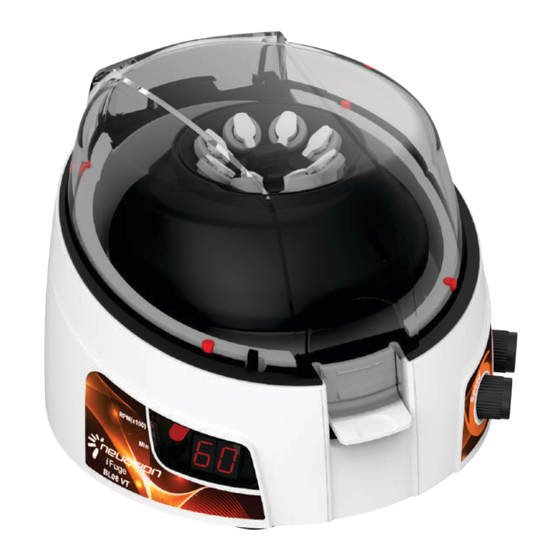
User Guide STANDARD PARTS PROTECTIVE LID ROTOR SAFETY SWITCH RELEASE BUTTON TIMER KNOB SPEED KNOB DISPLAY POWER ON/OFF SWITCH SOCKET NON SLIP RUBBER BASE... -
Page 5: Introduction
User Guide INTRODUCTION Congratulations! You are using long lasting brushless motor personal centrifuge. The smart microprocessor controlled variable speed and time personal Micro Centrifuge offers versatility, simplicity, safety and ease of usage in a single package. This product comes with unique features like imbalance detection & closed loop control. -
Page 6: Features
User Guide FEATURES BLDC MOTOR FRO MAINTENANCE FREE LONG LIFE C LOSED ROTOR LEADS TO LESSER FRICTION, REDUCING NOISE & HEAT GENERATION 8 POSITION MICRO TUBE ROTOR DIGITAL DISPLAY ALTERNATES BETWEEN SPEED AND TIME HIGHLY EFFICIENT & ACCURATE WITH ± 25 RPM ... -
Page 7: Specifications
User Guide SPECIFICATIONS MOTOR TYPE BLDC MOTOR MAXIMUM SPEED 6000 rpm SPEED TYPE Variable speed up to 6000 RPM SPEED ACCURACY ± 25 RPM MAX RCF 2000 x g SIZE (LxWxH) 162 x 157 x 116 mm WEIGHT 1.1 Kg ELECTRICAL 100 - 240 VAC, 50 / 60 Hz POWER CONSUMPTION... -
Page 8: Operating Conditions And Precautions
User Guide OPERATING CONDITIONS AND PRECAUTIONS personal Micro centrifuge is designed to be safe under the following conditions: For indoor use only. Ambient temperature of 4°C to 65°C. Main supply voltage fluctuations not to exceed +/- 10% of the nominal ... -
Page 9: Installation
User Guide INSTALLATION ON/OFF SWITCH POWER SOCKET NON SLIP RUBBER BASE The smart BLDC variable speed and time Micro Centrifuge is supplied in a Box. Open the Box, then gently remove centrifuge from Box and connect the power adaptor. The instruction manual and the accessories should be kept with the centrifuge. -
Page 10: Operation
User Guide OPERATING operate this personal Micro Centrifuge below steps should be followed:- 1. Switch ‘On’ the centrifuge from rear side so that display will show you the readings. ote : En Symbol indicates that Imbalance d etection feature is enabled. Load Rotor symmetrically... - Page 11 User Guide Balancing the Rotor PICTURE:-1 TO CENTRIFUGE 8 SAMPLES AT A TIME FILL 8 TEST TUBES EQUALLY. THEN INSERT T HEM INTOT HE HOLES OFT HE ROTOR A S SHOWN IN PICTURE 1. PICTURE:-2 TO CENTRIFUGE 4 SAMPLES AT A TIME FILL T HE TEST...
- Page 12 Balancing the Rotor PICTURE:- 4 TO CENTRIFUGE 2 SAMPLES AT AT IME FILL 2 TEST TUBES EQUALLY. THEN INSERT THEM INTO THE HOLES OF ROTOR IN OPPOSITE DIRECTION AS SHOWN IN PICTURE 4. POSITIONS CAN BE 1-5, 2-6, 3-7, 4-8. PICTURE:- 5 TO CENTRIFUGE 1 SAMPLE FILL A...
- Page 13 User Guide 0.2 ML 0.4 ML 0.5 ML 1.5 ML / 2.0 ML 1.5 ML / 2.0 ML 1.5 ML / 2.0 ML 1.5 ML / 2.0 ML PCR STRIP 8 DIFFERENT TYPES OF TEST TUBES CAN BE CENTRIFUGED BY USING TWO INTERCHANGEABLE ROTORS Interchangeable Rotor ROTOR_8 SLOT PCR ROTOR...
- Page 14 User Guide Changing the Rotor Sticker Mark Grub Screw To tighten Wrench Rotor To loosen Motor Shaft Insert Hexagonal Allen wrench into the marked hole provided on the side of the rotor. The grub screw is located at the bottom of the rotor on the marked si de.
- Page 15 User Guide Time & Speed Settings and Display Time control, Speed control display : The unit is equipped with a 0-25 minutes timer. By operating the timer knob one can set the desired time time indicator display cycle. time increments decrements will be in minutes and will show on display and indicator.
- Page 16 User Guide During the running of centrifuge the time and speed will be displayed alternatively accompanied by time indicator and speed indicator respectively . Quick spin function : By keeping the timer to infinity and speed to any suitable speed, one can open and close the lid to operate the centrifuge in quick spin function mode .
- Page 17 User Guide Speed Time User can activate and deactivate the unbalance detection in minor unbalace of the rotor by long pressing of the timer knob as shown in above picture. Unbalance Rotor When imbalance detection is activated & the centrifuge is running with an unbalanced rotor, (by not placing the weights on the rotor equally and symmetrically) it may lead to excessive vibrations resulting in damage to the...
-
Page 18: Care & Maintenance
User Guide Unbalance Indicator User action : Open the lid of centrifuge, correct the unbalanced load by various methods described in rotor loading part of the manual. Then close the lid of the centrifuge and `reset the centrifuge`. Resetting is done by switching off and again switching on the centrifuge by using the on/off switch located on the rear side of the centrifuge. -
Page 19: Warranty Statement
User Guide This products is warranted to be free from defects in material and workmanship for a period of one (1) year from date of purchase. Your product will be duly repaired upon prompt notification in compliance with the following conditions : This warranty is valid only if the product is used for its intended purpose and within the guidelines specified in this instruction manual. - Page 20 All items returned for service should be set postage prepaid in the original packaging or other suitable carton, added to avoid damage. This warranty is valid only if the warranty is registered with the supplier within 30 days from the date of purchase.
-
Page 21: Product Disposal
User Guide PRODUCT DISPOSAL...
Need help?
Do you have a question about the iFuge BL08 VT and is the answer not in the manual?
Questions and answers