Table of Contents
Advertisement
Quick Links
Advertisement
Table of Contents

Related Manuals for Neuation iFUGE D08


Summary of Contents for Neuation iFUGE D08
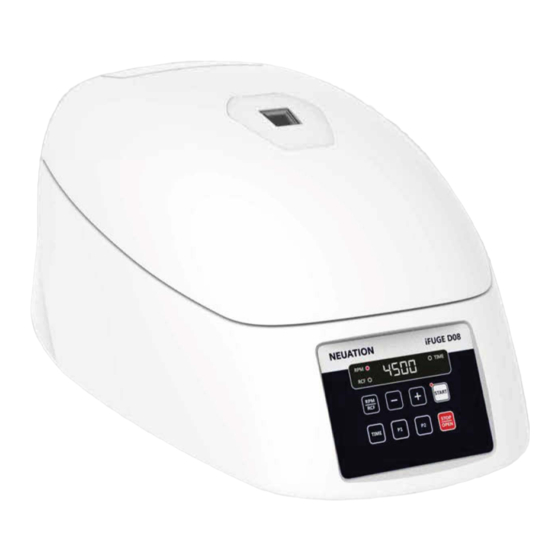
- Page 1 NEUATION iFUGE D08 PRODUCT USER MANUAL...
-
Page 2: Table Of Contents
TABLE OF CONTENTS lntroduction Intended Use Symbol Features Technical Specification Standard Accessories Installation Standard Parts Listing Reduction Adaptors 10. Rotor Installation 11. Balancing the Rotor 12. User Interface & Display 13. Operation 14. Safety Precaution 15. Maintenance & Cleaning 16. Troubleshooting 17. -
Page 3: Lntroduction
1. INTRODUCTION This manual provides important safety information for this centrifuge. lt should be kept near the centrifuge for quick & easy reference. This centrifuge is equipped with maintenance free brushless DC motor drive and a safety feature of imbalance detection. -
Page 4: Standard Accessories
5. T ECHNICAL SPECIFICATION Speed Accuracy ± 100 RPM ± 100 RPM Speed Steps Run time 1 to 99 mins & infinite mode Noise Level ::.62 dB (A) Ambient Temperature 5- 4 0 ·c Permissible Relative Humidity ::.80% Acceleration Time 35 ±... - Page 5 7. INSTALLATION 4. A single technician / lab personal should only be allowed near the centrifuge while its running. The following points are important forproper installation: Must be used on Fiat & Non - Slippery Surface , . V , . __,, _ (;')_, , _ Must have Clearance of 20 cm from all 4 sides...
-
Page 6: Standard Parts Listing
7. INSTALLATION 7.2 CONNECTING POWER ADAPTOR 1. Connect one slde of power adaptor to rear side of centrifuge and other to supply as shown in the figure below. 2. Rotate clockwise the adaptor nut to tighten the adaptor with the centrifuge. Ensure the power switch is OFF while connecting the power adaptor. -
Page 7: Reduction Adaptors
8. STANDARD PARTS USTING 4. Power switch 1. View window 5. Adapter port 2. Operation and setting buttons & Display 3. Emergency lid release Bottom View ------ Rubber Mount/ Base Mount 9. REDUCTION ADAPTORS This centrifuge features centrifugation for wide range of volumes from 5ml to 50ml with the combination of its adaptors. -
Page 8: Rotor Installation
10. ROTOR INSTALLATION ._ T - Allen Key ===;;;:==31 To Tighten Rotor Nut----... The rotor of the centrifuge is pre-installed. In case of any spillage, remove the rotor as shown in the above figure to clean the rotor and its chamber thoroughly. 10.1 REMOVING ROTOR 1. -
Page 9: User Interface & Display
11. BALANCING THE ROTOR cause serious damage to the centrifuge. The following are process of symmetrical loading of centrifuge tu bes inside the rotor. 2. The samples in the tubes should be of equal volume. To achieve a balanced condition of the 8 reduction adaptor are mandatory to place inside the rotor whether 2, 3, 4 or6 / 8 tubes are being used. -
Page 10: Operation
12. USER INTERFACE & DISPLAY ltem Name Function Press this button to select RPM value. Then Press"+/-" to set RPMvalue. Long press "RPM/RCF" to toggle between RPM/RCF value. Select the RCF value tobe set for centrifugation. Single press "START" button centrifuge will start as per set RPM START and TIME. - Page 11 13. OPERATION 13.1 SPEED SETTING After closing the centrifuge lid, press "RPM/RCF" button to select speed setting in RPM/RCF mode. Speed display will blink for 5 seconds. Now press(+) button to increase the speed value and press (-) button to decrease the speed value. Minimum and Maximum RPM of the centrifuge is 500 RPM to 4500 RPM respectively.
-
Page 12: Safety Precaution
13. OPERATION NOTE: In case of power failure once the rotor has stopped, pul/ out the emergency lid release as shown in the figure. This will open the centrifuge lid. 13.4 PROGRAM MODE Single press "P1" button to enter into program mode. and Press "RPM/RCF" Button to change in RPM/RCF in program mode. -
Page 13: Troubleshooting
15. MAINTENANCE & CLEANING 3. lf the device is contaminated, use a 70% IPA solution to decontaminate it. 4. Be careful to not scratch the surface of equipment when cleaning it. 5. Do not use a metal sponge. 6. The brushless motor in the centrifuge requires no routine maintenance. Any required service should be performed by authorized, qualified personnel only. -
Page 14: Warranty Statement
16. TROUBLESHOOTING Wait for the rotor to come to a Rotor is still spinning stop Centrifuge lid cannot be opened Emergency lid release after Power Failure rotor stop Load rotor symmetrically & Rotor not loaded sym metrica lly restart operation Centrifuge shakes Either a broken tube, during acceleration... -
Page 15: Product Disposal
17. WARRANTY STATEMENT distributor in weil packed and insured manner and all shipping charges must be paid. Some states do not allow limitation on the length of implied warranties or the exclusion or limitation of incidental or consequential damages. This warranty gives you specific legal rights. - Page 16 Accumax Lab Devices Private Limited Plot No. 15, 16 & 32 GIDC Electronic Park SEZ, Seetor 26, Gandhinagar, Gujarat, lndia - 382026. Website: www.neuation.com...
Need help?
Do you have a question about the iFUGE D08 and is the answer not in the manual?
Questions and answers