Table of Contents
Advertisement
Quick Links
Advertisement
Table of Contents

Related Manuals for Neuation iSWIX MV


Summary of Contents for Neuation iSWIX MV
- Page 1 MV PRODUCT USER MANUAL...
-
Page 3: Table Of Contents
TABLE OF CONTENTS PRODUCT DESCRIPTION........... Introduction Intended Use Features TECHNICAL SPECIFICATIONS........... ACCESSORIES 3. SAFETY PRECAUTIONS............4. INSTALLATION..............LOCATION CONNECTING THE POWER ADAPTOR 5. STANDARD PART LISTING..........6. USER INTERFACE & DISPLAY..........7. OPTION AL ATTACHMENTS &THEIR INSTALLMENT.. 8. OPERATION................CONNECTING THE POWER ADAPTOR SETTING SPEED SETTING TIME PULSE MODE PROGRAMMABLE PULSE MODE OPERATION MAINTENANCE & CLEANING.......... 11 10. TROUBLE SHOOTING............ 11 11. WARRANTY STATEMENT............ 12 12. PRODUCT DISPOSAL............ 13... -
Page 5: Product Description
1. PRODUCT DESCRIPTION INTRODUCTION This vortex mixer is designed for laboratory mixing. It assures the highest performance in terms of speed, reliability, precision and safety. The vortex mixer has a variable speed with digital control that allows low RPM start-up for gentle shaking and high speed mixing for vigorous vortexing of multiple samples. -
Page 6: Technical Specifications
2. TECHNICAL SPECIFICATIONS Motor Brushless DC Motor Orbital Diameter 4 mm Speed 300-2500 RPM Speed Accuracy ± 5% Time 1 to 999 minute & infinite Programmable Pulse Mode Platform Size 295 x 200 mm Dimensions (W x D x H) 400 x 249 x 440 mm Weight 17.6 kg IP Rating... -
Page 7: Installation
Do not the lift vortex mixer with the attachments Clean the unit with a damp cloth using a mild detergent only. Do not use chemical cleaning agents. If liquid is spilled on the unit, first disconnect unit from the external (main) power supply and then clean the unit with damp cloth. -
Page 8: Connecting The Power Adaptor
CONNECTING THE POWER ADAPTOR 1. Connect one side of power adaptor to rear side of Vortex and other to supply as shown in the figure below. 2. Rotate clockwise the adaptor nut to tighten the adaptor with the centrifuge. Ensure the power switch is OFF while connecting the power adaptor. -
Page 9: Standard Part Listing
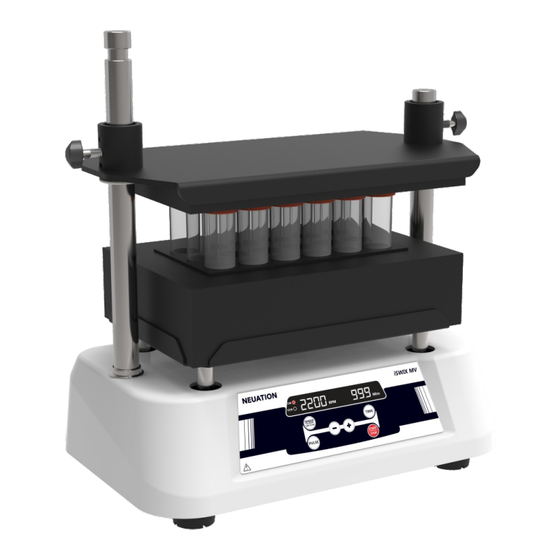
5. STANDARD PART LISTING Front Side Adjustable plate for holding tubes / flasks Knob for tightening/ loosening the lid Knob for tightening/ which holds loosening the lid tubes / flasks which holds tubes / flasks Control Panel Rubber Feet Back Side Power Adapter Port ON / OFF Switch... -
Page 10: User Interface & Display
6. USER INTERFACE & DISPLAY Mins SPEED TIME START PULSE STOP Name/Symbol Function LED shows the Clockwise motion and CW/CCW Counterclockwise motion Press SPEED button to select speed by Speed Increment / Decrement Press TIME button to select time by Time Increment / Decrement buttons Press PULSE button to activate pulse mode Pulse Press this button to increase the values of... -
Page 11: Option Al Attachments &Their Installment
7. OPTIONAL ATTACHMENTS & THEIR INSTALLATION There are 4 optional attachments that comes with this high capacity Multi-tube vortexer and is supplied with any chosen one. Their details and compatibility with respect to RPM is mentioned below in the table. Max. Max. Capacity Attachment Details Recommended Fill Recommended Speed 2500 RPM... - Page 12 Ÿ Next, place the foam attachment on the base and subsequently place the tubes / flasks on the foam. Make sure to place the tubes / flasks evenly on the foam. Ÿ Follow the exact reverse steps mentioned in Point 2 and Point 1 and make sure to firmly tight the knob.
-
Page 13: Operation
8. OPERATION CONNECTING THE POWER ADAPTOR After connecting the power adaptor, switch ON the power at the rear side of the Vortex mixer. Make sure to check the top lid is tightened firmly before use. If the lid isn’t tightened firmly, it may damage the tubes / flasks during operation. -
Page 14: Setting Time
Speed values are saved after blinking 5 times. SETTING TIME Press “Time” to select time value and use increment or decrement button to set run time. Run time for operation can be set between 1 minute to 999 minutes with incremental/decremental step of 1 minute. It can also be set for continuous or infinite mode indicated by ‘][’... -
Page 15: Maintenance & Cleaning
9. MAINTENANCE & CLEANING Always keep the vortex mixer & its accessories in a safe storage Ÿ location and clean periodically with moist cloth. After cleaning, ensure that all parts are dry before re-use Ensure that while cleaning the unit is not plugged in. Ÿ... -
Page 16: Warranty Statement
ERROR PROBLEM SOLUTION Last run memory not Switch on vortex immediately after Maintain 3 sec gap between display switching off. switch off and switch on. Switch off vortex and switch on the vortex again. If the error still System gets hung Electronics error. -
Page 17: Product Disposal
entertained. All items returned for service should be sent postage prepaid in the original packaging or other suitable carton, padded to avoid damage. We will not be responsible for damage incurred by improper packaging. All items returned for service should be set postage prepaid in the original packaging or other suitable carton, added to avoid damage. - Page 18 As disposal regulations within the EU may vary from country to country, please contact your supplier if necessary.
- Page 20 Accumax Lab Devices Private Limited Plot No. 15, 16 & 32 GIDC Electronic Park SEZ, Sector 26, Gandhinagar, Gujarat, India - 382026. Website: www.accumaxlab.com...
Need help?
Do you have a question about the iSWIX MV and is the answer not in the manual?
Questions and answers