Advertisement
Quick Links
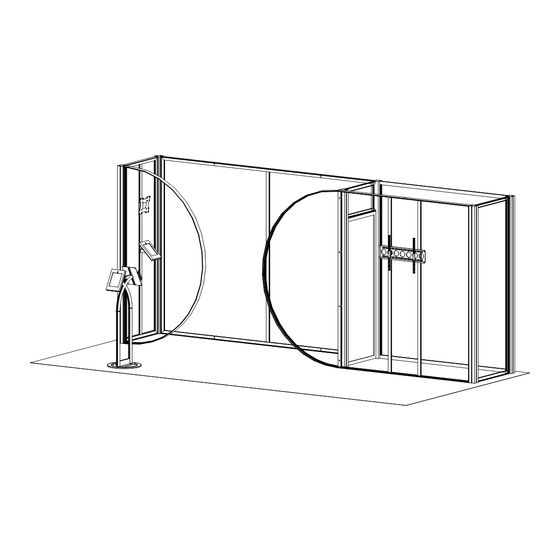
Step 1
Order #XXXXX -
VK-2957 - General Layout
866.652.2100
10'
Plan View
20'
Perspective View
WHEN DISASSEMBLING ALUMINUM EXTRUSION, TIGHTEN ALL
SETSCREWS AND LOCKS TO PREVENT LOSS DURING SHIPPING
© 2015
w w w . c l a s s i c e x h i b i t s . c o m
Page 1 of 7
Advertisement

Related Manuals for Classic Exhibits visionarydesigns VK-2957


Summary of Contents for Classic Exhibits visionarydesigns VK-2957
- Page 1 Step 1 Order #XXXXX - VK-2957 - General Layout 866.652.2100 10’ Plan View 20’ Perspective View WHEN DISASSEMBLING ALUMINUM EXTRUSION, TIGHTEN ALL SETSCREWS AND LOCKS TO PREVENT LOSS DURING SHIPPING © 2015 w w w . c l a s s i c e x h i b i t s . c o m Page 1 of 7...
- Page 2 Step 2 Order #XXXXX - General Information 866.652.2100 Using Your Setup Instructions The Visionary Designs Setup Instructions are created specifically for your Detail A configuration. They are laid out sequentially, including an exploded view of the entire display, and then a logical series of detailed steps to assemble the main structure and components.
- Page 3 Step 3 Order #XXXXX - General Information 866.652.2100 SEG Graphic Installation Graphic: To Ensure Proper Fit Graphic Removal Corner A Corner B Corner D Corner C Step 1 Step 2 Step 3 To remove the graphic from It is important to first insert graphic Repeat Step 1 for opposite corner Once all corners are inserted, press the frame, locate the fabric...
- Page 4 Step 1 Order #XXXXX - VK-2957 - Backwall Assembly 866.652.2100 Steps: Item Qty. Description Item Qty. Description 1) Connect vertical extrusion [6] to vertical [5]. 96”h Q914 Square Vertical Extrusion 92.417”h Z45 Vertical Extrusion Custom Cam Lock detail. 96”h Q914 Square Vertical Extrusion 7/7A 34”w TSP46 Horizontal Extrusion Repeat step for connecting verticals [3] &...
- Page 5 Step 2 Order #XXXXX - VK-2957 - Backwall Assembly Cont’d 866.652.2100 Item Qty. Description Steps: Steps Cont’d: 96”h Q914 Square Vertical Extrusion 1) Assemble TSP46 extrusions [9,9A,10,10A]. 5) Assemble TSP49 extrusions [25,25A,26,26A] 96”h Q914 Square Vertical Extrusion Corner Connections detail. Corner Connections detail.
- Page 6 Step 3 Order #XXXXX - VK-2957 - Large D-Frame Light Box Assembly 866.652.2100 Item Qty. Description TSP70 Connection Tighten 96”h TSP70 Vertical Extrusion screw 15/15A 42”w TSP70 Horizontal Extrusion 15B/15C 42”w TSP70 Horizontal Extrusion 150.79”h TSP70 Curved Extrusion 94.937”h Z45 Vertical Extrusion 94.937”h Z45 Vertical Extrusion w/ Holes Connect extrusions together with V4 connector piece and...
- Page 7 Step 4 Order #XXXXX - VK-2957 - Small D-Frame Light Box Assembly 866.652.2100 Item Qty. Description 96”h TSP70 Vertical Extrusion 29/29A 3”w TSP70 Horizontal Extrusion 150.7964”h TSP70 Curved Extrusion Steps: 1) Attach [29] & [29A] to vertical extrusion [28]. TSP70 w/ A1 L-Bracket Connection detail.
- Page 8 Step 5 Order #XXXXX - VK-2957 - Assembly of Assemblies 866.652.2100 Steps: Steps: 1) Connect assembled Large D-Frame to assembled backwall by 2) Connect assembled Small D-Frame to assembled backwall by using stand-off barrels & Caps. using stand-off caps. NOTE: Extrusion [18] will attach to extrusion [4]. TSP70 to Vertical Attachment detail.
- Page 9 Step 6 Order #XXXXX - VK-2957 - Wire Management 866.652.2100 Symbol Key LED Tape Lighting Photos & Details Steps: Super Bright Cord Flow Indicators 1) Connect power cords and DC adaptor cords to LED Tape Lighting. LED Tape Lighting Photos & Details detail.
- Page 10 Step 7 Order #XXXXX - VK-2957 - Pedestal Assembly 866.652.2100 Item Qty. Description Nuts Base Plate 10”w Z72 Horizontal Extrusion Mounting Plate iPad Clamshell Lock Square Clam Shell Plate Lock Lock Steps: 1) Slide infill between stand verticals as shown. 2) Attach horizontal [20] between stand verticals.
Need help?
Do you have a question about the visionarydesigns VK-2957 and is the answer not in the manual?
Questions and answers