Table of Contents

Subscribe to Our Youtube Channel
Related Manuals for Classic Exhibits visionary designs VK-1359


Summary of Contents for Classic Exhibits visionary designs VK-1359
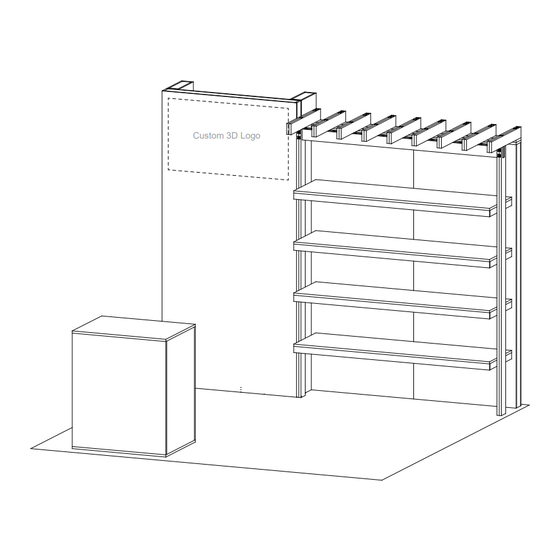
- Page 1 © 2023 Order #XXXXX VK-1359 - 10’ x 10’ Inline Display Custom 3D Logo 10’ 10’ Plan View SETUP INSTRUCTIONS If you would like to tell us about your experience with your setup instructions please email us at info@classicexhibits.com...
-
Page 2: Grid View
© 2023 Order #XXXXX Grid View = 1 sq foot... -
Page 3: General Setup Instructions
© 2023 Order #XXXXX General Information General Setup Instructions - Read entire setup instruction manual prior to WARNING unpacking parts and pieces. - The setup instructions are created specifically for this configuration. - Setup instructions are laid out sequentially in steps, including exploded views with detailed explanation for assembly. - Page 4 © 2023 Order #XXXXX Crate Packing CRATE PACKING Crate 1 of 1...
- Page 5 © 2023 Order #XXXXX Backwall Assembly Item Qty. Description Steps: 12”w x 95”h x 4”d Return Wall Panel 1) Assemble wall panels [A] thorugh [E] together as shown, using 46”w x 95”h x 4”d Wall Panel w/ dimensional logo roto cam locks. See Roto Cam Lock Connection detail.
- Page 6 © 2023 Order #XXXXX Pergola Assembly Item Qty. Description Steps: Pergola Ceiling Assembly 1) Attach Posts [F] & [G] to underside of Pergola Ceiling Assembly 2.5”w x 86.5”h Post using bolts as shown. 2.5”w x 86.5”h Post Pergola Ceiling Assembly (KEEP ASSEMBLED) Place Pergola Ceiling on floor, upside down.
- Page 7 © 2023 Order #XXXXX Pergola Attachment Steps: 1) Attach Pergola to top of backwall panels [D/E] using Bolt to T-Nut Connection. Bolt to T-Nut Connection bolt T-nut When assembled Step 3 of 6...
-
Page 8: Back View
© 2023 Order #XXXXX Shelf Attachment Item Qty. Description Steps: 66.938”w x 18”d Shelf w/ Z41 1) Insert outer extrusions through holes in backwall panels; 19.5”w Z41 Horizontal Extrusion secure with wing nuts on back side. See Extrusion Attachment detail. 2) Slide extrusions on underside of shelves into backwall, resting shelves on outer extrusions. -
Page 9: Underside View
© 2023 Order #XXXXX Shelf Attachment (cont’d) Steps: 1) Secure sides of shelves to posts [F,G] using Bolt to T-Nut Connection. 2) Connect power cords to LED Lights behind logo, under shelves & under pergola ceiling. Bolt to T-Nut Connection bolt T-nut Completed Assembly... - Page 10 © 2023 Order #XXXXX Reception Counter Steps: No assembly is required. BACK VIEW FRONT VIEW Step 6 of 6...
Need help?
Do you have a question about the visionary designs VK-1359 and is the answer not in the manual?
Questions and answers