
Related Manuals for Classic Exhibits Perfect 10 Helio


Summary of Contents for Classic Exhibits Perfect 10 Helio
- Page 1 Step 1 Order #xxxxx - p10 - Helio - General Layout 866.652.2100 10’ Plan View 10’ WHEN DISASSEMBLING TIGHTEN ALL KNOBS TO PREVENT LOSS DURING SHIPPING © 2008 w w w . c l a s s i c e x h i b i t s . c o m Page 1 of 6...
- Page 2 Step 1 Order #xxxxx - p10 - Helio - Backwall Assembly 866.652.2100 Part Number Description Left Leg Assembly w/ A10 Clamps Attached Middle Leg Assembly NOTE: When assembling horizontals they should Upper Curved Vertical w/ A10 Clamps Attached be placed approximately one inch from TOP and BOTTOM. Upper Curved Vertical Step 1 23”w Horizontal...
- Page 3 Step 2 Order #xxxxx - p10 - Helio - Backwall Assembly 866.652.2100 Part Number Description Right Leg Assembly w/ A10 Clamps Attached NOTE: When assembling horizontals they should be placed approximately one inch from TOP and BOTTOM. Upper Curved Vertical 69”w Horizontal w/ Hinge Facing UP Step 2 69”w Horizontal w/ Hinge Facing DOWN...
- Page 4 Step 3 Order #xxxxx - p10 - Helio - Wing and Blade Assembly 866.652.2100 Decorative Blade Attachment (if accidently removed) Slide A10 Clamp into groove of square extrusion. When desired location is found, tighten set screw to secure. Attach decorative wing and blades to A10’s attached to Set- Screw...
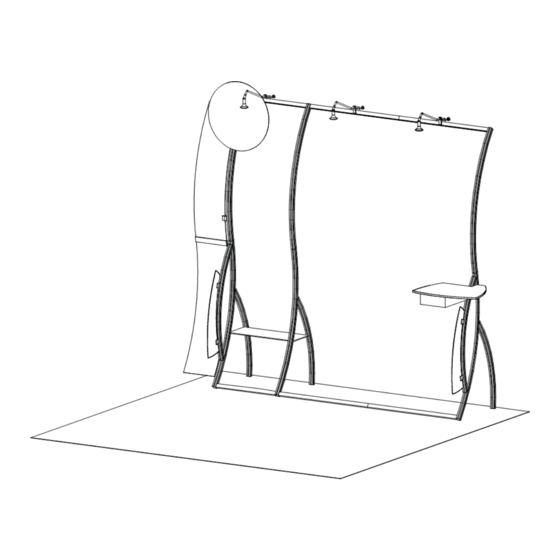
- Page 5 Step 4 Order #xxxxx - p10 - Helio - Header, Cubby and Shelf Placement 866.652.2100 Light Connection Accessary Attachment Attach Lights to Attach Header support to Backwall Backwall where then attach header to support by Velcroing it. desired and tighten in place.
- Page 6 Order #xxxxx - p10 - Case Packing - Case 1 of 2 866.652.2100 Case #1 - Backwall Components Top View of each Level Vertical Connection Bar Header Supports A10’s Attached A10’s Attached Wing Attachment Level 1 Level 2 Level 5 Level 4 Level 3 Cutout...
- Page 7 Order #xxxxx - p10 - Case Packing - Case 2 of 2 866.652.2100 Case #2 - Backwall Components Top View of each Level Backside Shelf Wings Cubby Level 2 Level 1 WHEN DISASSEMBLING TIGHTEN ALL KNOBS TO PREVENT LOSS DURING SHIPPING ©...
Need help?
Do you have a question about the Perfect 10 Helio and is the answer not in the manual?
Questions and answers