RGBlink mini-mx User Manual
Hide thumbs
Also See for mini-mx:
- User manual (82 pages) ,
- Quick start manual (32 pages) ,
- Quick start manual (19 pages)
Table of Contents
Advertisement
Quick Links
Advertisement
Table of Contents

Related Manuals for RGBlink mini-mx


Summary of Contents for RGBlink mini-mx
- Page 1 User Manual...
-
Page 2: Table Of Contents
2.4 Connect Microphone and External Monitoring Devices ........14 2.5 Connect USB for Streaming and Recording ............15 2.6 Connect Computer ....................16 2.7 Turn on Your mini-mx ..................16 © Xiamen RGBlink Science & Technology Co., Ltd. | support@rgblink.com | www.rgblink.com... - Page 3 5.1 Specification ......................41 5.2 FAQ ........................42 5.3 Upgrade ......................43 5.4 Terms & Definitions ...................46 5.5 Revision History ....................52 Chapter 6 Support ....................53 © Xiamen RGBlink Science & Technology Co., Ltd. | support@rgblink.com | www.rgblink.com Ph: +86 592 5771197...
-
Page 4: Declarations
RGBlink. If the purchaser or a third party carries out modifications or repairs on goods delivered by RGBlink, or if the goods are handled incorrectly, in particular if the systems are commissioned operated incorrectly or if, after the transfer of risks, the goods are subject to influences not agreed upon in the contract, all guarantee claims of the purchaser will be rendered invalid. -
Page 5: Operators Safety Summary
To protect users from electric shock, ensure that the chassis connects to earth via the ground wire provided in the AC power Cord. The AC Socket-outlet should be installed near the equipment and be easily accessible. © Xiamen RGBlink Science & Technology Co., Ltd. | support@rgblink.com | www.rgblink.com Ph: +86 592 5771197... - Page 6 The environment in which you install your product should be clean, properly lit, free from static, and have adequate power, ventilation, and space for all components. © Xiamen RGBlink Science & Technology Co., Ltd. | support@rgblink.com | www.rgblink.com Ph: +86 592 5771197...
-
Page 7: Chapter 1 Your Product
Chapter 1 Your Product 1.1 In the Box 1 x USB-C to USB-A 1 x Power Adapter 1 x USB-C to USB-C Cable Cable © Xiamen RGBlink Science & Technology Co., Ltd. | support@rgblink.com | www.rgblink.com Ph: +86 592 5771197... -
Page 8: Product Overview
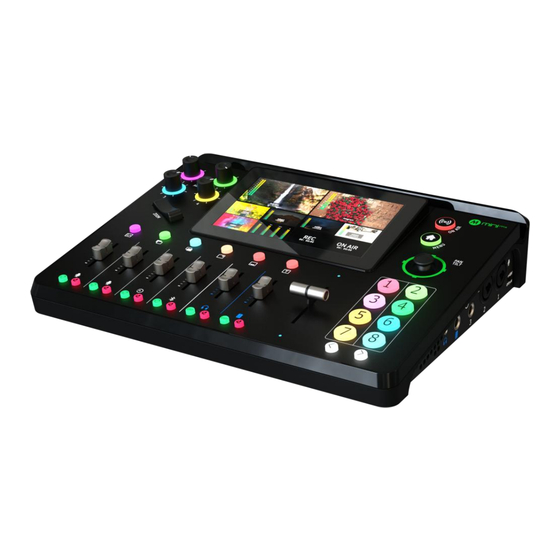
Mix to the max. The all-in-one mini-mx video enables accessible professional multi-source video productions with cameras, laptops and multiple audio sources. For live presentation and streaming, do it all with ease from the unique and fully featured mini-mx.. © Xiamen RGBlink Science & Technology Co., Ltd. -
Page 9: Key Features
● Save and store up to 16 scene presets. One-click for preset recall ● Control via computer and mobile phone ● Support Chroma Key ● One-key quick switch between portrait and landscape screen © Xiamen RGBlink Science & Technology Co., Ltd. | support@rgblink.com | www.rgblink.com Ph: +86 592 5771197... -
Page 10: Front Panel
● Long press to enter LAYOUT interface. ● Control audio volume level for each channel. ❹ Channel Fader ● Indicate MIC1、 MIC2、 Line-in、 Bluetooth、 PREVIEW、 PROGRAM from left © Xiamen RGBlink Science & Technology Co., Ltd. | support@rgblink.com | www.rgblink.com Ph: +86 592 5771197... - Page 11 ● Check streaming status on LCD screen: steady red shows ON AIR、 flashing ON AIR ⓬ red shows unstable network、unlit shows streaming is finished. ⓭ 5.5-inch Touch Screen For menu operation and multi-view window monitoring. © Xiamen RGBlink Science & Technology Co., Ltd. | support@rgblink.com | www.rgblink.com Ph: +86 592 5771197...
-
Page 12: Interface Panel
● Connect to HDMI video sources. HDMI 1~4 Inputs ❻ ● 4K resolution and downward compatible with all resolution. Locking Hole Use with T-lock to fix the device. ❼ © Xiamen RGBlink Science & Technology Co., Ltd. | support@rgblink.com | www.rgblink.com Ph: +86 592 5771197... -
Page 13: Dimension
Except condenser microphones that require phantom power, please Turn Off phantom power switch when connecting other devices. 1.2.4 Dimension Following is the dimension of mini-mx for your reference: 280.0mm x 222.6mm x 63.5m. © Xiamen RGBlink Science & Technology Co., Ltd. -
Page 14: Chapter 2 Install Your Product
Users can use any camera, computer or other HDMI device as the input source of the mini-mx. mini-mx supports up to 4 sources of different formats and resolutions at the same time via 4 HDMI ports, and 4 HDMI inputs support up to 4K@60Hz. If users are using interlaced signal, mini-mx supports de-interlace through HDMI 1 automatically. -
Page 15: Connect Hdmi Output
On the right panel of mini-mx, there are five audio jacks in total. mini-mx features THREE high-quality audio input jacks on the right panel, TWO of which adopt Neutrik jacks (MIC in 1 supports 48V phantom power). The other one adopts Line-in 6.35mm TRS jack, which can be directly connect to the mobile phone, computer and console. -
Page 16: Connect Usb For Streaming And Recording
Insert a U disk to the other USB 3.0 port labeled number 1 by USB 3.0 cable to perform recording. mini-mx supports recording streaming media content to an external USB storage device, such as U disk or SSD. The SSD storage can reach up to 2T, and the USB storage can support up to 64G. The supported format is exFAT. -
Page 17: Connect Computer
2.7 Turn on Your mini-mx After mini-mx is connected to power supply, push the power switch on the rear panel, the device will show mini-mx logo and then enter to the operation interface. © Xiamen RGBlink Science & Technology Co., Ltd. -
Page 18: Chapter 3 Use Your Product
After the above steps are completed, users can use mini-mx to do the following. 3.1 Preview Interface As shown below, once powering on mini-mx, the 5.5 inch display will show mini-mx logo and then come into the preview interface. Operator can refer to the description below. -
Page 19: Main Interface
● Check streaming duration. ❼ Streaming Status ● Long press to enter streaming setting interface. 3.2 Main Interface Push MENU button to enter main interface. © Xiamen RGBlink Science & Technology Co., Ltd. | support@rgblink.com | www.rgblink.com Ph: +86 592 5771197... - Page 20 ● 4 windows in the upper for HDMI 1~4 signal monitoring, use Button 1~4 to ❻Source or Preset Selection switch signal. ● 4 windows at the bottom for sources selection, use U disk to import sources. © Xiamen RGBlink Science & Technology Co., Ltd. | support@rgblink.com | www.rgblink.com Ph: +86 592 5771197...
-
Page 21: Menu
3.3 MENU There is a 5.5” touch screen on mini-mx operation board, through which most operation can be done. Push MENU button and the LCD screen will quickly return to the main menu interface. As shown in the figure above the UI style on the touch screen is similar to current smart phone operating interface. -
Page 22: Layout
3.5 Layout Tap【LAYOUT】or Button【2】to enter layout setting interface. Layout Setting RGBlink offers 7 layout options. Enter layout interface shown as follow and choose the layout needed. Layer Size and Position Setting After layout selection is completed, use the adjuster on the front panel to adjust layer size and the joystick to quickly adjust the position for more detailed adjustment. -
Page 23: Ptz Control
VISCA protocol and save the position and zoom information for quick calling. The PTZ preset of mini-mx not only saves the parameters of the PTZ, but also includes calling the camera, that is, when the VIEW of PTZ is loaded, the input is switched to the camera signal source at the same time. - Page 24 The IP address of mini-mx and camera controlled should be in the same LAN.) Example 2: Use mini-mx and switch to control FOUR cameras. 1) In order to check if IP address of mini-mx and the cameras are occupied, please use the ping command to analyze network connectivity.
- Page 25 1. If use network cable to directly connect to the device, mini-mx can only control one camera and only the IP address of this camera can be captured. 2. If devices are connected to same LAN, mini-mx can search IP address of all cameras in the LAN. Click icon to select the IP address of the camera to be controlled through the drop-down box.
- Page 26 Use the joystick or tap number to adjust speed. 13, 10, 7, 4, 1 is optional. Click icon to clear wrong settings so as to restore the set parameters to the default values. © Xiamen RGBlink Science & Technology Co., Ltd. | support@rgblink.com | www.rgblink.com Ph: +86 592 5771197...
-
Page 27: Scenes
3.7 Scenes mini-mx save presets to Scene in real time. If users want to quickly load current preset next time, just save it to corresponding View. The Scene will save all the currently set parameters including Layout, Chroma Key Setting, PTZ Presets, therefore when user needs to load a preset, push corresponding Scene for quick calling. -
Page 28: Audio
Scene in real time. 3.9 Audio mini-mx supports mixed output of multiple channels, and also allows user to check volume meter and set audio delay. Tap【AUDIO】or push Button【6】to enter the audio setting interface. - Page 29 Page Up/Down Click page up/down icon to enter different pages for more audio clip selection. ❻ Audio Clips ● Audio clip storage and playback area. © Xiamen RGBlink Science & Technology Co., Ltd. | support@rgblink.com | www.rgblink.com Ph: +86 592 5771197...
-
Page 30: Video Output
Default to be Multi-view preview, which can be switched to Program or 1~4 HDMI inputs for various applications. Users can return to main interface to check input source preview on the touch screen. © Xiamen RGBlink Science & Technology Co., Ltd. | support@rgblink.com | www.rgblink.com Ph: +86 592 5771197... - Page 31 Address in green filling bank indicates selected status. mini-mx supports streaming up to 4 platforms at the same time. Turn on Stream switch on this interface or push ON AIR button on the front panel to start streaming.
- Page 32 Then insert the SSD or USB storage into the USB 3.0 recording port. Warning: If the SSD could not be recognized when inserting into mini-mx,then use a dual USB cable to power the SSD. Tap Record in【OUTPUT】menu to enter recording configuration interface.
-
Page 33: Settings
If the SSD or USB disk is inserted, it can be captured automatically by mini-mx with the capacity and remaining minutes display. mini-mx supports settings of recording quality and format. Click recording switch to start/stop recording. The window in the left allows users to view the recording status, including disk info and remaining time for recording. - Page 34 Tap System in【SETTING】menu to enter the interface below. About Click About to check information about mini-mx. As shown in the figure below, users can view Device Name and SN serial number. Click Device Version to check current version and upgrade mini-mx.
- Page 35 Date & Time Click Date & Time to set time displayed in mini-mx. If the device is connected to the network, turn on automatic setting switch to synchronize the time. If the device is not connected to the network, users can set the time manually.
- Page 36 NET: Turn on NET to stream by using the hotspot of mobile phone. 1. For iOS system, please do as follows: 1) Connect mobile phone and USB port of mini-mx (with number 1 silkscreen) via a standard power cord. 2) Click “Settings” > Select “Personal Hotspot” > Enter “WLAN Password” > Turn on “Allow Others to Join”.
- Page 37 3) As shown in figures below, if the status changes from "Not Discoverable" to "Connection", it means that the mini-mx and the phone have achieved network sharing. 2. For Android system, please do as follows: 1) Connect mobile phone and USB port labeled number 1 via a standard power cord.
- Page 38 Click Mode to select T-Bar PVW Mode or CUT Mode. mini-mx defaults to T-Bar Mode. Users can also switch to CUT Mode by using Button 1~4 on the operation board to switch 4 HDMI inputs. The Button 1~4 corresponds to 4 HDMI inputs ©...
- Page 39 For some important occasions, users might need to preview and preset the next scene to ensure the accuracy and stability of the screen. mini-mx provides T-Bar PVW mode to allow switch after editing and confirmation. When PVW Mode is enabled, all operation could be checked on PVW window. Slide T-Bar to switch between PVW and PGM.
- Page 40 After successful connection of mini-mx and mobile phone, the interface will display the connected phones. Then play music via Bluetooth. In addition to above settings, users can also set Chinese, English or German as the interface language. mini-mx also supports setting T-Bar calibration and the overall brightness of LCD screen.
-
Page 41: Chapter 4 Ordering Codes
Chapter 4 Ordering Codes 4.1 Product Code 230-0004-01-0 mini-mx © Xiamen RGBlink Science & Technology Co., Ltd. | support@rgblink.com | www.rgblink.com Ph: +86 592 5771197... -
Page 42: Chapter 5 Appendix
FAT32( ≤ 32 GB) | exFAT(64GB~2T) Supported Standards HDMI H.265 ITU-T H.265/ ISO/IEC 23008-2 Power Compatibility USB Power Delivery (PD) 3.0 Supported Cables Certified USB PD Aware © Xiamen RGBlink Science & Technology Co., Ltd. | support@rgblink.com | www.rgblink.com Ph: +86 592 5771197... -
Page 43: Faq
4. mini-mx cannot control PTZ. A: Please make sure that the IP address of mini-mx and PTZ are in the same network segment. For example, the IP address of PTZ is 192.168.5.163. Please also set the IP address of mini-mx to 192.168.5.X ( (2~254) except163 Outside), confirm on mini XPOSE whether the Visca port number in the PTZ settings is the corresponding port number, for example, the Visca port number of the PTZ of RGBlink is 1259. -
Page 44: Upgrade
8. mini-mx HDMI input what kind of YUV. A:mini-mx supports 4:4:4,not supports 4:2:0. 9. When mini-mx input is i format signal will be half-screened or cut with the P format signal, the height of the P format will be cut. - Page 45 2) Dropbox https://www.dropbox.com/scl/fo/h8vbhed05btgwruhyiqrg/h?dl=0&rlkey=00qqa2wmtqe0987m5ulev9uxc Warning: 1.Do not power off during the upgrade process, otherwise mini-mx may be unable to enter the system after booting. 2.If the version is V1.0.27 and before, please upgrade the old version to V1.0.27 before upgrading the new version.
- Page 46 4)Synchronization for scene indicators 5)Synchronization for recording and streaming indicators 6)Add options for PVW input source 7)White virtual slider 8)Real-time IP address display 9)Background and LOGO © Xiamen RGBlink Science & Technology Co., Ltd. | support@rgblink.com | www.rgblink.com Ph: +86 592 5771197...
-
Page 47: Terms & Definitions
8 channels of audio, and control signals, over a single cable. ●HDMI 1.3: Released on June 22 2006, and increased the maximum TMDS clock to 340 MHz (10.2 Gbit/s). Support © Xiamen RGBlink Science & Technology Co., Ltd. | support@rgblink.com | www.rgblink.com... - Page 48 Terminates the end of an optical fiber, and enables quicker connection and disconnection than splicing. The connectors mechanically couple and align the cores of fibers so light can pass. 4 most common types © Xiamen RGBlink Science & Technology Co., Ltd. | support@rgblink.com | www.rgblink.com...
- Page 49 ●NTSC: The colour video standard used in North America and some other parts of the world created by the National Television Standards Committee in the 1950s. NTSC utilizes an interlaced video signals. © Xiamen RGBlink Science & Technology Co., Ltd. | support@rgblink.com | www.rgblink.com...
- Page 50 The protocol is used for establishing and controlling media sessions between end points. ●MPEG: Moving Picture Experts Group is a working group formed from ISO and IEC developing standards that allow © Xiamen RGBlink Science & Technology Co., Ltd. | support@rgblink.com | www.rgblink.com Ph: +86 592 5771197...
- Page 51 The less white in a colour, the truer the colour or the greater its saturation. Saturation is the amount of pigment in a colour, and not the intensity. © Xiamen RGBlink Science & Technology Co., Ltd. | support@rgblink.com | www.rgblink.com...
- Page 52 The source device will then output the provided EDID data, ensuring proper video image quality. © Xiamen RGBlink Science & Technology Co., Ltd. | support@rgblink.com | www.rgblink.com...
-
Page 53: Revision History
Update user interface Aster All information herein is Xiamen RGBlink Science & Technology Co Ltd. excepting noted. is a registered trademark of Xiamen RGBlink Science & Technology Co Ltd. While all efforts are made for accuracy at time of printing, we reserve the right to alter otherwise make change without notice. -
Page 54: Chapter 6 Support
Chapter 6 Support © Xiamen RGBlink Science & Technology Co., Ltd. | support@rgblink.com | www.rgblink.com Ph: +86 592 5771197...
Need help?
Do you have a question about the mini-mx and is the answer not in the manual?
Questions and answers