RGBlink mini-mx User Manual
Hide thumbs
Also See for mini-mx:
- User manual (82 pages) ,
- Quick start manual (32 pages) ,
- Quick start manual (18 pages)
Table of Contents
Advertisement
Quick Links
Advertisement
Table of Contents

Related Manuals for RGBlink mini-mx


Summary of Contents for RGBlink mini-mx
- Page 1 User Manual...
-
Page 2: Table Of Contents
2.3 Connect HDMI Output ...................13 2.4 Connect Microphone and External Monitoring Devices ......13 2.5 Connect USB for Streaming and Recording ..........14 2.6 Connect Computer ..................14 © Xiamen RGBlink Science & Technology Co., Ltd. | support@rgblink.com | www.rgblink.com Ph: +86 592 5771197... - Page 3 2.7 Turn on Your mini-mx ..................15 Chapter 3 Use Your Product ................16 3.1 Standby Interface ..................16 3.2 Touch Screen Operation ................17 3.3 Switch Effect Setting ..................18 3.4 PIP ........................19 3.5 PTZ ........................21 3.6 Scenes ......................22 3.7 Chroma Key ....................23 3.8 Audio .......................
-
Page 4: Declarations
RGBlink. If the purchaser or a third party carries out modifications or repairs on goods delivered by RGBlink, or if the goods are handled incorrectly, in particular if the systems are commissioned operated incorrectly or if, after the transfer of risks, the goods are subject to influences not agreed upon in the contract, all guarantee claims of the purchaser will be rendered invalid. -
Page 5: Operators Safety Summary
To protect users from electric shock, ensure that the chassis connects to earth via the ground wire provided in the AC power Cord. The AC Socket-outlet should be installed near the equipment and be easily accessible. © Xiamen RGBlink Science & Technology Co., Ltd. | support@rgblink.com | www.rgblink.com Ph: +86 592 5771197... - Page 6 The environment in which you install your product should be clean, properly lit, free from static, and have adequate power, ventilation, and space for all components. © Xiamen RGBlink Science & Technology Co., Ltd. | support@rgblink.com | www.rgblink.com Ph: +86 592 5771197...
-
Page 7: Chapter 1 Your Product
Chapter 1 Your Product 1.1 In the Box 1 x USB-C to USB-A 1 x Power Adapter 1 x USB-C to USB-C Cable Cable © Xiamen RGBlink Science & Technology Co., Ltd. | support@rgblink.com | www.rgblink.com Ph: +86 592 5771197... -
Page 8: Product Overview
Mix to the max. The all-in-one mini-mx video enables accessible professional multi-source video productions with cameras, laptops and multiple audio sources. For live presentation and streaming, do it all with ease from the unique and fully featured mini-mx.. © Xiamen RGBlink Science & Technology Co., Ltd. -
Page 9: Key Features
● Save and store up to 16 scene presets. One-click for preset recall ● Control via computer and software ● Support Chroma Key ● One-key quick switch between portrait and landscape screen © Xiamen RGBlink Science & Technology Co., Ltd. | support@rgblink.com | www.rgblink.com Ph: +86 592 5771197... -
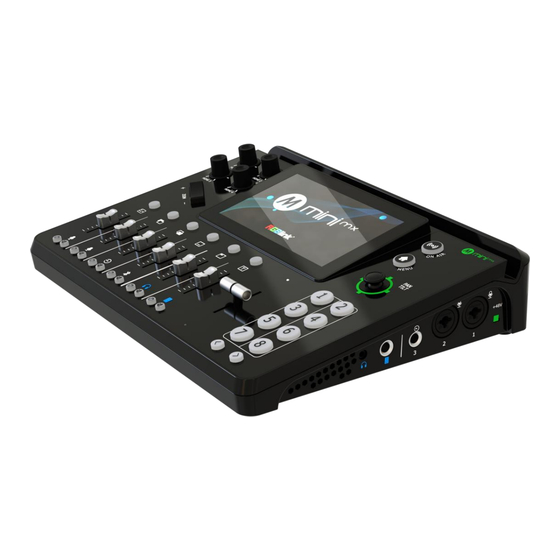
Page 10: Front Panel
● Adjust position of sub-picture when it is under position and scale adjustment. ● Press to return to the previous menu; press and hold to return to the main menu. MENU ● Button color adjustable. © Xiamen RGBlink Science & Technology Co., Ltd. | support@rgblink.com | www.rgblink.com Ph: +86 592 5771197... -
Page 11: Interface Panel
● Audio and video stream output port. UVC (WEBCAM) ● Connect mini-mx to a laptop for instant recognition as webcam for streaming or video conference. ● Insert SSD or U disk to USB 3.0 recording output interface for recording. USB-C ●... -
Page 12: Dimension
1.2.4 Dimension Following is the dimension of mini-mx for your reference: 280mm x 222.6mm x 63.5mm © Xiamen RGBlink Science & Technology Co., Ltd. | support@rgblink.com | www.rgblink.com Ph: +86 592 5771197... -
Page 13: Chapter 2 Install Your Product
Connect mini-mx to power plug by the link cable Note: The Power Supply included with mini-mx is the recommended power supply for use with the device. In the event the power supply is mislaid or otherwise not available, following needs should be met : 1.Support PD "Fast Charge"... -
Page 14: Connect Hdmi Output
2.4 Connect Microphone and External Monitoring Devices On the right panel of mini-mx, there are 5 Audio Ports, which includes 3 Audio IN Ports and 2 Audio OUT Ports. For Audio IN Ports, two input ports adopt XLR/TRS NUTRICK audio jack (one supports 48V Phantom Power Supply) ;... -
Page 15: Connect Usb For Streaming And Recording
Facebook, YouTube, Zoom, Twitter and other streaming media platform. Insert a U disk to the other USB 3.0 port (with number 1 silk screen) on mini-mx by USB 3.0 cable to perform recording. The SSD storage can reach up to 2T, and the USB storage can support up to 64G. -
Page 16: Turn On Your Mini-Mx
● Microsoft Windows 10 64-bit Note: 1. The IP address of the mini-mx must be in the same LAN as the computer. 2. Please use a switch with multiple ports for controlling of several cameras. 2.7 Turn on Your mini-mx After mini-mx is connected to power supply, push the power button on the rear panel, the device will enter to the boot interface and enter operation interface within 10S. -
Page 17: Chapter 3 Use Your Product
After the above steps are completed, you can use mini-mx to do the following. 3.1 Standby Interface As shown above, once powering on mini-mx, the 5.5 inch display will show mini-mx logo firstly and then come into the standby interface. Operator can refer to the description below. -
Page 18: Touch Screen Operation
●To Enter MENU, Return to Standby Interface, Page up and Page down. 3.2 Touch Screen Operation Touch Screen Introduction There is a 5.5” touch screen on mini-mx operation board, through which most operation can be done. Before introducing the operation of the touch screen, we need to introduce the button【MENU】, the MENU and back key. -
Page 19: Switch Effect Setting
There are T-Bar Mode and Fast Mode available. mini-mx defaults to T-Bar Mode. Users can also switch to Fast Mode by using buttons ①②③④ on the operation board to switch 4 HDMI inputs. The buttons ① ② ③ ④ on the operation board corresponds to the 4 HDMI inputs one-to-one. -
Page 20: Pip
If users need to use PIP, push button【MENU】to return to the main menu, then tap【PIP】icon or button【2】to enter the PIP setting interface. Users can also tap the layer used in Standby Interface for quick enter of PIP setting. © Xiamen RGBlink Science & Technology Co., Ltd. | support@rgblink.com | www.rgblink.com Ph: +86 592 5771197... - Page 21 If the layout【4】 is selected, use the adjuster to achieve a better view of the picture ratio. © Xiamen RGBlink Science & Technology Co., Ltd. | support@rgblink.com | www.rgblink.com Ph: +86 592 5771197...
-
Page 22: Ptz
The PTZ preset of mini-mx not only saves the parameters of the PTZ, but also includes calling the camera, that is, when the View of the PTZ is loaded, the input is switched to the camera signal source at the same time. -
Page 23: Scenes
3.6 Scenes mini-mx save presets to Scene in real time. If users want to quickly load current preset next time, © Xiamen RGBlink Science & Technology Co., Ltd. -
Page 24: Chroma Key
(2) mini-mx allows user to save 16 presets in total to the corresponding View 1-16. Click icon to return to previous page or enter the next page for preset selection. Click icon to form a static picture of the current PREVIEW scene and save it in the current scene. -
Page 25: Audio
Scene in real time. 3.8 Audio mini-mx supports mixed output of multiple channels, and also supports to check volume meter and set audio delay. Tap【Audio】or push button【6】to enter the audio setting interface. - Page 26 ●Configure audio delay for MIC 1 input to keep audio in sync with the video. MIC 1 Delay ●Range: 0~300mm, increase or reduce 10mm each time. © Xiamen RGBlink Science & Technology Co., Ltd. | support@rgblink.com | www.rgblink.com Ph: +86 592 5771197...
-
Page 27: Video Output
Push button 【 MENU】 to return to main menu and click Program in 【 Output 】interface to set parameters . Default to be Program, which can be changed to multi-view Preview or Test Pattern. © Xiamen RGBlink Science & Technology Co., Ltd. | support@rgblink.com | www.rgblink.com Ph: +86 592 5771197... - Page 28 In this interface, users can import RTMP address and set the delay time as needed. Record The mini-mx supports recording streaming media content to an external SSD or USB storage through the USB 3.0 interface. The SSD storage can reach up to 2T, and the USB storage can support up to 64G. The supported formats is exFAT.
-
Page 29: Settings
Then insert the SSD or USB storage into the USB 3.0 recording port. Note: If the SSD could not be recognized when inserting into mini-mx,then use a dual USB cable to power the After inserting the SSD or USB disk, tap Record in【Output】menu to enter recording configuration interface. - Page 30 System Tap System in【Setting】menu to enter the interface below. Click About to check information about mini-mx. As shown in the figure below, users can view Device Name and SN. Click Device Version to check current version and upgrade mini-mx. © Xiamen RGBlink Science & Technology Co., Ltd.
- Page 31 Click Auto PVW to switch this function on and set interval. Tap Reset to check current version of mini-mx and perform factory reset. Key Color Tap Key Color in【Setting】menu to adjust button color on the front panel. Users can set the color and whole brightness of keys as needed. After adjustment, click Confirm to complete settings.
- Page 32 In addition to above settings, users can also set Chinese, English or German as the interface language. mini-mx also supports setting T-Bar calibration and the overall brightness of LCD screen. © Xiamen RGBlink Science & Technology Co., Ltd. | support@rgblink.com | www.rgblink.com...
-
Page 33: Chapter 4 Ordering Codes
Chapter 4 Ordering Codes 4.1 Product Code 230-0004-01-0 mini-mx © Xiamen RGBlink Science & Technology Co., Ltd. | support@rgblink.com | www.rgblink.com Ph: +86 592 5771197... -
Page 34: Chapter 5 Appendix
FAT32( ≤ 32 GB) | exFAT(64GB~2T) Supported Standards HDMI H.265 ITU-T H.265/ ISO/IEC 23008-2 Power Compatibility USB Power Delivery (PD) 3.0 Supported Cables Certified USB PD Aware © Xiamen RGBlink Science & Technology Co., Ltd. | support@rgblink.com | www.rgblink.com Ph: +86 592 5771197... -
Page 35: Faq
4. mini-mx cannot control PTZ. A: Please make sure that the IP address of mini-mx and PTZ are in the same network segment. For example, the IP address of PTZ is 192.168.5.163. Please also set the IP address of mini-mx to 192.168.5.X ( (2~254) except163 Outside), confirm on mini XPOSE whether the Visca port number in the PTZ settings is the corresponding port number, for example, the Visca port number of the PTZ of RGBlink is 1259. -
Page 36: Terms & Definitions
8. mini-mx HDMI input what kind of YUV. A:mini-mx supports 4:4:4,not supports 4:2:0. 9. When mini-mx input is i format signal will be half-screened or cut with the P format signal, the height of the P format will be cut. - Page 37 1920 × 1080 at 120 Hz. Compared to HDMI 1.3, 3 more features added which are HDMI Ethernet Channel (HEC) , audio return channel (ARC),3D Over HDMI, a new Micro HDMI Connector, an expanded set of color spaces. © Xiamen RGBlink Science & Technology Co., Ltd. | support@rgblink.com | www.rgblink.com...
- Page 38 GBIC, and CATV. SC is one of the most popular options, as its simplicity in design comes along with great durability and affordable prices. © Xiamen RGBlink Science & Technology Co., Ltd. | support@rgblink.com | www.rgblink.com...
- Page 39 PAL TV set. PAL, is widely used in needed on a PAL TV set. PAL, is widely used in Western © Xiamen RGBlink Science & Technology Co., Ltd. | support@rgblink.com | www.rgblink.com Ph: +86 592 5771197...
- Page 40 ●H.264: Also known as AVC (Advanced Video Coding) or MPEG-4i is a common video compression standard. H.264 was standardized by the ITU-T Video Coding Experts Group (VCEG) together with the ISO/IEC JTC1 Moving Picture Experts © Xiamen RGBlink Science & Technology Co., Ltd. | support@rgblink.com | www.rgblink.com...
- Page 41 ●Frame: In interlaced video, a frame is one complete image.A video frame is made up of two fields, or two sets of © Xiamen RGBlink Science & Technology Co., Ltd. | support@rgblink.com | www.rgblink.com...
- Page 42 The source device will then output the provided EDID data, ensuring proper video image quality. © Xiamen RGBlink Science & Technology Co., Ltd. | support@rgblink.com | www.rgblink.com...
-
Page 43: Revision History
Release Aster All information herein is Xiamen RGBlink Science & Technology Co Ltd. excepting noted. is a registered trademark of Xiamen RGBlink Science & Technology Co Ltd. While all efforts are made for accuracy at time of printing, we reserve the right to alter otherwise make change without notice. -
Page 44: Chapter 6 Support
Chapter 6 Support © Xiamen RGBlink Science & Technology Co., Ltd. | support@rgblink.com | www.rgblink.com Ph: +86 592 5771197...
Need help?
Do you have a question about the mini-mx and is the answer not in the manual?
Questions and answers