RGBlink mini-mx Quick Start Manual
Streaming video mixer
Hide thumbs
Also See for mini-mx:
- User manual (82 pages) ,
- Quick start manual (22 pages) ,
- User manual (54 pages)
Table of Contents
Advertisement
Quick Links
Advertisement
Table of Contents

Related Manuals for RGBlink mini-mx


Summary of Contents for RGBlink mini-mx
- Page 1 Streaming Video Mixer Quick Start...
-
Page 2: Table Of Contents
Content Product Overview ............................3 Preview Interface ............................9 Main Interface ............................10 Getting Started with mini-mx ......................12 Plug in Power ............................12 Connect HDMI Input ..........................12 Connect HDMI Output .......................... 13 Connect Microphones and Other Devices ..................13 Connect Headphones and Speakers ....................14 Using mini-mx ............................ - Page 3 Streaming and Recording ........................28 Streaming ..............................28 Recording ..............................28 Upgrading mini-mx ..........................29 Updating Firmware ..........................29 Contact us ..............................31 Warranty ..............................31 www.rgblink.com...
-
Page 4: Product Overview
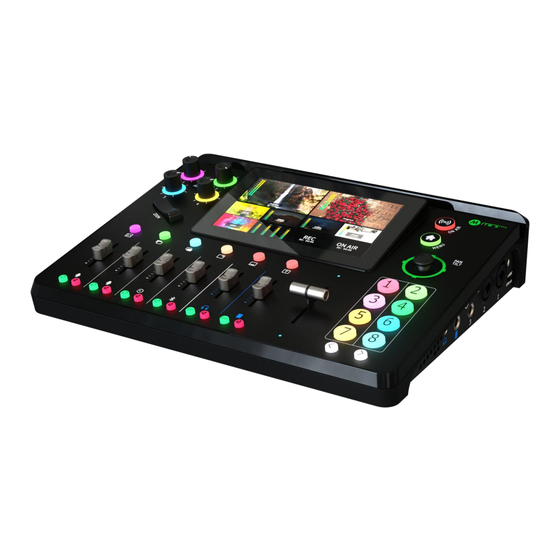
● 5-direction joystick for controlling up to 4 PTZ cameras ● Save and store up to 16 scene presets. One-click for preset recall ● Control via computer and mobile phone ● Support Chroma Key ● One-key quick switch between portrait and landscape screen www.rgblink.com... - Page 5 ● Layers are all closed by default. Press button to open. Layer Selection Buttons ❸ ● Button in green indicates editing state, button in blue indicates PVW state. ● To close opened layer, press button first, wait for button www.rgblink.com...
- Page 6 When the signal is being edited, the button illuminated green. ● Set pan, tilt and zoom for PTZ camera. 5-Direction Joystick ❿ ● Position adjustment for layer. ⓫ MENU Button ● Press to switch interface between Preview Interface 、Main www.rgblink.com...
- Page 7 ● Press to start or end streaming. ● Check streaming status on LCD screen: steady red shows ON ⓬ ON-AIR Button AIR、flashing red shows unstable network、unlit shows streaming is finished. ⓭ 5.5" HD Touchscreen For menu operation and multi-view window monitoring www.rgblink.com...
- Page 8 USB-C 3.0 Record Port ● Use with USB-C cable provided to share network with mobile phone. ❸ Ethernet Port For web streaming, PTZ control and firmware upgrade ❹ PROGRAM Output Port Default as Program Output, can set as Multi-view Preview or www.rgblink.com...
- Page 9 XLR/TRS NEUTRIK MIC IN Port with 48V Phantom Power MIC in 1 ⓮ supported. ● 48V Phantom Power supported. ⓯ +48V DIP Switch ● Defaults to OFF. Warning: Except condenser microphones that require phantom power, please Turn Off phantom power switch when connecting other devices. www.rgblink.com...
-
Page 10: Preview Interface
Audio Status Monitoring Bluetooth audio input. ● Tap to enter Audio Setting interface. Check recording duration. Long press to enter recording setting ❻ Recording Status interface. Check streaming duration. Long press to enter streaming setting ❼ Streaming Status interface. www.rgblink.com... -
Page 11: Main Interface
❸ PROGRAM Show PGM screen and audio meter. Check time, recording& streaming status, bit stream, disk ❹ Status Display capacity, recording duration. Enter Main Interface, Page Up, Page Down, Enter Setting ❺ Icons Interface. www.rgblink.com... - Page 12 ● Use Button 1~8 for selection. ● 4 windows in the upper for HDMI 1~4 signal Signal Monitor & Source Select monitoring, use Button 1~4 to switch signal. ❻ ● 4 windows at the bottom for sources selection, use U disk to import sources. www.rgblink.com...
-
Page 13: Getting Started With Mini-Mx
Getting Started with mini-mx Plug in Power Powering mini-mx RGBlink mini-mx is packaged with a PD power adapter (power cable included) , check the power supply standard used in your country/region before power connection. Push the power switch on the rear panel, the touch screen will enter the operation interface. -
Page 14: Connect Hdmi Output
Connect HDMI Output Connecting Monitors mini-mx features two HDMI output ports. Use HDMI cables to connect MULTI-VIEW and PROGRAM ports to a monitor so as to check PVW and PGM views in real time. Switch Window Display Program Port:Default as Program Output, can set as Multi-view Preview or Test Pattern optional Output by menu. -
Page 15: Connect Headphones And Speakers
Use mute button to mute that channel on the PGM output. Connect Headphones and Speakers Connecting Headphones mini-mx comes with TWO audio output jacks on the right panel, One adopts 3.5mm mini-jack, which can be directly connect to the headphone for audio monitoring. - Page 16 Therefore, power on speaker after connection, and power off it before unplugging. 2. MIC 2 supports access to wireless microphone with a 3.5mm female to 6.5mm male single-track adapter. LINE supports access to wireless microphone with a 3.5mm female to 6.5mm male dual-track adapter. www.rgblink.com...
-
Page 17: Using Mini-Mx
Using mini-mx Menu Entering Menu Push MENU button and the LCD screen will quickly enter menu. Menu Interface Eight functions are available in main menu, which include EFFECTS, LAYOUT, PTZ, SCENE, CHROMA KEY, AUDIO, OUTPUT and SETTING. Adding Background How to enter Background Interface... -
Page 18: Adding Layer A
Warning: Resolution of background source needs to be the SAME as the output resolution. Adding Layer A Turning on Layer A Push Layer A button on the front panel to edit the layer. This operation also simultaneously turns on layer A. www.rgblink.com... - Page 19 7 layout options available. Select required layout for Layer A and display it on the background. Adjusting Size and Position Use the adjuster on the front panel to adjust layer size and the joystick to quickly adjust the position for more detailed adjustment. www.rgblink.com...
-
Page 20: Adding Layer B
Push Layer B button on the front panel to edit the layer. This operation also simultaneously turns on layer B. Selecting Input Signal Tap HDMI 1~4 signal on the main interface or the 1~4 buttons on the front panel to select the input. www.rgblink.com... -
Page 21: Adding Caption
Importing and Adding Sources Insert a U disk into the USB port with number 1 silkscreen to import background sources. Touch "+" to add sources to the area on the right side, and long press the added source for deletion. www.rgblink.com... -
Page 22: Control Ptz Cameras
Use the joystick to quickly adjust the horizontal position and vertical position. Control PTZ Cameras Controlling PTZ mini-mx supports simultaneous control of up to four cameras. Warning: Please check if the port number of the controlled camera is set to 1259. If the port number is not 1259, please enter correct port number of controlled camera in the box. -
Page 23: Saving Scenes
LAN. Enter IP address of the camera in the following interface and then click "Confirm" to save. If devices are connected to same LAN, mini-mx can search IP address of all cameras in the LAN. Click icon to select the IP address of the camera to be controlled through the drop-down box. -
Page 24: Loading And Switching Scenes
Saving Scenes mini-mx allows user to save 16 presets in total to the corresponding View 1-16. Click icon to form a static picture of the current PREVIEW scene and save it in the current scene. Click icon to delete scenes no longer needed. - Page 25 T-Bar Mode PVW and PGM views can be transitioned by pushing T-bar. CUT Mode Use Button 1~4 on the operation board to switch 4 HDMI inputs. The Button 1~4 corresponds to the 4 HDMI inputs one-to-one. www.rgblink.com...
-
Page 26: Setting Up Channels And Outputs
HDMI inputs support embedded audio volume adjustment. Using the Physical and Virtual Faders mini-mx features four physical faders and eight virtual faders. The physical faders function like any other mixer: use the sliders to adjust the level for that channel. -
Page 27: Understanding The Audio Outputs
When“listen”function is triggered, the button on the front panel and icon on the audio setting will be illuminated green. Understanding the Audio Outputs Default Configuration mini-mx comes with two separate outputs, including one PGM Output and one Headphone Output. www.rgblink.com... - Page 28 Using the Physical and Virtual Faders mini-mx features two physical faders and two virtual faders. Same operations as described before: use the sliders to adjust the level for the output channel and the virtual fader position will be mirrored in real-time on audio setting interface.
-
Page 29: Streaming And Recording
Video Media Player software like OBS; mini-mx also supports network share with mobile phone. Connect mobile phone and USB port labeled number 1 via a standard power cord for streaming. Connecting LAN for Streaming Use the LAN port, users can live streaming directly to the live platform via IP address. -
Page 30: Upgrading Mini-Mx
USB disk. Steps Power on mini-mx and connect USB disk to USB-C port (with number 1 silkscreen) by an OTG cable. 2. Tap the Setting icon on Menu or Button 8, then ‘... - Page 31 3. Tap ‘Device Version’ , insert U disk with upgrade file to USB port labeled number, and mini-mx will automatically identify the file available. 4. Select file needed in‘Upgrade File ’and then tap ‘Upgrade’. Warning : DO NOT power off the device during upgrading.
-
Page 32: Contact Us
All products are designed and tested to the highest quality standard and backed by 1 year parts and labor warranty. Warranties are effective upon delivery date to customer and are non-transferable. RGBlink warranties are only valid to the original purchase/owner. Warranty related repairs include parts and labor, but do not include...
Need help?
Do you have a question about the mini-mx and is the answer not in the manual?
Questions and answers