RGBlink mini-mx Quick Start Manual
Streaming video mixer
Hide thumbs
Also See for mini-mx:
- User manual (82 pages) ,
- Quick start manual (32 pages) ,
- User manual (54 pages)
Table of Contents
Advertisement
Quick Links
Advertisement
Table of Contents

Related Manuals for RGBlink mini-mx


Summary of Contents for RGBlink mini-mx
- Page 1 Streaming Video Mixer Quick Start...
-
Page 2: Table Of Contents
Content Product Overview .......................... 1 Key Features ..........................1 Front Panel ..........................2 Interface Panel ........................4 Using mini-mx ..........................6 Adding Background ......................6 Adding Layer A ........................7 Adding Layer B ........................9 Adding Logo ......................... 10 Controlling PTZ Cameras ....................11 Saving Scenes ........................ -
Page 3: Product Overview
● Save and store up to 16 scene presets. One-click for preset recall ● Support Chroma Key ● One-key quick switch between portrait and landscape screen ● Support web control, compatible with mobile devices and computers, compatible with multiple operating systems www.rgblink.com... -
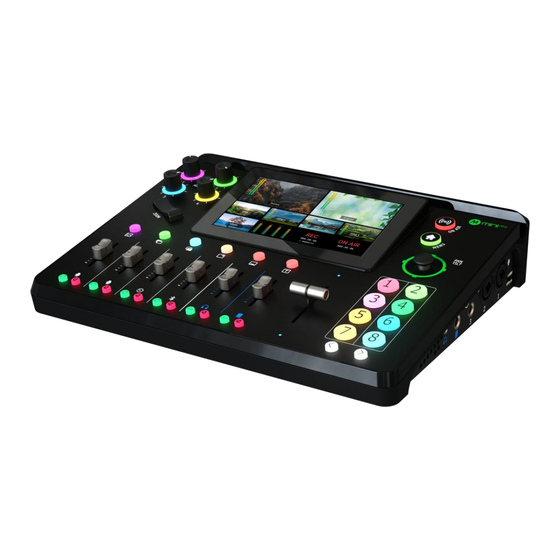
Page 4: Front Panel
Press button illuminated blue again to close the opened layer. Press and hold for 2 seconds to enter LAYOUT interface. Control audio volume level for each channel. ❹ Channel Fader Indicate MIC1、 MIC2、 Line-in、 Bluetooth、 PREVIEW、 PROGRAM from left to right. www.rgblink.com... - Page 5 Press to start or end streaming. Check streaming status on LCD screen: steady red shows ON ⓬ ON-AIR Button AIR, flashing red shows unstable network, unlit indicates streaming is finished. ⓭ 5.5" HD Touchscreen For menu operation and multi-view window monitoring. www.rgblink.com...
-
Page 6: Interface Panel
Preview or Test Pattern. Default as multi-view preview output, can set as Program or ❺ MULTI-VIEW Output Port HDMI 1~4. ❻ HDMI 1~4 Inputs 4K resolution and downward compatible with all resolution. ❼ Locking Hole Use with T-lock to fix the device. www.rgblink.com... - Page 7 XLR/TRS NEUTRIK MIC IN Port with 48V Phantom Power ⓮ MIC in 1 supported. 48V Phantom Power supported. ⓯ +48V DIP Switch Defaults to OFF. Warning: Except condenser microphones that require phantom power, please Turn Off phantom power switch when connecting other devices. www.rgblink.com...
-
Page 8: Using Mini-Mx
Using mini-mx Adding Background Inserting a U Disk Insert a U disk into the USB port labeled number 1 to import background sources. How to enter Background Interface Tap BACKGROUND in Layer Selection Area or Source Selection Area can quickly enter background interface. -
Page 9: Adding Layer A
Adding Layer A Turning on Layer A Push Layer A button on the front panel to edit the layer. This operation also simultaneously enables Layer A. Selecting Input Signal Push 1~4 buttons on the front panel to select the input. www.rgblink.com... - Page 10 You can also enter LAYOUT interface by pressing and holding any button on Layer Selection Area. 7 layout options available. Select required layout for Layer A and display it on the background. Layer Scaling and Cropping Tap Option 8 to set more specific parameters. www.rgblink.com...
-
Page 11: Adding Layer B
KEY】in Menu or push Button 5 to enter the Chroma Key interface. Chroma Key switch defaults to OFF. Turn on Chroma Key to perform matting on Layer B. Warning: Enabling Chroma Key defaults to perform matting on Layer B. www.rgblink.com... -
Page 12: Adding Logo
Warning: 1. No space and symbols in picture name. 2. png format (32-bit depth), resolution within 1920x1080, subject to the actual output resolution. Turning on Logo Push Logo button on the front panel to enable it. www.rgblink.com... -
Page 13: Controlling Ptz Cameras
Use the joystick to quickly adjust the horizontal position and vertical position. Controlling PTZ Cameras Controlling PTZ mini-mx supports simultaneous control of up to four cameras. Warning: Please check if the port number of the controlled camera is set to 1259. If the port number is not 1259, please enter correct port number of controlled camera in the box. -
Page 14: Saving Scenes
Enter IP address of the camera in the following interface and then click "Enter" to save. Capturing IP Address Automatically If devices are connected to same LAN, mini-mx can search current IP address and IP address set before of all cameras in the LAN. -
Page 15: Loading And Switching Scenes
Saving Scenes mini-mx allows user to save 16 presets in total to the corresponding View 1-16. Click icon to form a static picture of the current PREVIEW scene and save it in the current scene. Click icon to delete scenes no longer needed. - Page 16 T-Bar Mode Preview and Program views can be transitioned by pushing T-bar. CUT Mode Use Button 1~4 on the operation board to switch 4 HDMI inputs. The Button 1~4 corresponds to the 4 HDMI inputs one-to-one. www.rgblink.com...
-
Page 17: Setting Up Channels And Outputs
HDMI inputs support embedded audio volume adjustment. Using the Physical and Virtual Faders mini-mx features four physical faders and eight virtual faders. The physical faders function like any other mixer: use the sliders to adjust the level for that channel. -
Page 18: Understanding The Audio Outputs
When“listen”function is triggered, the button on the front panel and icon on the audio setting will be illuminated green. Understanding the Audio Outputs Default Configuration mini-mx comes with two separate outputs, including one Headphone Output and one Program Output. www.rgblink.com... - Page 19 Using the Physical and Virtual Faders mini-mx features two physical faders and two virtual faders. Same operations as described before: use the sliders to adjust the level for the output channel and the virtual fader position will be mirrored in real-time on audio setting interface.
-
Page 20: Streaming And Recording
Choose correct network mode when using local network for streaming. (Tap the Setting icon on Menu or Button 8, then‘Network’ >‘Network Mode’ > ‘Cable’) Recording Connecting a USB Storage Device mini-mx supports recording streaming media content to an external USB storage device, such as U disk or SSD, through the USB port labeled number 1. - Page 21 Xiamen RGBlink Science & Technology Co Ltd. ● Tel: +86-592-5771197 ● Fax: +86-592-5788216 ● Customer Hotline: 4008-592-315 ● Web: http://www.rgblink.com ● E-mail:support@rgblink.com ● Headquarter: Room 601A, No. 37-3 Banshang community, Building 3, Xinke Plaza, Torch Hi-Tech Industrial Development Zone, Xiamen, China...
Need help?
Do you have a question about the mini-mx and is the answer not in the manual?
Questions and answers