
Subscribe to Our Youtube Channel
Related Manuals for PLANEPRINT paper plane


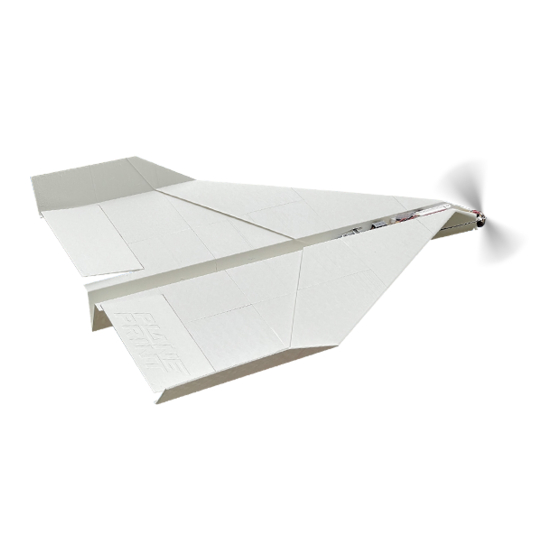
Summary of Contents for PLANEPRINT paper plane
- Page 1 NOTE: Slicing works best the ONLY place where you can get with CURA! original Planeprint STL fi les legally!
- Page 2 LW-PLA LW-PLA PAPER PLANE PRINTING & ASSEMBLING MANUAL © PLANEPRINT...
- Page 3 • Carbon rod Ø1.5*1000mm, 1 piece • Rod connection 2mm, 6 pieces • Self adhesive velcro tape Tapping screws 2mm Tools Cutter knife, small Philips screwdriver, Sandpaper, Needle nose pliers Rod connection hole 2mm PAPER PLANE PRINTING & ASSEMBLING MANUAL © PLANEPRINT...
- Page 4 This manual is constantly being improved and supplemented, we recommend downloading the latest version from our website before building. To print all PLANEPRINT models you need to set some basic profiles in Cura (If you use another slicer, please set the same parameters).
-
Page 5: Additional Settings
Please note the additional settings for the individual parts! P1_Interconnects_pp.stl MATERIAL PLA, Weight: ~ 3 g ADDITIONAL SETTINGS None required P1_Motor mount_pp.stl MATERIAL PLA, Weight: ~ 5 g ADDITIONAL SETTINGS None required PAPER PLANE PRINTING & ASSEMBLING MANUAL © PLANEPRINT... - Page 6 Please note the additional settings for the individual parts! P1_Parts_pp.stl MATERIAL PLA, Weight: ~ 2 g ADDITIONAL SETTINGS None required P1_Servo mount_pp.stl MATERIAL PLA, Weight: ~ 3 g ADDITIONAL SETTINGS None required PAPER PLANE PRINTING & ASSEMBLING MANUAL © PLANEPRINT...
- Page 7 PLA, Weight: ~ 3 g ADDITIONAL SETTINGS None required You can optionally use the spinner to increase the tension of the rubber band for the prop. Try which spinner fi ts better on your prop. PAPER PLANE PRINTING & ASSEMBLING MANUAL © PLANEPRINT...
- Page 8 The following parts should be sliced with the PROFILE P4_Flex. Please note the additional settings for the individual parts! P4_TPU-Parts_pp.stl MATERIAL TPU A95, Weight: ~ 2 g ADDITIONAL SETTINGS • Infi ll Density: 100 % PAPER PLANE PRINTING & ASSEMBLING MANUAL © PLANEPRINT...
- Page 9 P5_Aileron L_pp.stl MATERIAL LW-PLA, ~ 11 g* *Weighed (approximate guideline) ADDITIONAL SETTINGS None required P5_Aileron R_pp.stl MATERIAL LW-PLA, ~ 11 g* *Weighed (approximate guideline) ADDITIONAL SETTINGS None required PAPER PLANE PRINTING & ASSEMBLING MANUAL © PLANEPRINT...
- Page 10 *Weighed (approximate guideline) ADDITIONAL SETTINGS • Wall Line Count: 2 P5_Delta 2 L_pp.stl MATERIAL LW-PLA, ~ 17 g* *Weighed (approximate guideline) ADDITIONAL SETTINGS None required Remove support. Please be careful with the knife! PAPER PLANE PRINTING & ASSEMBLING MANUAL © PLANEPRINT...
- Page 11 None required Remove support. Remove support. Please be careful with the knife! Please be careful with the knife! P5_Delta 3 L_pp.stl MATERIAL LW-PLA, ~ 18 g* *Weighed (approximate guideline) ADDITIONAL SETTINGS None required PAPER PLANE PRINTING & ASSEMBLING MANUAL © PLANEPRINT...
- Page 12 P5_Delta 3 M_pp.stl MATERIAL LW-PLA, ~ 40 g* *Weighed (approximate guideline) ADDITIONAL SETTINGS None required P5_Delta 3 R_pp.stl MATERIAL LW-PLA, ~ 18 g* *Weighed (approximate guideline) ADDITIONAL SETTINGS None required PAPER PLANE PRINTING & ASSEMBLING MANUAL © PLANEPRINT...
- Page 13 P5_Delta 4 L_pp.stl MATERIAL LW-PLA, ~ 17 g* *Weighed (approximate guideline) ADDITIONAL SETTINGS None required P5_Delta 4 M_pp.stl MATERIAL LW-PLA, ~ 29 g* *Weighed (approximate guideline) ADDITIONAL SETTINGS None required PAPER PLANE PRINTING & ASSEMBLING MANUAL © PLANEPRINT...
- Page 14 Basic settings for LW-PLA: Please follow the instructions in our WINGTEST AND CALIBRATION TOOL on our website for correct adjustment! P5_Delta 4 R_pp.stl MATERIAL LW-PLA, ~ 17 g* *Weighed (approximate guideline) ADDITIONAL SETTINGS None required PAPER PLANE PRINTING & ASSEMBLING MANUAL © PLANEPRINT...
-
Page 15: Basic Information
The remaining top surface is about 1 mm thick. To compensate for this, you can move the new part to be printed down the Z axis in Cura by 1 mm. Glue joint Broken part Glue joint PAPER PLANE PRINTING & ASSEMBLING MANUAL © PLANEPRINT... - Page 16 CA glue on the hinge. Wait again for the glue to run in, and then spray the activator on it. Do not use too much glue, the Ailerons must move easily! PAPER PLANE PRINTING & ASSEMBLING MANUAL © PLANEPRINT...
- Page 17 Delta assembly Delta assembly P5_Delta 3 R_pp.stl medium liquid medium liquid P5_Delta 3 M_pp.stl STEP 1 P5_Delta 3 L_pp.stl STEP 2 P5_Delta 2 L_pp.stl P5_Delta 1_pp.stl P5_Delta 2 R_pp.stl PAPER PLANE PRINTING & ASSEMBLING MANUAL © PLANEPRINT...
-
Page 18: Servo Mount
P1_Servo mount_pp.stl too high, you can print them in Cura at the appropriate height by changing the dimension for the Z-axis. If the servos are tight, you can mount the servo arms. PAPER PLANE PRINTING & ASSEMBLING MANUAL © PLANEPRINT... - Page 19 Servo mount Ailerons Rod connection P1_Parts_pp.stl P1_Parts_pp.stl Carbon rods Ø1.5 mm Rod connection PAPER PLANE PRINTING & ASSEMBLING MANUAL © PLANEPRINT...
-
Page 20: Motor Mount
You only need this part if the rubber band is too loose. P4_TPU-Parts_pp.stl Carbon rod Ø1.5 mm Rod connection P1_Spinner_pp.stl The TPU part comes between the motor and motor mount to protect the PLA from heat. PAPER PLANE PRINTING & ASSEMBLING MANUAL © PLANEPRINT... - Page 21 RC Components Use self-adhesive Velcro tape to attach the battery. Battery Controller Reiceiver Storage To avoid deformation, we recommend storing the model upside down on a fi lament box or similar. PAPER PLANE PRINTING & ASSEMBLING MANUAL © PLANEPRINT...
-
Page 22: Technical Specifications
Do not forget to check if the wings are exactly in ballance in the roll axis. If one wing is heavier, correct this with a small weight on the wingtip. correct this with a small weight on the wingtip. PAPER PLANE PRINTING & ASSEMBLING MANUAL © PLANEPRINT... -
Page 23: Control Direction Test
The flight characteristics are very similar to a airplane with the separate functions Rudder and real paper airplane. It is very wobbly around the Aileron, mixing these functions (Combi Switch) makes longitudinal axis, but flies stable overall. PAPER PLANE PRINTING & ASSEMBLING MANUAL © PLANEPRINT... -
Page 24: Age Recommendation
3D printing Always keep the transmitter switched on when the model will not be replaced by PLANEPRINT.com in any way. is switched on. When operating, always keep a safe distance from your Always remove the battery before disassembling the model.
Need help?
Do you have a question about the paper plane and is the answer not in the manual?
Questions and answers