Table of Contents
Advertisement
Quick Links
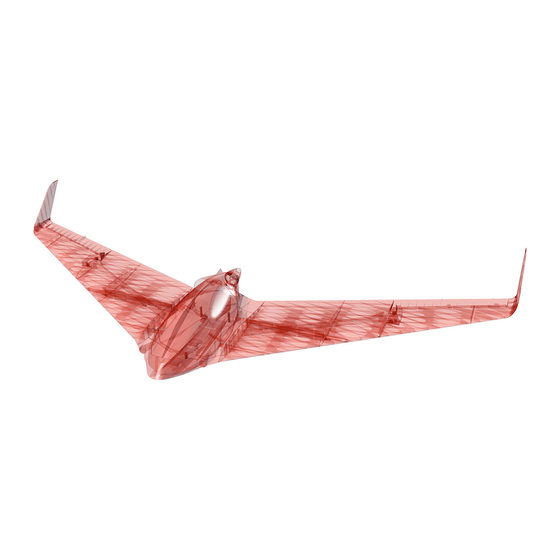
Planeprint V-TURN
• Our fi rst self designed wing in 3D super lightweight construction.
• Real 1 wall construction (Currently only supported by CURA!).
• Wingspan 1400 mm (55 inches).
V1.3 2020
WATCH OUT!
This 3D print model
is specially optimized
for CURA.
STL DATA FOR DOWNLOADING
www.planeprint.com
AT
EN
EN
Advertisement
Table of Contents

Related Manuals for PLANEPRINT V-TURN


Summary of Contents for PLANEPRINT V-TURN
- Page 1 Planeprint V-TURN • Our fi rst self designed wing in 3D super lightweight construction. • Real 1 wall construction (Currently only supported by CURA!). • Wingspan 1400 mm (55 inches). WATCH OUT! STL DATA FOR DOWNLOADING This 3D print model is specially optimized www.planeprint.com...
- Page 2 Our STL files are provided with indelible copyright water- marks that can be verified at any time. Thank you for your understanding and have fun with your PLANEPRINT MODEL! V-TURN PRINTING & CONSTRUCTION MANUAL...
- Page 3 PRINTING MANUAL V-TURN PRINTING & CONSTRUCTION MANUAL © PLANEPRINT...
-
Page 4: Additional Settings
Interconnects_profi le1.stl Material: PLA Weight: ~ 2 g ADDITIONAL SETTINGS • Use transparent PLA, then they are not visible INFO STL: Motorframe_profi le1.stl Material: PLA Weight: ~ 5 g ADDITIONAL SETTINGS None nessesery V-TURN PRINTING & CONSTRUCTION MANUAL © PLANEPRINT... - Page 5 Recommended additional settings are listed in the screenshots. INFO STL: Spinner3blade plate_profi le1.stl Spinner2blade plate_profi le1.stl Material: PLA Weight: ~ 1 g ADDITIONAL SETTINGS None nessesery INFO STL: Servocover-X_profi le1.stl Material: PLA Weight: ~ 5 g ADDITIONAL SETTINGS None nessesery V-TURN PRINTING & CONSTRUCTION MANUAL © PLANEPRINT...
- Page 6 ADDITIONAL SETTINGS • Wall Line Count 20 The lights should be printed sepa- rately, then the result is nicer be- cause the print head does not have to switch between the two parts. V-TURN PRINTING & CONSTRUCTION MANUAL © PLANEPRINT...
- Page 7 Recommended additional settings are listed in the screenshots. INFO STL: Starter car_profi le2.stl Material: PLA Weight: ~ 29 g ADDITIONAL SETTINGS • Wall Line Count 4 • Top Layers 3 • Bottom Layers 3 V-TURN PRINTING & CONSTRUCTION MANUAL © PLANEPRINT...
- Page 8 Weight: ~ 20 g ADDITIONAL SETTINGS • brim • use transparent PLA INFO STL: Canopy2_profi le3.stl Material: PLA Weight: ~ 12 g ADDITIONAL SETTINGS Depending on your printer, a brim may not be nessesery. V-TURN PRINTING & CONSTRUCTION MANUAL © PLANEPRINT...
- Page 9 Depending on your printer, a brim may not be nessesery. INFO STL: Fuselage2_profi le3.stl Material: PLA Weight: ~ 98 g ADDITIONAL SETTINGS Depending on your printer, a brim may not be nessesery. V-TURN PRINTING & CONSTRUCTION MANUAL © PLANEPRINT...
- Page 10 Depending on your printer, a brim may not be nessesery. INFO STL: Aileron-left_profi le3.stl Aileron-right_profi le3.stl Material: PLA Weight: ~ 15 g ADDITIONAL SETTINGS Depending on your printer, a brim may not be nessesery. V-TURN PRINTING & CONSTRUCTION MANUAL © PLANEPRINT...
- Page 11 Depending on your printer, a brim may not be nessesery. INFO STL: Wing 2-left_profi le3.stl Wing 2-right_profi le3.stl Material: PLA Weight: ~ 55 g ADDITIONAL SETTINGS Depending on your printer, a brim may not be nessesery. V-TURN PRINTING & CONSTRUCTION MANUAL © PLANEPRINT...
- Page 12 Depending on your printer, a brim may not be nessesery. INFO STL: Wing 4-left_profi le3.stl Wing 4-right_profi le3.stl Material: PLA Weight: ~ 37 g ADDITIONAL SETTINGS Depending on your printer, a brim may not be nessesery. V-TURN PRINTING & CONSTRUCTION MANUAL © PLANEPRINT...
- Page 13 ADDITIONAL SETTINGS Depending on your printer, a brim may not be nessesery. INFO STL: Winglets_profi le3.stl Material: PLA Weight: ~ 16 g ADDITIONAL SETTINGS Depending on your printer, a brim may not be nessesery. V-TURN PRINTING & CONSTRUCTION MANUAL © PLANEPRINT...
- Page 14 INFO STL: Spinner3blade_profi le3.stl Spinner2blade_profi le3.stl Material: PLA Weight: ~ 3 g ADDITIONAL SETTINGS Depending on your printer, a brim may not be nessesery. V-TURN PRINTING & CONSTRUCTION MANUAL © PLANEPRINT...
- Page 15 INFO STL: Hinges_profi le4.stl Material: TPU soft Weight: ~ 1 g ADDITIONAL SETTINGS None nessesery INFO STL: Wheel_profi le4.stl Material: TPU soft Weight: ~ 9 g ADDITIONAL SETTINGS • Wall line Count 10 V-TURN PRINTING & CONSTRUCTION MANUAL © PLANEPRINT...
- Page 16 We recommend the purchase of a small range of • Velcro and fastening tape screws, which can be used for the battery pack and receiver for all future PLANEPRINT models. TOOLS Simply search the Internet for: M2 Flat Head Tapping •...
- Page 17 CONSTRUCTION MANUAL V-TURN PRINTING & CONSTRUCTION MANUAL © PLANEPRINT...
- Page 18 The adhesive connections must hold perfectly! and align the parts perfectly. If glue co- mes out, wipe with a cloth. Then spray IMPORTANT! activator spray on the glue points. This surfaces should be sanded Connections V-TURN PRINTING & CONSTRUCTION MANUAL © PLANEPRINT...
- Page 19 Assembly of the wings First remove the support from wing 5 Winglet Use the fl at interconnects to position the Winglets Be careful when handling the cutter! Wing5 Wing4 Wing3 Wing2 Wing1 V-TURN PRINTING & CONSTRUCTION MANUAL © PLANEPRINT...
-
Page 20: Assembling The Fuselage
Assembling the fuselage Fuselage3 Fuselage2 Use the interconnects to position fuselage2 and fuselage3 Fuselage1 Assembling the canopy Canopy1 Canopy2 Use the interconnects to position fuselage2 and fuselage3 V-TURN PRINTING & CONSTRUCTION MANUAL © PLANEPRINT... - Page 21 If the canopy does not fi t Be careful when magnets so that they do handling the cutter! exactly, work a little with not reject each other! the cutter knife. Fuselage Canopy V-TURN PRINTING & CONSTRUCTION MANUAL © PLANEPRINT...
- Page 22 Be careful not to use too much glue, the flap must move easily! These spacers ensure the correct gap distance. Don´t remove! Use a interconnect to position the aileron parts V-TURN PRINTING & CONSTRUCTION MANUAL © PLANEPRINT...
- Page 23 Installation of the servos There is a choice of servo covers for different servos and also a customizable version. customizable V-TURN PRINTING & CONSTRUCTION MANUAL © PLANEPRINT...
-
Page 24: Wing Attachment
2 * 8 fl at screw. Make sure that the wings rest fi rmly on the fuselage. If the carbon tubes in the wings are a little stiff, clamp the remaining tube in a drill and enlarge the hole a little. V-TURN PRINTING & CONSTRUCTION MANUAL © PLANEPRINT... -
Page 25: Motor Installation
Motor installation RC components Battery pack Receiver V-TURN PRINTING & CONSTRUCTION MANUAL © PLANEPRINT... - Page 26 Starter car Lenght: 88 mm (3,46 inches) Lenght: 72 mm (2,83 inches) Carbon rod Ø 3mm Interconnects_profile1.stl To start put the V-TURN on the starter car in the three recesses. After take-off the starter car stays on the ground. V-TURN PRINTING &...
- Page 27 Print this page, fix it on adhesive foil (silver) and cut the foil. IMPORTANT: The print must be set to 100% page size, so that the size fits exactly! Be careful when handling the cutter! left right V-TURN PRINTING & CONSTRUCTION MANUAL © PLANEPRINT...
- Page 28 DETAIL PHOTOS V-TURN PRINTING & CONSTRUCTION MANUAL © PLANEPRINT...
-
Page 29: Transmitter Configuration
The CG has to fit exactly! Elevator = 10 mm = 10 mm TECHNICAL SPECIFICATIONS 647 mm (25.4 inches) 1400 mm (55 inches) FLYING WEIGHT: ~ 1000 g (depending on RC components and 3D printing) V-TURN PRINTING & CONSTRUCTION MANUAL © PLANEPRINT... -
Page 30: Control Direction Test
MAIDEN FLIGHT Trim the ailerons 2 mm up. In flight, the V-TURN is very neutral and shows no peculiarities if the CG fits exactly. Typically for flying wings, he slowly pulls his nose down if he is flown too slowly. -
Page 31: Age Recommendation
Filaments, printing supplies, hardware or mitter or model. consumables that can not be used after faulty 3D printing will not be replaced by PLANEPRINT.com in any way. Always keep the model in view and under control. Use only fully charged batteries.
Need help?
Do you have a question about the V-TURN and is the answer not in the manual?
Questions and answers