Advertisement
Quick Links
Freescale Semiconductor
Quick Start
QorIQ T4240 Development System
Quick Start
The QorIQ T4240 development system (T4240QDS-PB) is
a flexible system that supports the 24 threads. The
T4240QDS main board is mounted in a 4U rack-mounted
chassis and the main PCB is a custom form factor.
An additional layer of flexibility for system clocking, power
distribution, and I/O multiplexing is built into the
T4240QDS board. Eight expansion slots are provided for
adding standard PCIe cards or Freescale specialized SerDes
riser cards (XFI or XAUI networking). The T4240QDS
board comes with a Linux® board support package (BSP)
that provides a comprehensive starting point for Linux
development efforts.
The T4240QDS board is available in two form factors:
•
T4240QDS board installed in a chassis
•
T4240QDS board as a stand-alone system
When you finish reading this document, you should be
familiar with:
•
T4240QDS hardware kit contents
•
Board configuration settings
•
How to get started and boot the board
© 2015 Freescale Semiconductor, Inc. All rights reserved.
Document Number:T4240QDSQSG
Rev.1, 10/2015
Contents
1. Introduction . . . . . . . . . . . . . . . . . . . . . . . . . . . . . . . . . 2
2. Hardware kit contents . . . . . . . . . . . . . . . . . . . . . . . . . 3
3. T4240QDS board diagram . . . . . . . . . . . . . . . . . . . . . 3
4. Connections and switch settings . . . . . . . . . . . . . . . . . 4
5. Starting up and booting system . . . . . . . . . . . . . . . . . 13
6. Pre-loaded RCW and boot flash information . . . . . . 18
7. Revision history . . . . . . . . . . . . . . . . . . . . . . . . . . . . 19
Advertisement

Subscribe to Our Youtube Channel
Related Manuals for Freescale Semiconductor QorIQ T4240


Summary of Contents for Freescale Semiconductor QorIQ T4240
-
Page 1: Table Of Contents
QorIQ T4240 Development System Quick Start The QorIQ T4240 development system (T4240QDS-PB) is Contents 1. Introduction ....... . . 2 a flexible system that supports the 24 threads. -
Page 2: Introduction
Communications Processor Family Integrated Multicore Communications Processor Family. Reference Manual (document Link: T4240RM) http://www.freescale.com/webapp/sps/site/prod_summary.jsp?code=T4240&fpsp =1&tab=Documentation_Tab QorIQ T4240 Development System - Provides details about the features of the 4240 Development System Board. Fact Sheet (document T4240QDSFS) Link: http://www.freescale.com/webapp/sps/site/prod_summary.jsp?code=T4240QDS &fpsp=1&tab=Documentation_Tab T4240 QorIQ... -
Page 3: Hardware Kit Contents
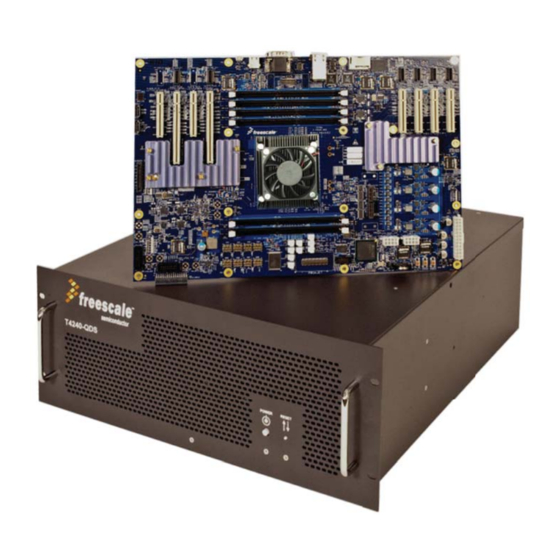
Refer to the pack-out list for the list of items included in the kit. T4240QDS board diagram Figure 1 Figure 2 shows the T4240QDS board. Figure 1. T4240QDS board - Components QorIQ T4240 Development System Quick Start, Rev.1 Freescale Semiconductor... -
Page 4: Connections And Switch Settings
Figure 2. T4240QDS board and case Connections and switch settings This section explains the T4240QDS connections and switch settings. Connection settings In order to operate the T4240QDS and U-Boot, you need to connect different cables to the board. Some of the cable connections are required, however, some of the connections are optional. - Page 5 — J23 - D2_DIMM #1, pre-installed DDR3 2GB uDIMM 72 bit (with ECC) Single Rank — J22 - D1_DIMM #1, pre-installed DDR3 2GB uDIMM 72 bit (with ECC) Single Rank — J200 - D3_DIMM #1, pre-installed DDR3 2GB uDIMM 72 bit (with ECC) Single Rank QorIQ T4240 Development System Quick Start, Rev.1 Freescale Semiconductor...
- Page 6 Figure 4. Default DDR DIMM assembly 3. Power supply (Required): If your power supply appears similar to the power supply shown in Figure 5, perform the following steps to connect the power supply to the T4240QDS system. For power supply setup and connections: a) Gather the following items from the packaging: —...
- Page 7 6-pin end of the adapter cable to the 6-pin portion of the VGA1 power supply connector. Also ensure that the latching mechanism of the VGA1 connector aligns with the latching tab of the 6-pin adapter cable connector, as shown in Figure QorIQ T4240 Development System Quick Start, Rev.1 Freescale Semiconductor...
- Page 8 Figure 8. 12 V power adapter cable attached to the 6-pin VGA1 connector Figure 9. Latch of VGA1 connector aligned with latching tab of adapter connector e) To attach the power supply cables to the T4240QDS system: – Attach the 2x4 P8 power supply connector to the EPS_BULK_12V header (J27) of the T4240QDS board.
- Page 9 Connections and switch settings Figure 10. Power supply connections (before insertion) Figure 11. Completed power supply connections (after insertion) QorIQ T4240 Development System Quick Start, Rev.1 Freescale Semiconductor...
- Page 10 4. Serial cable (Required): Attach serial cable to UART1_BOTTOM port of the T4240QDS as shown in Figure 13. Attach other end of cable to the serial port of PC. This connection provides visibility of boot activity to the COM port window of the PC. Configure the serial port of the host PC with the settings shown in Figure Figure 12.
- Page 11 Ensure that the switch settings for SW1 through SW9 are configured as shown in Figure 15. For more details on decoding the switch settings, see the QorIQ T4240 Development System Reference Manual. QorIQ T4240 Development System Quick Start, Rev.1 Freescale Semiconductor...
- Page 12 Figure 15. SW1-SW9 switch settings 4.3.1 Default switch settings The default switch settings for the T4240QDS board are: Table 4-3. Switch settings Switches Settings 0x17 0xfe 0x0c 0x50 0xe2 0x0f 0xea 0xcd 0x1f • It is important to have . This setting lets RCW to be fetched from the on board 16 bit SW1= 0x17 NOR flash memory.
-
Page 13: Starting Up And Booting System
HOT_3V and HOT_5V LEDs should illuminate. Figure 16. llluminated LEDs 2. Switch on the T4240QDS board by pressing the red POWER push button switch (SW11), as shown in Figure Figure 17. Red POWER push button switch QorIQ T4240 Development System Quick Start, Rev.1 Freescale Semiconductor... - Page 14 3. After a few seconds, the board will turn on with the LEDs illuminated, as shown in the following figures, and the U-Boot output will appear on the COM port screen. Figure 18. Power LEDs after start up: All ON except POVDD Figure 19.
- Page 15 DDR:933.333 MHz (1866.667 MT/s data rate) (Asynchronous), IFC:183.333 MHz FMAN1: 733.333 MHz FMAN2: 733.333 MHz QMAN: 366.667 MHz PME: 533.333 MHz D-cache 32 KiB enabled I-cache 32 KiB enabled Reset Configuration Word (RCW): 00000000: 1607001b 18101b16 00000000 00000000 QorIQ T4240 Development System Quick Start, Rev.1 Freescale Semiconductor...
- Page 16 00000010: 04362858 30548c00 ec020000 f5000000 00000020: 00000000 ee0000ee 00000000 000307fc 00000030: 00000000 00000000 00000000 00000028 Board: T4240QDS, Sys ID: 0x1e, Sys Ver: 0x12, vBank: 0 FPGA: v6 (T4240QDS_2014_0211_1852), build 547 on Wed Feb 12 00:52:40 2014 SERDES Reference Clocks: SERDES1=125MHz SERDES2=125MHz SERDES3=100MHz SERDES4=100MHz I2C: ready SPI:...
- Page 17 FM1@DTSEC5 [PRIME], FM1@TGEC1, FM1@TGEC2, FM2@DTSEC1, FM2@DTSEC2, FM2@DTSEC3, FM2@DTSEC4, FM2@DTSEC5, FM2@DTSEC6, FM2@DTSEC9, FM2@DTSEC10, e1000#0 Warning: e1000#0 MAC addresses don't match: Address in SROM is 68:05:ca:0f:23:a3 Address in environment is 00:04:9f:00:7a:0b Hit any key to stop autoboot: => QorIQ T4240 Development System Quick Start, Rev.1 Freescale Semiconductor...
-
Page 18: Pre-Loaded Rcw And Boot Flash Information
Pre-loaded RCW and boot flash information Following are the RCW default settings: • 1667 MHz CPU, 733 MHz CCB, 1867 MT/s DDR • RGMII-1 (TOP) = FM1@DTSEC5 • RGMII-2 (BOT) = FM2@DTSEC5 • SerDes REFCLK = 125 MHz for SD1 and SD2 •... -
Page 19: Revision History
• Removed Chapter 7 “Connecting a 750W Power Supply“ • Moved Chapter 8 “Configuring T4240 QDS in Chassis” to Section 4.2 1 June 2013 T4240QDS Quick Start Guide Rev 0 release. QorIQ T4240 Development System Quick Start, Rev.1 Freescale Semiconductor... - Page 20 Freescale, the Freescale logo, CodeWarrior, and QorIQ are trademarks of Freescale Semiconductor, Inc., Reg. U.S. Pat. & Tm. Off. All other product or service names are the property of their respective owners. © 2015 Freescale Semiconductor, Inc. Document Number: T4240QDSQSG Rev.1...
Need help?
Do you have a question about the QorIQ T4240 and is the answer not in the manual?
Questions and answers