
Subscribe to Our Youtube Channel
Related Manuals for ESAB Cutmaster 100


Summary of Contents for ESAB Cutmaster 100
- Page 1 All manuals and user guides at all-guides.com esab Cutmaster ® Plasma Cutting system sL100 1Torch Operating Manual Art # A-12775 380/400V Revision: Issue Date: Manual No.: April 8, 2015 0-5404 esab.com.cn...
- Page 2 All manuals and user guides at all-guides.com WE APPRECIATE YOUR BUSINESS! Congratulations on your new ESAB product. We are proud to have you as our customer and will strive to provide you with the best service and reliability in the industry. This product is backed by our extensive warranty and world-wide service network.
- Page 3 While the information contained in this Manual represents the Manufacturer's best judge- ment, the Manufacturer assumes no liability for its use. Plasma Cutting Power Supply ESAB Cutmaster 100 with SL100 1Torch™ ® Operating Manual Number 0-5404...
- Page 4 All manuals and user guides at all-guides.com be sure this information reaches the operator. You can get extra copies through your supplier. CAUTION These INsTRUCTIONs are for experienced operators. If you are not fully familiar with the principles of operation and safe practices for arc welding and cutting equipment, we urge you to read our booklet, “Precautions and safe Practices for arc Welding, Cutting, and Gouging,”...
-
Page 5: Table Of Contents
All manuals and user guides at all-guides.com TABLE OF CONTENTS SECTION 1: SAFETY ..........................1-1 Safety Precautions ..................1-1 SECTION 2 SYSTEM: INTRODUCTION ......................... 2-1 2.01 How To Use This Manual ................2-1 2.02 Equipment Identification ................. 2-1 2.03 Receipt Of Equipment ..................2-1 2.04 Power Supply Specifications ................ - Page 6 All manuals and user guides at all-guides.com TABLE OF CONTENTS SECTION 5 SYSTEM: SERVICE ............................. 5-1 5.01 General Maintenance ..................5-1 5.02 Maintenance Schedule ..................5-2 5.03 Common Faults ....................5-2 5.04 Fault Indicator ....................5-3 5.05 Basic Troubleshooting Guide ................5-4 5.06 Power Supply Basic Parts Replacement ............
-
Page 7: Section 1: Safety
SECTION 1: SAFETY Safety Precautions Users of ESAB welding and plasma cutting equipment have the ultimate responsibility for ensuring that anyone who works on or near the equipment observes all the relevant safety precautions. Safety precautions must meet the requirements that apply to this type of welding or plasma cutting equipment. The following recommendations should be observed in addition to the standard regulations that apply to the workplace. - Page 8 All manuals and user guides at all-guides.com ESAB CuTmASTEr 100 Arc welding and cutting can be injurious to yourself and others. WARNING Take precautions when welding and cutting. Ask for your employer's safety practices which should be based on manufacturers' hazard data.
-
Page 9: Section 2 System: Introduction
Warnings will be enclosed in a box such as this. Additional copies of this manual may be purchased by contacting ESAB at the address and phone num- ber in your area listed on back cover of this manual. Include the Owner’s Manual number and equipment identification numbers. -
Page 10: Power Supply Specifications
All manuals and user guides at all-guides.com ESAB CuTmASTEr 100 2.04 Power Supply Specifications ESAB Cutmaster 100 Power Supply Specifications ® Three Phase , 50/60 Hz 380 VAC (360 - 440 VAC), Input Power Three Phase , 50/60 Hz 400 VAC (360 - 440 VAC), Input Power Cable Power Supply includes input cable. -
Page 11: Input Wiring Specifications
All manuals and user guides at all-guides.com ESAB CuTmASTEr 100 2.05 Input Wiring Specifications ESAB Cutmaster 100 Power Supply Input Cable Wiring requirements ® Input voltage Freq Power Input Suggested Sizes Flexible Cord Flexible Cord Volts Fuse (amps) (Min. AWG) (Min. -
Page 12: Power Supply Features
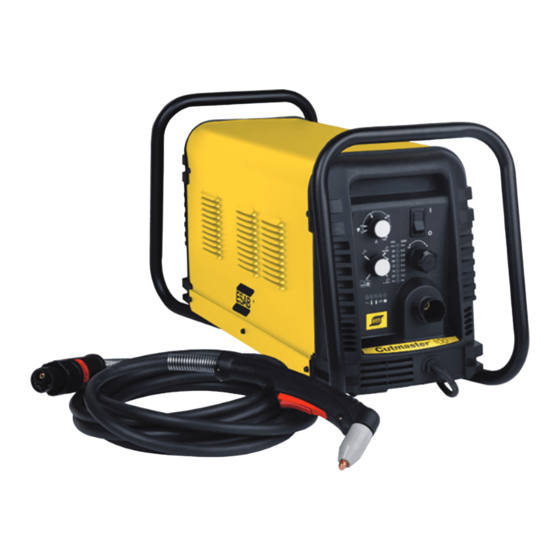
All manuals and user guides at all-guides.com ESAB CuTmASTEr 100 2.06 Power Supply Features Handle and Leads Wrap Control Panel Torch Leads Receptacle Art # A-08359 Work Cable and Clamp Port for Optional Automation Interface Cable Filter Assembly Gas Inlet Port... -
Page 13: Section 2 Torch: Introduction
All manuals and user guides at all-guides.com ESAB CuTmASTEr 100 SECTION 2 TORCH: 2T.03 Specifications INTRODUCTION A. Torch Configurations 1. Hand/Manual Torch, Models 2T.01 Scope of Manual The hand torch head is at 75° to the torch handle. The hand torches include a torch This manual contains descriptions, operating instruc- handle and torch trigger assembly. -
Page 14: 04 Options And Accessories
All manuals and user guides at all-guides.com ESAB CuTmASTEr 100 F. Torch Ratings 2T.05 Introduction to Plasma manual Torch ratings A. Plasma Gas Flow Ambient 104° F Temperature 40° C Plasma is a gas which has been heated to an... - Page 15 All manuals and user guides at all-guides.com ESAB CuTmASTEr 100 B. Gas Distribution E. Parts - In - Place (PIP) The single gas used is internally split into plasma The torch includes a 'Parts - In - Place' (PIP) cir- and secondary gases.
- Page 16 All manuals and user guides at all-guides.com ESAB CuTmASTEr 100 This Page Intentionally Blank INTRODUCTION Manual 0-5404 2T-4...
-
Page 17: Section 3 System: Installation
All manuals and user guides at all-guides.com ESAB CuTmASTEr 100 SECTION 3 SYSTEM: 3.03 Primary Input Power Connections INSTALLATION CAUTION Check your power source for correct voltage before plugging in or connecting the unit. The primary 3.01 Unpacking power source, fuse, and any extension cords used must conform to local electrical code and the 1. -
Page 18: Gas Connections
All manuals and user guides at all-guides.com ESAB CuTmASTEr 100 Installing Optional Single - Stage Air Filter 6. Connect the wires as follows. • Wiring to L1, L2 and L3 input. See the previ- An optional filter kit is recommended for improved ous illustration and power label. It does not filtering with compressed air, to keep moisture and matter what order these wires are attached. - Page 19 All manuals and user guides at all-guides.com ESAB CuTmASTEr 100 Installing Optional Two - Stage Air Filter Kit This optional two - stage air line filter is also for use on compressed air shop systems. Filter removes moisture and contaminants to at least 5 microns.
- Page 20 All manuals and user guides at all-guides.com ESAB CuTmASTEr 100 This Page Intentionally Blank INSTALLATION Manual 0-5404...
-
Page 21: Section 3 Torch: Installation
If necessary, connect the torch to the Power Sup- WARNING ply. Connect only the ESAB model SL100 / Manual Disconnect primary power at the source before or SL100 / Mechanical Torch to this power supply. disassembling the torch or torch leads. - Page 22 All manuals and user guides at all-guides.com ESAB CuTmASTEr 100 This Page Intentionally Blank INSTALLATION Manual 0-5404 3T-2...
-
Page 23: Section 4 System: Operation
All manuals and user guides at all-guides.com ESAB CuTmASTEr 100 SECTION 4 SYSTEM: OPERATION 4.01 Front Panel Controls / Features See Illustration for numbering Identification 1. Output Current Control Sets the desired output current. Output settings up to 60 Amps may be used for drag cutting (with the torch tip contacting the workpiece) or higher for standoff cutting. -
Page 24: Preparations For Operation
(10) minute period once the condition is Check that the torch is properly connected. Only cleared. ESAB model SL100 / Manual or SL100 / Mechani- cal Torches may be connected to this Power Sup- ply. See Section 3T of this manual. - Page 25 All manuals and user guides at all-guides.com ESAB CuTmASTEr 100 Typical Cutting Speeds STANDOFF ESAB Cutmaster 100 Gas Pressure Settings ® Cutting speeds vary according to torch output amperage, the type of material being cut, and Leads SL100 SL100 operator skill. Refer to Section "4T.08...
- Page 26 All manuals and user guides at all-guides.com ESAB CuTmASTEr 100 This Page Intentionally Blank OPERATION Manual 0-5404...
-
Page 27: Section 4 Torch: Operation
All manuals and user guides at all-guides.com ESAB CuTmASTEr 100 SECTION 4 TORCH: 3. Install the replacement Electrode by pushing it straight into the torch head until it clicks. OPERATION 4. Install the starter cartridge and desired tip for the operation into the torch head. -
Page 28: 02 Cut Quality
All manuals and user guides at all-guides.com ESAB CuTmASTEr 100 4T.02 Cut Quality Kerf Width The width of the cut (or the width of material re- NOTE! moved during the cut). Cut quality depends heavily on setup and pa- rameters such as torch standoff, alignment with... -
Page 29: 03 General Cutting Information
All manuals and user guides at all-guides.com ESAB CuTmASTEr 100 4T.03 General Cutting Information Left Side Cut Angle Right Side WARNING Cut Angle Disconnect primary power at the source before dis- assembling the power supply, torch, or torch leads. Frequently review the Important Safety Precautions at the front of this manual. -
Page 30: 04 Hand Torch Operation
All manuals and user guides at all-guides.com ESAB CuTmASTEr 100 4T.04 Hand Torch Operation Standoff Cutting With Hand Torch NOTE! For best performance and parts life, always use the Trigger correct parts for the type of operation. 1. The torch can be comfortably held in one hand Trigger Release or steadied with two hands. - Page 31 All manuals and user guides at all-guides.com ESAB CuTmASTEr 100 5. Slide the trigger release toward the back of the torch handle while simultaneously squeezing the trigger. The pilot arc will start. Shield Cup Standoff Guide Trigger Torch Tip Workpiece...
- Page 32 All manuals and user guides at all-guides.com ESAB CuTmASTEr 100 Piercing With Hand Torch shield cup in anti - spatter compound will minimize the amount of scale which adheres 1. The torch can be comfortably held in one hand to it.
-
Page 33: 05 Gouging
All manuals and user guides at all-guides.com ESAB CuTmASTEr 100 4T.05 Gouging Torch Head WARNING Be sure the operator is equipped with proper gloves, clothing, eye and ear protection and that all safety precautions at the front of this manual have 35°... -
Page 34: 06 Mechanized Torch Operation
All manuals and user guides at all-guides.com ESAB CuTmASTEr 100 Travel speed also affects the bevel angle of a cut. 4T.06 Mechanized Torch Operation When cutting in a circle or around a corner, slow- Cutting With Mechanized Torch ing down the travel speed will result in a squarer cut. -
Page 35: 07 Parts Selection For Sl100 Torch Cutting
All manuals and user guides at all-guides.com ESAB CuTmASTEr 100 4T.07 Parts Selection for SL100 Torch Cutting Ohmic Clip Automation Torch Ohmic Clip 9-8224 Manual Torch 9-8259 20-40A Shield Tip: Shield Cap, Machine Cup Body, STANDOFF 40A 9-8245 9-8237 CUTTING... -
Page 36: 08 Recommended Cutting Speeds For Mechanized Torch With Exposed Tip
All manuals and user guides at all-guides.com ESAB CuTmASTEr 100 4T.08 Recommended Cutting Speeds for Mechanized Torch With Exposed Tip Type Torch: SL100 With Exposed Tip Type Material: Mild Steel Type Plasma Gas: Air Type Secondary Gas: Single Gas Torch... - Page 37 All manuals and user guides at all-guides.com ESAB CuTmASTEr 100 Type Torch: SL100 With Exposed Tip Type Material: Mild Steel Type Plasma Gas: Air Type Secondary Gas: Single Gas Torch Thickness Output Amperage Speed (Per Minute) Standoff Plasma Gas Press...
- Page 38 All manuals and user guides at all-guides.com ESAB CuTmASTEr 100 Type Torch: SL100 With Exposed Tip Type Material: Mild Steel Type Plasma Gas: Air Type Secondary Gas: Single Gas Torch Thickness Output Amperage Speed (Per Minute) Standoff Plasma Gas Press...
- Page 39 All manuals and user guides at all-guides.com ESAB CuTmASTEr 100 Type Torch: SL100 With Exposed Tip Type Material: Mild Steel Type Plasma Gas: Air Type Secondary Gas: Single Gas Torch Thickness Output Amperage Speed (Per Minute) Standoff Plasma Gas Press...
-
Page 40: 09 Recommended Cutting Speeds For Mechanized Torch With Shielded Tip
All manuals and user guides at all-guides.com ESAB CuTmASTEr 100 4T.09 Recommended Cutting Speeds for Mechanized Torch With Shielded Tip Type Torch: SL100 With Shielded Tip Type Material: Mild Steel Type Plasma Gas: Air Type Secondary Gas: Single Gas Torch... - Page 41 All manuals and user guides at all-guides.com ESAB CuTmASTEr 100 Type Torch: SL100 With Shielded Tip Type Material: Mild Steel Type Plasma Gas: Air Type Secondary Gas: Single Gas Torch Thickness Output Amperage Speed (Per Minute) Standoff Plasma Gas Press...
- Page 42 All manuals and user guides at all-guides.com ESAB CuTmASTEr 100 Type Torch: SL100 With Shielded Tip Type Material: Mild Steel Type Plasma Gas: Air Type Secondary Gas: Single Gas Torch Thickness Output Amperage Speed (Per Minute) Standoff Plasma Gas Press...
- Page 43 All manuals and user guides at all-guides.com ESAB CuTmASTEr 100 Type Torch: SL100 With Shielded Tip Type Material: Mild Steel Type Plasma Gas: Air Type Secondary Gas: Single Gas Torch Thickness Output Amperage Speed (Per Minute) Standoff Plasma Gas Press...
-
Page 44: Patent Information
All manuals and user guides at all-guides.com ESAB CuTmASTEr 100 PATENT INFORMATION Plasma Cutting Torch Patents The following parts are covered under U.S. and Foreign Patents as follows: Catalog # Description Patent(s) 9-8215 Electrode US Pat No(s) 6163008; 6987238 Other Pat(s) Pending 9-8277 Cartridge US Pat No(s) 6903301; 6717096; 6936786;... - Page 45 All manuals and user guides at all-guides.com ESAB CuTmASTEr 100 Catalog # Description Patent(s) 9-8245 Shield Cap US Pat No(s) 6914211; D496951 Other Pat(s) Pending The following parts are also licensed under U.S. Patent No. 5,120,930 and 5,132,512: Catalog # Description 9-8235 Shield Cap 9-8236...
- Page 46 All manuals and user guides at all-guides.com ESAB CuTmASTEr 100 This Page Intentionally Blank OPERATION Manual 0-5404 4T-20...
-
Page 47: Section 5 System: Service
All manuals and user guides at all-guides.com ESAB CuTmASTEr 100 SECTION 5 SYSTEM: SERVICE 5.01 General Maintenance Maintain more often Warning! if used under severe Disconnect input power before maintaining. conditions Each Use Visual check of torch tip and electrode... -
Page 48: Maintenance Schedule
4. Worn torch parts Daily Operational Checks or Every Six Cutting 5. Cutting current too low. Hours: 6. Non - Genuine ESAB parts used 1. Check torch consumable parts, replace if dam- 7. Incorrect gas pressure aged or worn. Main Arc 1. -
Page 49: Fault Indicator
All manuals and user guides at all-guides.com ESAB CuTmASTEr 100 5.04 Fault Indicator At initial power up, two lights will temporarily illuminate for 2-3 seconds to show the version of software used. To determine the first digit, count the function indicators left to right, 1 through 5. To determine the second digit count the pressure indicators, reading from bottom to top, 0 through 7. -
Page 50: Basic Troubleshooting Guide
All manuals and user guides at all-guides.com ESAB CuTmASTEr 100 5.05 Basic Troubleshooting Guide WARNING There are extremely dangerous voltage and power levels present inside this unit. Do not attempt to diagnose or repair unless you have had training in power electronics measurement and troubleshooting techniques. - Page 51 All manuals and user guides at all-guides.com ESAB CuTmASTEr 100 Problem - Symptom Possible Cause recommended Action FAULT & 80 PSI 1. Torch shield cup is loose. 1. Tighten shield cup by hand. Do not overtighten. indicators flashing. 2. Torch tip, electrode or starter 2.
-
Page 52: Power Supply Basic Parts Replacement
All manuals and user guides at all-guides.com ESAB CuTmASTEr 100 5.06 Power Supply Basic Parts C. Filter Element Assembly Replacement Replacement The Filter Element Assembly is in the rear panel. For better system performance, the filter element should WARNING be checked per the Maintenance Schedule (Section Disconnect primary power to the system before 5.02), and either cleaned or replaced. - Page 53 All manuals and user guides at all-guides.com ESAB CuTmASTEr 100 5. Remove the fitting from the filter element as- Optional Single-Stage Filter Element sembly by inserting a 6 mm hex wrench into Replacement the internal hex fitting and turning it counter These instructions apply to power supplies where the clock-wise (left).
- Page 54 All manuals and user guides at all-guides.com ESAB CuTmASTEr 100 Optional Two-Stage Filter Element Replacement The Two-Stage Air Filter has two Filter Elements. When the Filter Elements become dirty the Power Supply will continue to operate but cut quality may become unacceptable. Refer to Section 6, Parts List, for replace- ment filter element catalog number. 1. Shut OFF primary input power.
-
Page 55: Section 5 Torch: Service
All manuals and user guides at all-guides.com ESAB CuTmASTEr 100 SECTION 5 TORCH: SERVICE Upper Groove 5T.01 General Maintenance with Vent Holes Must Remain Open NOTE! Refer to Previous "Section 5: System Service" for Upper O-Ring common and fault indicator descriptions. -
Page 56: Inspection And Replacement Of Consumable Torch Parts
All manuals and user guides at all-guides.com ESAB CuTmASTEr 100 4. Remove the tip. Check for excessive wear 5T.02 Inspection and Replacement of (indicated by an elongated or oversized orifice). Consumable Torch Parts Clean or replace the tip if necessary. -
Page 57: Parts Lists
All manuals and user guides at all-guides.com ESAB CuTmASTEr 100 SECTION 6: PARTS LISTS 6.01 Introduction A. Parts List Breakdown The parts list provide a breakdown of all replaceable components. The parts lists are arranged as follows: 6.03 Power Supply Replacement 6.04 Replacement Power Supply Parts 6.05... -
Page 58: Replacement Power Supply Parts
All manuals and user guides at all-guides.com ESAB CuTmASTEr 100 6.04 Replacement Power Supply Parts Description Catalog # Regulator 9-0115 Filter Assembly Replacement Element 9-0116 Input Power Cord for 380/400 V Power Supply 9-0216 6.05 Options and Accessories Description Catalog # Single - Stage Filter Kit (includes Filter & Hose) -
Page 59: Replacement Parts For Hand Torch
All manuals and user guides at all-guides.com ESAB CuTmASTEr 100 6.06 Replacement Parts for Hand Torch Item # Description Catalog # Torch Handle Replacement Kit (includes items No. 2 & 3) 9-7030 Trigger Assembly Replacement Kit 9-7034 Handle Screw Kit (5 each, 6-32 x 1/2” cap screw, and wrench) 9-8062 Torch Head Assembly Replacement Kit (includes items No. 5 & 6) 9-8219... -
Page 60: Replacement Parts - For Machine Torches With Unshielded Leads
All manuals and user guides at all-guides.com ESAB CuTmASTEr 100 6.07 Replacement Parts - for Machine Torches with Unshielded Leads Item No. Qty Description Catalog No. Torch Head Assembly without leads (includes items 2, 3, and 14) 9-8220 Large O-Ring... -
Page 61: Replacement Shielded Machine Torch Leads Assemblies
All manuals and user guides at all-guides.com ESAB CuTmASTEr 100 6.08 Replacement Shielded Machine Torch Leads Assemblies Item No. Qty Description Catalog No. Mechanized Shielded Leads Assemblies with ATC Connectors 5 - foot / 1.5 m Leads Assembly with ATC Connector 4-7846 10 - foot / 3.05 m Leads Assembly with ATC Connector 4-7847 25 - foot / 7.6 m Leads Assembly with ATC Connector... -
Page 62: Torch Consumable Parts (Sl100)
All manuals and user guides at all-guides.com ESAB CuTmASTEr 100 6.09 Torch Consumable Parts (SL100) Ohmic Clip Automation Torch Ohmic Clip 9-8224 Manual Torch 9-8259 20-40A Shield Tip: Shield Cap, Machine Cup Body, STANDOFF 9-8237 40A 9-8245 CUTTING 9-8205 Shield Cap, Deflector... -
Page 63: Appendix 1: Sequence Of Operation (Block Diagram
All manuals and user guides at all-guides.com ESAB CuTmASTEr 100 APPENDIX 1: SEQuENCE OF OPErATION (BLOCK DIAGrAm) ACTION: ACTION: ACTION: ACTION: RUN / Rapid Auto Restart / ON / OFF switch to ON Close external RUN / SET / LATCH disconnect switch. -
Page 64: Appendix 2: Data Tag Information
All manuals and user guides at all-guides.com ESAB CuTmASTEr 100 APPENDIX 2: DATA TAG INFOrmATION Manufacturer's Name and/or Logo, Location, Model and Revision Level, Serial Number Model: and Production Code Date of Mfr: Regulatory Standard Covering Type of Power This Type of Power Supply... -
Page 65: Appendix 3: Torch Pin - Out Diagrams
All manuals and user guides at all-guides.com ESAB CuTmASTEr 100 APPENDIX 3: TOrCH PIN - OuT DIAGrAmS A. Hand Torch Pin - Out Diagram ATC Female Receptacle ATC Male Connector Front View Front View Negative / Negative / Plasma Plasma... -
Page 66: Appendix 4: Torch Connection Diagrams
All manuals and user guides at all-guides.com ESAB CuTmASTEr 100 APPENDIX 4: TOrCH CONNECTION DIAGrAmS A. Hand Torch Connection Diagram Torch: SL60 / SL100 Hand Torch Leads: Torch Leads with ATC Connector Power Supply: with ATC Receptacle Male ATC Leads... - Page 67 All manuals and user guides at all-guides.com ESAB CuTmASTEr 100 This Page Intentionally Blank Manual 0-5404 APPENDIX...
-
Page 68: Appendix 5: System Schematic, 380/400V Units
All manuals and user guides at all-guides.com ESAB CuTmASTEr 100 APPENDIX 5: SYSTEM SCHEMATIC, 380/400V UNITS PRI 3 PRI 3 PRI 3 PRI 3 PRI 4 PRI 4 PRI 4 PRI 4 BIAS BIAS SUPPLY SUPPLY PRI 2 PRI 2... - Page 69 Chk: Chk: App: App: App: App: App: App: Sheet Sheet Sheet Sheet Sheet Sheet SCHEMATIC, ESAB Cutmaster 100/120 20'/50' SL100 400V/208-460V SCHEMATIC, ESAB Cutmaster 100/120 20'/50' SL100 400V/208-460V TITLE: TITLE: TITLE: TITLE: TITLE: TITLE: Size Size Size Size Size Size...
-
Page 70: Appendix 6: Publication History
All manuals and user guides at all-guides.com ESAB CuTmASTEr 100 APPENDIX 6: Publication History Cover Date rev. Change(s) Jan. 15, 2015 Manual released. April 8, 2015 Updated per ECO-B2708. Changed "SL60/ Manual" pg. 2T-1 to "SL100/ Manual". APPENDIX Manual 0-5404... - Page 71 All manuals and user guides at all-guides.com This Page Intentionally Blank...
- Page 72 Bucharest SOUTH AFRICA ESAB Mexico S.A. Vamberk Tel: +40 316 900 600 ESAB Africa Welding & Cutting Ltd Monterrey Tel: +420 2 819 40 885 Fax: +40 316 900 601 Durbanvill 7570 - Cape Town Fax: +420 2 819 40 120...
Need help?
Do you have a question about the Cutmaster 100 and is the answer not in the manual?
Questions and answers