
Related Manuals for PLANEPRINT AERON


Summary of Contents for PLANEPRINT AERON
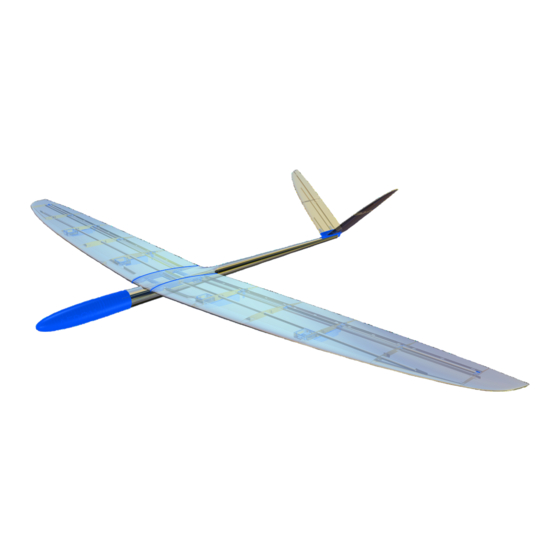
- Page 1 High-performance motor and glider version www.planeprint.com NOTE: Slicing works best the ONLY place where you can get with CURA! original Planeprint STL fi les legally!
- Page 2 LW-PLA CARBON AERON PRINTING & ASSEMBLING MANUAL © PLANEPRINT...
- Page 3 • Self-adhesive Velcro tape • Some lead (about 150 grams for the glider version) Tools Carbon fiber strips MPX Connector Cutter knife, small Philips screwdriver, Sandpaper, Metal saw, Needle nose pliers, Soldering tool AERON PRINTING & ASSEMBLING MANUAL © PLANEPRINT...
- Page 4 SERVOS 6 pieces like KST DS215 V3 MG Digital HV or comparable Dimensions (The optimal distance between screws is 28 mm): 23 mm max. 12 mm Space for controller and battery 130 mm AERON PRINTING & ASSEMBLING MANUAL © PLANEPRINT...
- Page 5 3D printer is a very complex and extensive process. Therefore, we appeal to your fairness not to forward the STL data you have acquired to third parties. Thank you for your understanding and have fun with your PLANEPRINT MODEL! AERON PRINTING &...
- Page 6 P1_Fairing Aileron_ae and P1_Fairing flap_ae.stl MATERIAL PLA, Weight: ~ 3 g ADDITIONAL SETTINGS • Wall Line Count: 1 • Bottom Layers: 0 • Infill Density: 0 % • prints two of both STL AERON PRINTING & ASSEMBLING MANUAL © PLANEPRINT...
- Page 7 This part is only needed if you want to print the glider version. P1_Fuselage 1 motor_ae.stl MATERIAL PLA, Weight: ~ 30 g ADDITIONAL SETTINGS This part is only needed if you want to print the motor version. AERON PRINTING & ASSEMBLING MANUAL © PLANEPRINT...
- Page 8 The following parts should be sliced with the PROFILE P1_Fullbody. Please note the additional settings for the individual parts! P1_Fuselage 2_ae.stl MATERIAL PLA, Weight: ~ 24 g ADDITIONAL SETTINGS None required P1_Interconnects_ae.stl MATERIAL PLA, Weight: ~ 2 g ADDITIONAL SETTINGS None required AERON PRINTING & ASSEMBLING MANUAL © PLANEPRINT...
- Page 9 This part is only needed if you want to print the motor version. If your engine needs different hole positions there are alternative STL P1_MPX connectors_ae.stl MATERIAL PLA, Weight: ~ 5 g ADDITIONAL SETTINGS None required AERON PRINTING & ASSEMBLING MANUAL © PLANEPRINT...
- Page 10 MATERIAL PLA, Weight: ~ 2 g ADDITIONAL SETTINGS This part is only needed if you want to print the motor version. P1_Protector Fuselage_ae.stl MATERIAL PLA, Weight: ~ 14 g ADDITIONAL SETTINGS None required AERON PRINTING & ASSEMBLING MANUAL © PLANEPRINT...
- Page 11 Please note the additional settings for the individual parts! P1_Protector Wing_ae.stl MATERIAL PLA, Weight: ~ 21 g ADDITIONAL SETTINGS None required P1_Servo mount ailerons_ae.stl MATERIAL PLA, Weight: ~ 13 g ADDITIONAL SETTINGS None required AERON PRINTING & ASSEMBLING MANUAL © PLANEPRINT...
- Page 12 Please note the additional settings for the individual parts! P1_Servo mount flaps_ae.stl MATERIAL PLA, Weight: ~ 14 g ADDITIONAL SETTINGS None required P1_V-Tail parts_ae.stl MATERIAL PLA, Weight: ~ 7 g ADDITIONAL SETTINGS None required AERON PRINTING & ASSEMBLING MANUAL © PLANEPRINT...
- Page 13 Please note the additional settings for the individual parts! P1_Wing belt_ae.stl MATERIAL PLA, Weight: ~ 7 g ADDITIONAL SETTINGS None required P1_Wing hinges L_ae.stl P1_Wing hinges R_ae.stl MATERIAL PLA, Weight: ~ 5 g ADDITIONAL SETTINGS None required AERON PRINTING & ASSEMBLING MANUAL © PLANEPRINT...
- Page 14 Horizontal Expansion (-0.1 mm or less). NOTE This part must be absolutely stable, because it absorbs the forces of the wings. P1_Clips 1mm wire.stl MATERIAL PLA, Weight: ~ 1 g ADDITIONAL SETTINGS None required AERON PRINTING & ASSEMBLING MANUAL © PLANEPRINT...
- Page 15 None required P2_RC Frame glider_ae.stl MATERIAL PLA, Weight: ~ 45 g ADDITIONAL SETTINGS • Top Layers: 3 • Bottom Layers: 3 This part is only needed if you want to print the glider version. AERON PRINTING & ASSEMBLING MANUAL © PLANEPRINT...
- Page 16 MATERIAL PLA, Weight: ~ 43 g ADDITIONAL SETTINGS This part is only needed if you want to print the motor version. P2_Servo frame_ae.stl MATERIAL PLA, Weight: ~ 3 g ADDITIONAL SETTINGS None required AERON PRINTING & ASSEMBLING MANUAL © PLANEPRINT...
- Page 17 The following parts should be sliced with the PROFILE P2_Hollowbody. Please note the additional settings for the individual parts! P2_V-Tail center_ae.stl MATERIAL PLA, Weight: ~ 15 g ADDITIONAL SETTINGS • Infill Pattern: Gyroid AERON PRINTING & ASSEMBLING MANUAL © PLANEPRINT...
- Page 18 Please note the additional settings for the individual parts! P4_Hinges_ae.stl MATERIAL TPU A95, Weight: ~ 1 g ADDITIONAL SETTINGS None required P4_Wing belt flex_ae.stl MATERIAL TPU A95, Weight: ~ 4 g ADDITIONAL SETTINGS • Infill Density: 100 % AERON PRINTING & ASSEMBLING MANUAL © PLANEPRINT...
- Page 19 Label the Aileron parts with adhesive tape so you don‘t mix them up during assembly. P5_AIL 2 L_ae.stl and P5_AIL 2 R_ae.stl MATERIAL LW-PLA, ~ 8 g* *Weighed (approximate guideline) ADDITIONAL SETTINGS None required AERON PRINTING & ASSEMBLING MANUAL © PLANEPRINT...
- Page 20 P5_AIL 3 R_ae.stl MATERIAL LW-PLA, ~ 4 g* *Weighed (approximate guideline) ADDITIONAL SETTINGS None required P5_AIL 4 L_ae.stl and P5_AIL 4 R_ae.stl MATERIAL LW-PLA, ~ 7 g* *Weighed (approximate guideline) ADDITIONAL SETTINGS None required AERON PRINTING & ASSEMBLING MANUAL © PLANEPRINT...
- Page 21 P5_AIL 5 R_ae.stl MATERIAL LW-PLA, ~ 4 g* *Weighed (approximate guideline) ADDITIONAL SETTINGS None required P5_AIL 6 L_ae.stl and P5_AIL 6 R_ae.stl MATERIAL LW-PLA, ~ 5 g* *Weighed (approximate guideline) ADDITIONAL SETTINGS None required AERON PRINTING & ASSEMBLING MANUAL © PLANEPRINT...
- Page 22 Label the Flap parts with adhesive tape so you don‘t mix them up during assembly. P5_Flap 2 L_ae.stl and P5_Flap 2 R_ae.stl MATERIAL LW-PLA, ~ 9 g* *Weighed (approximate guideline) ADDITIONAL SETTINGS None required AERON PRINTING & ASSEMBLING MANUAL © PLANEPRINT...
- Page 23 P5_Flap 3 R_ae.stl MATERIAL LW-PLA, ~ 5 g* *Weighed (approximate guideline) ADDITIONAL SETTINGS None required P5_Flap 4 L_ae.stl and P5_Flap 4 R_ae.stl MATERIAL LW-PLA, ~ 9 g* *Weighed (approximate guideline) ADDITIONAL SETTINGS None required AERON PRINTING & ASSEMBLING MANUAL © PLANEPRINT...
- Page 24 ADDITIONAL SETTINGS None required Remove support. Remove support. Please be careful with the knife! Please be careful with the knife! P5_Fuselage 4_ae.stl MATERIAL LW-PLA, ~ 39 g* *Weighed (approximate guideline) ADDITIONAL SETTINGS None required AERON PRINTING & ASSEMBLING MANUAL © PLANEPRINT...
- Page 25 Due to the properties of LW-PLA, grooves may appear in the 2-wall print. You can ei- ther lower the flow or simply smooth them out later with sandpaper. But here, stability comes first. AERON PRINTING & ASSEMBLING MANUAL © PLANEPRINT...
- Page 26 But here, stability comes first. P5_V-Tail 1 L_ae.stl and P5_V-Tail 1 R_ae.stl MATERIAL LW-PLA, ~ 13 g* *Weighed (approximate guideline) ADDITIONAL SETTINGS None required AERON PRINTING & ASSEMBLING MANUAL © PLANEPRINT...
- Page 27 LW-PLA, ~ 7 g* *Weighed (approximate guideline) ADDITIONAL SETTINGS None required P5_V-Tail 3 L_ae.stl and P5_V-Tail 3 R_ae.stl MATERIAL LW-PLA, ~ 5 g* *Weighed (approximate guideline) ADDITIONAL SETTINGS • Z Seam Position: Back Left AERON PRINTING & ASSEMBLING MANUAL © PLANEPRINT...
- Page 28 P5_Wing 1 L_ae.stl and P5_Wing 1 R_ae.stl MATERIAL LW-PLA, ~ 54 g* *Weighed (approximate guideline) ADDITIONAL SETTINGS None required NOTE Do not mirror in the slicer! The left and right sides of the wing are different. AERON PRINTING & ASSEMBLING MANUAL © PLANEPRINT...
- Page 29 P5_Wing 2 R_ae.stl MATERIAL LW-PLA, ~ 50 g* *Weighed (approximate guideline) ADDITIONAL SETTINGS None required P5_Wing 3 L_ae.stl and P5_Wing 3 R_ae.stl MATERIAL LW-PLA, ~ 45 g* *Weighed (approximate guideline) ADDITIONAL SETTINGS None required AERON PRINTING & ASSEMBLING MANUAL © PLANEPRINT...
- Page 30 P5_Wing 4 R_ae.stl MATERIAL LW-PLA, ~ 37 g* *Weighed (approximate guideline) ADDITIONAL SETTINGS None required P5_Wing 5 L_ae.stl and P5_Wing 5 R_ae.stl MATERIAL LW-PLA, ~ 25 g* *Weighed (approximate guideline) ADDITIONAL SETTINGS None required AERON PRINTING & ASSEMBLING MANUAL © PLANEPRINT...
- Page 31 Basic settings for LW-PLA: Please follow the instructions in our WINGTEST AND CALIBRATION TOOL on our website for correct adjustment! P5_Wing 6 L_ae.stl and P5_Wing 6 R_ae.stl MATERIAL LW-PLA, ~ 12 g* *Weighed (approximate guideline) ADDITIONAL SETTINGS • Wall Line Count: 2 AERON PRINTING & ASSEMBLING MANUAL © PLANEPRINT...
-
Page 32: Basic Information
The remaining top surface is about 1 mm thick. To compensate for this, you can move the new part to be printed down the Z axis in Cura by 1 mm. Glue joint Broken part Glue joint AERON PRINTING & ASSEMBLING MANUAL © PLANEPRINT... -
Page 33: Fuselage Assembly
After gluing the other two carbon fi ber strips into the side gaps, the fuselage is stable. NOTE Check that the fuselage is aligned straight before gluing the carbon strips! AERON PRINTING & ASSEMBLING MANUAL PRINTING & ASSEMBLING MANUAL © PLANEPRINT... - Page 34 – glider version P2_RC Frame motor_ae.stl Buildplate side down P1_Fuselage 2_ae.stl Apply CA glue to both sides of the RC Frame glider and push it into the fuselage until it stops. P2_RC Frame glider_ae.stl AERON PRINTING & ASSEMBLING MANUAL © PLANEPRINT...
- Page 35 The screws don‘t have to be unscrewed all the way so you can‘t lose them. P1_V-Tail parts_ae.stl P2_V-Tail center_ae.stl Tapping screws Ø2mm AERON AERON PRINTING & ASSEMBLING MANUAL PRINTING & ASSEMBLING MANUAL © PLANEPRINT...
- Page 36 CA glue along the thin CA glue along the thin CA glue along the entire length. entire length. entire length. P5_Wing 6 L_ae.stl AERON PRINTING & ASSEMBLING MANUAL © PLANEPRINT...
-
Page 37: Wing Assembly
In our AERON from the offi cial video, the In our AERON from the offi cial video, the tube is not glued to the wing and it holds tube is not glued to the wing and it holds without problems …... - Page 38 Wing side Wing side Steel wire Ø0.8*1000mm P1_Wing hinges L_ae.stl Finally glue the rear part of the wing protector to the fl ap to secure the steel wire. P1_Protector Wing_ae.stl Flap AERON PRINTING & ASSEMBLING MANUAL © PLANEPRINT...
- Page 39 P1_Fairing Aileron_ae.stl P2_Fairing mount_ae.stl When linking the fl ap, note that it must defl ect only slightly upwards but very far downwards (butterfl y). AERON PRINTING & ASSEMBLING MANUAL © PLANEPRINT...
- Page 40 Glue the two brackets in the fuselage and wing so that they are fl ush with the outer edge. Check that the screwed-in connectors have suffi cient contact when the wing is mounted. P1_MPX connectors_ae.stl AERON PRINTING & ASSEMBLING MANUAL © PLANEPRINT...
- Page 41 No further securing is required. securing is required. securing is required. Steel wire Steel wire Ø0.8*1000mm Ø0.8*1000mm Rod connection Here the correct length is set and fi xed. AERON PRINTING & ASSEMBLING MANUAL PRINTING & ASSEMBLING MANUAL © PLANEPRINT...
- Page 42 2. then screw the servo frame tight from below. Here the correct length is set and fi xed. AERON PRINTING & ASSEMBLING MANUAL © PLANEPRINT...
-
Page 43: Motor Mounting
NOTE When fl ying, always remember that the motor mounted directly on PLA and will get hot during longer runtime! The AERON is a glider and the motor should only be used for short climbs. Cowling lock Steel wire Ø0.8*80mm P1_Motormount base_wp.stl... -
Page 44: Tips For Fl Ying
You can also fl y PLA motor mount!), use a slightly smaller prop than the AERON fast, but at a certain speed the effect of recommended by the manufacturer and always give the ailerons begins to weaken, then simply reduce the it time to cool down. -
Page 45: Technical Specifications
Do not forget to check if the wings are exactly in ballance in the roll axis. If one wing is heavier, correct this with a small weight on the wingtip. AERON PRINTING & ASSEMBLING MANUAL © PLANEPRINT... -
Page 46: Control Direction Test
SPEED (1 or 2mm up) THERMALS (2 or 3mm down) 50 % 50 % BUTTERFLY 100 % Motor version: We recommend that you put the engine on a switch and the Butterfly on the gas stick. AERON PRINTING & ASSEMBLING MANUAL © PLANEPRINT... - Page 47 3D printing Always keep the transmitter switched on when the model will not be replaced by PLANEPRINT.com in any way. is switched on. When operating, always keep a safe distance from your Always remove the battery before disassembling the model.
Need help?
Do you have a question about the AERON and is the answer not in the manual?
Questions and answers