Table of Contents
Advertisement
Quick Links
Advertisement
Table of Contents

Related Manuals for Leica GLOW800


Summary of Contents for Leica GLOW800
- Page 1 GLOW800 User Manual 10 748 652 - Version 01...
- Page 2 The information provided by this manual is directly related to the operation of the equipment. Medical decision remains the responsibility of the clinician. Leica Microsystems has made every effort to provide a complete and clear user manual highlighting the key areas of product use. Should additional information regarding the use of the product be required, please contact your local Leica representative.
-
Page 3: Table Of Contents
Preparation before surgery (ARveo 8) Selecting a profile with GLOW800 settings Creating a new surgeon profile Check and adjust the illumination and functions 25 Pre-operation checklist (GLOW800) Test card Preparation Test card functional areas GLOW800 / Ref. 10 748 652 / Version 01... -
Page 4: Introduction
Intended user correct and efficient way. Action required; this symbol indicates that The GLOW800 is intended for professional use only. The user must you need to perform a specific action or have corresponding technical qualification and have been trained in series of actions. -
Page 5: Dangers Of Use
Risk of infection due to unsterile GLOW800 test card Ultrasound or similar in place, in case of none or insufficient Do not use the GLOW800 test card in the sterile field. blood flow visualization out of the ICG/GLOW800 procedure is Use only in non-sterile environment. -
Page 6: Description
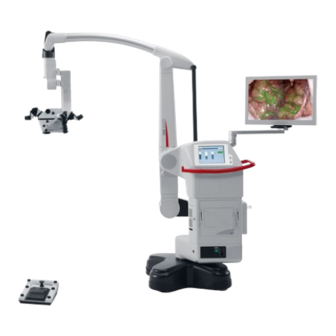
Leica ARveo 8 surgical microscope with GLOW800 components Function GLOW800 is an optional accessory for ARveo 8 that enables the user to excite and observe Near Infrared (NIR) fluorescence (FL) of the fluorophore (ICG). The filtered NIR fluorescence signal of the fluorophore (ICG) is acquired by NIR sensitive video cameras in the GLOW800 and processed in the microscope computing unit. -
Page 7: Controls
Lamp- It is recommended to use the 4-function joystick (2) to control the GLOW800 as it is defined in the GLOW800 preset, although you can assign the switches (1), (2), (3) and (5) of the handles individually in the configuration menu to fit the needs of each user. -
Page 8: Status Leds Gui Activation
GUI Activation The LEDs located on the C-arm of the stand are in the near sight of In addition to the handle button, GLOW800 can also be activated the surgeon and inform about the fluorescence and recording status and deactivated from the touch screen panel. Tapping the mode of the microscope: icon (1) a menu of available fluorescence modes is presented. -
Page 9: Overview
Heads-Up Microsurgery user manual. 3D glasses With the external 3D Video Monitor on cart and the 3D stand monitor, the below 3D glasses are provided GLOW800 / Ref. 10 748 652 / Version 01... -
Page 10: Fluorescence Observation Modes
Overview Fluorescence observation modes Black&White (monochrome) fluorescence view Video#2B GLOW800 offers two different modes to observe the fluorescence video signal: 5.2.1 Type A: Pseudocolor mode (Pseudocolor White light object view with the embedded fluorescence signal in pseudocolor, Video #1A Fluorescence display layout The following visualization settings can be predefined in the "View... - Page 11 Independent if the selected pseudocolor is "GREEN" or "BLUE", the pseudocolor picture on the "View Configuration" will always be displayed in "GREEN", however the monitor will display the user selected pseudocolor. GLOW800 / Ref. 10 748 652 / Version 01...
-
Page 12: Modify The Glow800 Settings
Tap the menu icon in the upper left corner of the "Live Screen" page (1). The "Options" page is displayed. Tap the "Surgeon Settings" icon (2) The "Surgeon Settings" page is displayed: GLOW800 / Ref. 10 748 652 / Version 01... -
Page 13: Fluorescence Settings
The default values for the lower and upper thresholds are 0 % and 100 % respectively, to observe the full range of fluorescence signals. GLOW800 / Ref. 10 748 652 / Version 01... - Page 14 Lower Threshold at 40 % and upper Threshold at 70 % - middle to high intensity is displayed only Leica GLOW800 10 746 513-xx Please read the Leica GLOW800 user manual! Black & White fluorescence observation White light + fluorescence observation (Video monitor) (Video monitor) GLOW800 / Ref. 10 748 652 / Version 01...
-
Page 15: Intensity
Medium intensity setting – 50 % Maximum intensity setting – 100 % Adjust the "Intensity" values from the live screen using the rotary menu (2). GLOW800 / Ref. 10 748 652 / Version 01... -
Page 16: Brightcare
Xenon bulb lifetime reaches its end. There is a default limitation to the WD and Mag when using the GLOW800 mode. If the WD and Mag are above this limit before switching to GLOW800 mode, the WD and Mag will be reduced upon switching to GLOW800 mode and the picture will get out of focus. - Page 17 • the monochrome fluorescence image and the digital white light image in Picture-in-picture or Side-by-side mode depending on the settings on the "Viewing Configuration" page (see chapter 5.3 "Fluorescence display layout", page 10). • Pseudocolor: Color display in GLOW mode. GLOW800 / Ref. 10 748 652 / Version 01...
-
Page 18: Recording
After 3 minutes the mode and recording will be stopped automatically and return to white light mode. Additionally you can take GLOW800 pictures via an assigned handle and/or foot switch button or the camera (2) icon on the touch panel. -
Page 19: Preparation Before Surgery (Arveo 8)
This brings up a detailed view of the video or picture on the touch panel. Select a surgeon profile for which the GLOW800 profile has already been defined at the "Select surgeon" page: Create a new surgeon profile if a surgeon profile has not been defined yet. - Page 20 • The "Create New" function (see chapter 8.2.3 "Creating a new profile", page 21) allows to start from blank list of user input settings which you can configure. GLOW800 / Ref. 10 748 652 / Version 01...
- Page 21 The dialog box is closed and the selected profile is copied into The dialog box is closed and the selected surgeon's profile and the surgeon profile and allows for activation of the GLOW800 function mappings are now copied into the new surgeon mode by pushing the joystick of the left handle to towards the profile you just created.
- Page 22 When you are on the handle configuration page, click the Tap on the "Surgeon Settings" button (2). button you want to assign for the activation of the GLOW800 The "Surgeon Settings" menu is displayed: mode. This will display the "Select function" popup window for the selected button: Tap "Handles"...
- Page 23 A list of available FL functions will be displayed: settings. The "Save Surgeon Settings" window will be displayed: Select the GLOW800 function (2) and tap "Confirm" (3) to store the settings. Save and store the settings by pressing "Yes, change in profile"...
- Page 24 Moving the joystick on the left handle to the left activates or The following selection menu opens: deactivates the GLOW800 mode. This preset can also be used as a starting point when creating a new surgeon profile (see chapter 8.2.2 "Copying settings from the GLOW800 "_Vascular"...
-
Page 25: Check And Adjust The Illumination And Functions
Switch on the illumination. It is highly recommended to change an existing surgeon profile or Check the microscope illumination. add a new surgeon profile to integrate the GLOW800 function in a Test the GLOW800 with the test card. full workflow. -
Page 26: Test Card
Check and adjust the illumination and functions Test card To check and test the GLOW800 function, to verify the proper adjustment of the white light and fluorescence image and to verify the illumination level the GLOW800 test card has to be used. -
Page 27: Test Card Functional Areas
Test card functional areas Adjust the fluorescence excitation to 50 %. The GLOW800 test card can now be observed in the eyepiece or Tests in white light fluorescence observation mode in white light fluorescence on the optional monitor. Check for the proper adjustment of the fluorescence image with the white light image. -
Page 28: Operation
WARNING • Excitation GLOW800 = 50 % Danger of injury to the patient due to not approved In GLOW800 fluorescence mode at least the fluorescence bars fluorescence media 0–6 have to be visible (E). Only use fluorescence media approved for the planned Check if the fluorescence pseudocolor is the one you intend to application, for example Indocyanine Green (ICG). -
Page 29: Care And Maintenance
Care and maintenance 11 Care and maintenance CAUTION Danger of injury to the patient due to excessive GLOW800 radiation GLOW800 is an accessory for ARveo 8. For care and GLOW800 mode is disabled automatically after 180 seconds. maintenance, refer to the user manual of ARveo 8. -
Page 30: What To Do If
If not all fluorescent areas can be in focus, there is no way to avoid this effect. GLOW800 / Ref. 10 748 652 / Version 01... -
Page 31: Corrections By The User
13.4 Corrections by the user Observation Cause Remedy Neither a sharp GLOW800 nor a sharp White Light The diopter settings of the surgeon's eyepiece are Adjust the WD to receive a sharp video image image on the monitor incorrect and you work off parfocality and adjust the diopters correctly. -
Page 32: Malfunction
Use test card for proper testing. Call the Leica service if the issue persists. No sharp GLOW800 image on the monitor in low The fluorescence focal plane is misaligned. Contact Leica Service. magnification, but the White Light image is... -
Page 33: Technical Data
14 Technical data The figure shows the camera image size with respect to the field of view for the visual video camera and the GLOW800 14.1 Technical data GLOW800 NIR camera. Please be aware that the field of view is not fully covered by the documentation system. -
Page 34: Manufacturer's Declaration Of Electromagnetic Compatibility (Emc)
Manufacturer's declaration of electromagnetic compatibility (EMC) 15 Manufacturer's declaration of electromagnetic compatibility (EMC) The GLOW800 was tested in combination with ARveo 8. For the EMC declaration, refer to the corresponding user manual. GLOW800 / Ref. 10 748 652 / Version 01... - Page 35 GLOW800 / Ref. 10 748 652 / Version 01...
- Page 36 10 748 652en/01 • Copyright © by Leica Microsystems (Schweiz) AG, Medical Division, CH-9435 Heerbrugg, 2022 • 11.2022 – • LEICA and the Leica Logo are registered trade- marks of Leica Microsystems IR GmbH. Leica Microsystems (Schweiz) AG · Max Schmidheiny Strasse 201 · CH-9435 Heerbrugg T +41 71 726 3333 www.leica-microsystems.com...
Need help?
Do you have a question about the GLOW800 and is the answer not in the manual?
Questions and answers