Table of Contents
Advertisement
Quick Links
Advertisement
Table of Contents

Related Manuals for Leica GLOW800


Summary of Contents for Leica GLOW800
- Page 1 GLOW800 User Manual 10 747 241 - Version 04...
- Page 2 The information provided by this manual is directly related to the operation of the equipment. Medical decision remains the responsibility of the clinician. Leica Microsystems has made every effort to provide a complete and clear user manual highlighting the key areas of product use. Should additional information regarding the use of the product be required, please contact your local Leica representative.
-
Page 3: Table Of Contents
Image injection of GLOW into the eyepiece(s) (User Settings) Video Fine Focus Check the illumination and function and adjustment Pre-operation checklist (GLOW800) Test card Preparation Test card functional areas Operation Using the GLOW800 Controlling the GLOW800 functions GLOW800 / Ref. 10 747 241 / Version 04... -
Page 4: Introduction
The GLOW800 is an accessory for Leica surgical microscopes. user manual of the Leica surgical microscope, and in particular In this user manual the functions of the GLOW800 are described. the safety notes. For information and description of the Leica surgical microscope,... -
Page 5: Information For The Person Responsible For The Instrument
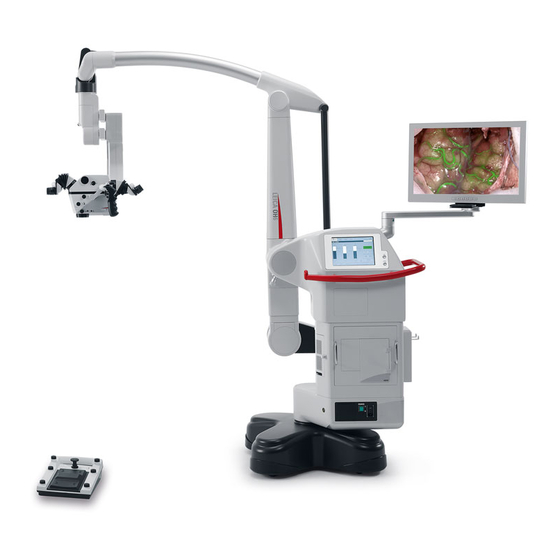
Function fluorescence media. Only use fluorescence media approved for the planned The illumination for the GLOW800 is a xenon lamp and is located in application. the Leica surgical microscope. This lamp provides visible and near infrared light. The NIR light cannot be observed through the... - Page 6 5 Interface main surgeon, 360° rotatable GLOW800 components 6 GLOW800 ULT • GLOW800 is built into the housing of the ULT530 • Integrated cameras for visible light and for NIR light (fluorescence), one common remote controlled fine focus for both...
- Page 7 1 Monitor (optional) 2 GUI screen 2 GUI screen 3 GLOW800 VPU (see chapter 3.2.2) 3 GLOW800 VPU (see chapter 3.2.2) 4 Illumination unit 4 Illumination unit 5 Status LED 5 Status LED GLOW800 / Ref. 10 747 241 / Version 04...
-
Page 8: Glow800 System Components - Signal Overview
= pseudo color fluorescence B/W-FL = black & white fluorescence WL/pc-FL = White light object image & pseudo color fluorescence 3D visualization is only for teaching purposes not intended for heads-up surgery. GLOW800 / Ref. 10 747 241 / Version 04... -
Page 9: Description
InfraRed (IR) to excite the fluorophore (ICG). The filtered NIR fluorescence signal of the fluorophore (ICG) is Black&White fluorescence view Video#2B acquired by a NIR sensitive video camera in the GLOW800 ULT and processed in the GLOW800 VPU. 5.1.1... - Page 10 5.1.2 Fluorescence observation and recording with a documentation system The GLOW800 VPU generates two videos which can be recorded by an optional documentation system, e. g. HDMD PRO, if integrated into the surgical microscope. The following recording and visualization settings can be predefined on an optional documentation system. The records and displays are done in the following way: White light fluorescence type A: Pseudocolor mode (Pseudocolor On –...
- Page 11 Right = video #1B With the optional HDMD Pro recording system activating and deactivating the GLOW800 will automatically start and stop the recording of the two predefined video streams. If the recording of the white light mode is already running, the recording will switch to record the two predefined video streams ("Loop WL and "Loop NIR").
-
Page 12: Controls
Y– It is recommended to use the 4-function joystick (2) to control the GLOW800 as it is defined in the GLOW800 preset, although you can assign the switches (1), (2), (3) and (5) of the handles individually in the configuration menu to fit the needs of each user. -
Page 13: Preparation Before Surgery
GLOW800 is on If the optional recording system is integrated into the microscope system, the recording icon (5) will change from black to red if the GLOW800 NIR video sequence (loop) is recorded. The replay icon (4) stays black. In replay mode the replay icon (4) becomes green and the recording icon (5) stays black (see below). - Page 14 In the left selection field, select the "Fluorescence" function group (7) by clicking on it. Modifying the "Fluorescence Vascular GLOW800" user preset Assign the function "GLOW800 Mode On/Off" (8) to any button If you adjusted the settings of the "Fluorescence Vascular by selecting the desired function.
-
Page 15: Fluorescence Visibility
Click on the "Save" button (9) to save your settings under the Excitation intensity) user name entered at the desired location. Open the "FL" tab to set the GLOW800 brightness to the In the service menu, a value for the maximum duration of required level with bar (1). -
Page 16: Glow800 User Setting Menu
GLOW800 User Setting Menu 7.2.3 GLOW800 Limits The "GLOW800 Limits" define Magnification and Working Distance The tab offers specific GLOW800 settings for each user: ranges for good fluorescence visibility. 7.3.1 Pseudocolor Pseudocolor defines one of two types of fluorescence observation. - Page 17 LowerThreshold at 40 % and upper Treshold at 70 % - middle to high intensity is displayed only Leica GLOW800 10 746 513-xx Please read the Leica GLOW800 user manual! Black & White fluorescence observation White light fluorescence observation (Video monitor) (Video monitor) GLOW800 / Ref. 10 747 241 / Version 04...
- Page 18 «Apply» button (7, page 14) to observe the results on the screen and eyepieces (with optional CaptiView). If the new range is saved the red bars will move to the appriate positions in the graphics; example: 32–72 % range. GLOW800 / Ref. 10 747 241 / Version 04...
- Page 19 If the GLOW800 image is injected in the left or both eyepieces by use of the optional CaptiView module (chapter 7.7), the choice of colors is reduced to blue #3 and green #6.
-
Page 20: User Settings Camera
• Reduction of the white light anatomical image brightness with the WL Brightness bar (6, page 14) 7.3.6 Apply button By pressing the "Apply" button (7, page 14) on the GLOW800 GLOW800 / Ref. 10 747 241 / Version 04... - Page 21 Disclaimer: Views on monitor or in the eyepiece might slightly differ from the images shown in this manual. GLOW800 / Ref. 10 747 241 / Version 04...
- Page 22 No homogenization No homogenization Medium homogenization – 50 % Medium homogenization – 50 % Maximum homogenization – 100 % Maximum homogenization – 100 % Homogenization is as well active in B/W mode (Pseudocolor = OFF). GLOW800 / Ref. 10 747 241 / Version 04...
-
Page 23: Video Settings
White light, GLOW800, FL400 and FL560 - by toggling from mode to mode with button (1): To re-activate the default/company reset values press the Default button (9). -
Page 24: Glow800 Image Injection
GLOW800 image injection With the optional CaptiView image injection integrated into the surgical microscope M530 ARveo, OH6 and OHX, the GLOW800 fluorescence information can be observed in the right, left or both eyepieces, as an injected digital image or as an overlay, according to the selected fluorescence observation type and the CaptiView settings. -
Page 25: Image Injection Of Glow Into The Eyepiece(S)
(User Settings) The GLOW800 ULT offers fine focusing and parfocality reset of the video focus. The injection of the GLOW800 images can be defined for each user in the CaptiView tab with the setting "GLOW800" (1) and the following options: •... -
Page 26: Check The Illumination And Function And Adjustment
Check the illumination Test card and function and To check and test the GLOW800 function, to verify the proper adjustment of the white light and fluorescence image and to verify adjustment the illumination level the GLOW800 test card has to be used. -
Page 27: Preparation
Switch to GLOW800 mode by pressing the GLOW800 On/Off button on the handle. Adjust the fluorescence illumination to 50 %. The GLOW800 test card can now be observed in the eyepiece in white light and on the optional monitor in white light fluorescence. -
Page 28: Test Card Functional Areas
Leica GLOW800 10 746 513-xx 1–6 Check the fluorescence intensity. At the required WD = 350 mm, Magnification = 3.0× and illumination = 50 % in GLOW800 fluorescence mode at least the fluorescence bars 1-6 have to be Please read the Leica visible. -
Page 29: Operation
GLOW800 video signals to the system's video output, ports and the video is displayed on the monitor. At the same time the recording of the GLOW800 video When using GLOW800 please ensure to have a Doppler signals is started at the optional connected HDMD PRO Ultrasound or similar in place, in case of none or insufficient recording unit. - Page 30 Please refer to the user manual of the corresponding Leica surgical microscope. 10.2 Design The GLOW Autofocus is an accessory to the Leica OH6, Leica OHX or ARveo control units. • Autofocus tab in the user settings 1 GLOW Autofocus USB stick...
- Page 31 Autofocus system Click the green "Autofocus" button. A message is displayed and in the following the "Autofocus" To operate the Leica OH6, Leica OHX or ARveo control unit, button will be gray. read the user manuals of the corresponding surgical microscope systems.
- Page 32 If not otherwise specified in the Autofocus service menu, the Autofocus window. Autofocus will scan up and down for the best focal plan in the WD range from 225 to 600 mm starting at the present position. GLOW800 / Ref. 10 747 241 / Version 04...
- Page 33 Care and maintenance 11 Care and maintenance GLOW800 is an accessory for a Leica surgical microscope. For care and maintenance please refer to the user manual of the Leica surgical microscope. 12 Disposal The respective applcable national laws must be observed for disposal of the products, with the involvement of corresponding disposal companies.
- Page 34 • Are the power cables attached correctly? • Are all connecting cables attached correctly? • Are all video cables attached correctly? 13.1 General For malfunctions regarding the Leica surgical microscope refer to the user manual of the Leica surgical microscope. 13.2 GLOW800 13.2.1 Calibration Observation...
- Page 35 13.2.4 Corrections by the user Observation Cause Remedy Neither a sharp GLOW800 nor a sharp White Light The video fine focus is not adjusted correctly Press the parfocal button or adjust the fine image on the monitor focus manually by pressing the buttons (+) or (-).
- Page 36 8 %. A fluorescence signal is reflected by surrounding Increase the lower threshold to 8 %–12 %. tissue Remaining ICG shows low fluorescence Increase the lower threshold to 8 %–12 %. GLOW800 / Ref. 10 747 241 / Version 04...
- Page 37 Use test card for proper testing. Call the Leica service if the issue persists. No sharp GLOW800 image on the monitor in low The fluorescence focal plane is disadjusted. Get in contact with Leica Service. magnification, but the White Light image is...
- Page 38 The figure shows the camera image size with respect to the The GLOW800 was tested in combination with Leica surgical field of view for the visual video camera and the GLOW800 microscopes. For the EMC declaration, please refer to the NIR camera.
- Page 39 Technical data GLOW800 / Ref. 10 747 241 / Version 04...
- Page 40 Copyright © by Leica Microsystems GmbH, 2019, Switzerland. Subject to modifications. LEICA and the Leica Logo are registered trademarks of Leica Microsystems IR GmbH. 10 747 241en/04 Printed – 02.2020...
Need help?
Do you have a question about the GLOW800 and is the answer not in the manual?
Questions and answers