
Subscribe to Our Youtube Channel
Related Manuals for TA Instruments DISCOVERY XENON FLASH


Summary of Contents for TA Instruments DISCOVERY XENON FLASH
- Page 1 DISCOVERY XENON FLASH DXF-200 getting Started guide Revision A Issued September 2020...
- Page 2 TA Instruments may have patents, patent applications, trademarks, copyrights, or other intellectual prop- erty covering subject matter in this document. Except as expressly provided in written license agreement from TA Instruments, the furnishing of this document does not give you any license to these patents, trademarks, copyrights, or other intellectual property.
-
Page 3: Introduction
Introduction Important: TA Instruments Manual Supplement Please click the TA Manual Supplement link to access the following important information supplemental to this Getting Started Guide: • TA Instruments Trademarks • TA Instruments Patents • Other Trademarks • TA Instruments End-User License Agreement •... -
Page 4: Notes, Cautions, And Warnings
Notes, Cautions, and Warnings This manual uses NOTES, CAUTIONS, and WARNINGS to emphasize important and critical instructions. In the body of the manual these may be found in the shaded box on the outside of the page. NOTE: A NOTE highlights important information about equipment or procedures. CAUTION: A CAUTION emphasizes a procedure that may damage equipment or cause loss of data if not followed correctly. -
Page 5: Warnings
Warnings WARNING: The operator of this instrument is advised that if the equipment is used in a manner not specified in this manual, the protection provided by the equipment may be impaired. AVERTISSEMENT: L'utilisateur de cet instrument est prévenu qu'en cas d'utilisation contraire aux indications du manuel, la protection offerte par l'équipement peut être altérée. -
Page 6: Thermal Safety
Thermal Safety DANGER: Source instrument surfaces can be hot enough to cause discomfort when in contact with the skin during a sample run. If you are conducting a subambient test, cold could also cause injury. After running any type of experiment, you must allow the DXF system to return to near room temperature before you touch the inner cell surfaces. -
Page 7: Table Of Contents
Thermal Safety ..........................6 Chemical Safety ..........................6 Lifting the Instrument ........................6 Table of Contents............................7 Chapter 1: Introducing the Discovery Xenon Flash................9 Overview ............................... 9 DXF System Components .......................... 10 Pulse Source Module ..........................10 Environmental Modules and Solid State (Pins) Detector Assembly ........... 14 Instrument Specifications ........................... - Page 8 Stopping an Experiment ..........................39 Chapter 4: Maintaining the DXF/EM..................... 40 General Cleaning Practices ......................... 40 Recommended Cleaning Supplies ......................41 Cleaning Maintenance Schedule ......................... 41 Maintenance Procedures ..........................42 Clean the Solid State Detector Pins ..................... 42 Clean the Light Pipe Assembly ......................43 Clean the Xenon Lamp Assembly Optics ....................
-
Page 9: Chapter 1: Introducing The Discovery Xenon Flash
Thermal conductivity can be calculated as a product of the thermal diffusivity, the specific heat, and the density of the material. A Discovery Xenon Flash (DXF) system automatically deter- mines the thermal conductivity using the measured (or separately entered) specific heat capacity and ther- mal diffusivity, with separately-entered density data. -
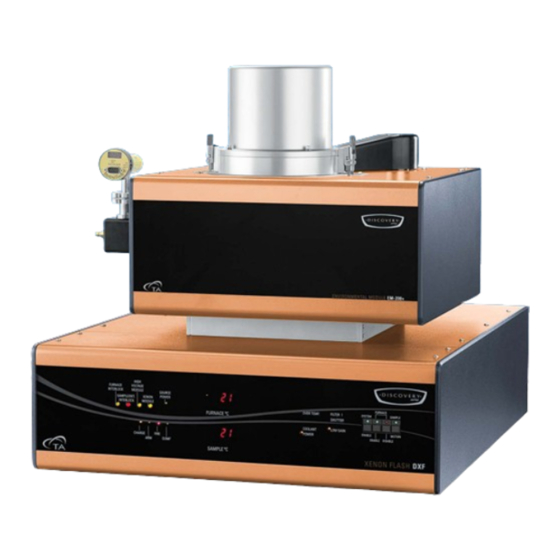
Page 10: Dxf System Components
Detector Assembly, and the controller. Pulse Source Module The Discovery Xenon Flash (DXF) covers the most commonly needed cryogenic to 200°C temperatures with a range of Environmental Modules, and employs a High Speed Xenon-Pulse Delivery Source (HSXD). The reflective optic configuration effectively harnesses the power of a Xenon flash tube, and, with the aid of proprietary wave guides, delivers it to the sample inside the Environmental Module. - Page 11 Table 1: DXF Front Panel LED Indicators - Flashlamp Indicator Function INTERNAL INTERLOCK 2 This internal interlock checks to make sure the metal covers are in place for the high voltage power section of the instru- ment. When the covers are closed the INTERNAL INTER- LOCK 2 LED changes from red to green.
- Page 12 Table 2: DXF Front Panel LED Indicators - Temperature Displays Indicator Function FURNACE TEMPERATURE°C Indicates the current temperature of the furnace. There are several indicators just to the left of the temperature display that may light up during normal operation. SPECIMEN TEMPERATURE °C Indicates the current temperature of the sample.
- Page 13 Table 3: DXF Front Panel Switches Indicator Function HARDWARE ENABLE When prompted by the operating software, this switch is pressed to enable the operation of the electronic hardware. If all the electronic checks are correct, the switch's integrated green LED will light up. ON INTERLOCK When prompted by the operating software, this switch is pressed to enable the temperature control of the furnace.
-
Page 14: Environmental Modules And Solid State (Pins) Detector Assembly
Environmental Modules and Solid State (Pins) Detector Assembly The Environmental Module includes a cooling block with heater cartridge-resistance furnace, providing temperature control of the sample operation in air or inert gas. The EM also includes a two-sample holder, supporting a variety of sample sizes. Adapters are available for smaller cylindrical and/or square samples. The module includes a Solid State (Pins) Detector. -
Page 15: Instrument Specifications
Instrument Specifications The tables found below contain the technical specifications for the DXF and EM. Table 4: DXF Technical Specifications Item/Area Specifications Dimensions Depth 66.04 cm (26 in) Width 53.34 cm (21 in) Height 40.64 cm (16 in) Weight 44 kg (96 lbs) System supply voltage: 198–242 VAC (rated for 10A) Power 50/60 Hz. - Page 16 CAUTION: Dewar LN tank minimum 50 litters capacity. Maximum 22 psi (1.5 bar) supply pres- sure. Pressure exceeding 22 psi will damage the instrument. MISE EN GARDE: Réservoir Dewar LN2 d'une capacité minimale de 50 litres. Pression d'alimenta- tion maximale de 22 psi (1,5 bar). Une pression supérieure à 22 psi endommagera l'instrument. DXF-200 Getting Started Guide Page 16...
-
Page 17: Chapter 2: Installing The Dxf System
• Connecting the utilities It is strongly recommended that you have your DXF system installed by a TA Instruments Service Repre- sentative; call for an installation appointment when you receive your instrument. CAUTION: To avoid mistakes, read this entire chapter before you begin installation. -
Page 18: Choosing A Location
Choosing a Location Because of the sensitivity of DXF experiments, it is important to choose a location for the instrument using the following guidelines. The DXF system should be: • A temperature and humidity controlled area. • A clean, vibration-free environment. •... -
Page 19: Moving The Instrument
All power strips must be fully grounded and carry the ground through to the sockets into which the computer is plugged. MISE EN GARDE: Un fil de masse lourd et indépendant doit être fourni via le raccordement élec- trique. Une mise à la terre incorrecte peut causer de graves dommages pour lesquels le fournisseur décline toute responsabilité. -
Page 20: Connecting The Environmental Module To The Pulse Source Module
Connecting the Environmental Module to the Pulse Source Module Before making any connections, make sure the DXF is level. Place the reflector in the location shown in the image below, and then install the sealing foam. Sealing Foam Reflector Alignment Pins Alignment Tracks Figure 5 Reflector and sealing foam. - Page 21 Lock the EM into place by rotating the red locking mechanisms 180 degrees to face inward. UNLOCKED LOCKED Figure 7 Lock the EM onto the DXF. Allow an additional 30 cm (12 in) clearance to the right of the instrument for connecting the LN tank.
-
Page 22: Dxf Back Panel
DXF Back Panel The table below provides a description of the function of each port/cable on the DXF back panel. Refer to Figure 8 for an illustration of rear connections. Ports not described and not labeled are not used. Table 6: DXF Back Panel Ports and Functions Port Function... - Page 23 POWER LED indicators J102 (SOLID STATE USB1 Cable J101 ENTRY DETECTOR Cable) MODULE USB Cable TEMPERATURE CONTROLLER COMMUNICATION Cable Figure 8 DXF back panel connections. DXF-200 Getting Started Guide Page 23...
-
Page 24: Connecting The Environmental Module To The Pulse Source
DXF Top Panel The DXF top panel has three ports; the table below provides a description of the function of each port. Refer to Figure 7 for an illustration of rear connections. Port Function TEMPERATURE SENSORS Connect Furnace and Sample RTD wires to Controls HEATER POWER Connect Heater Wires to Controls CRYOGENIC VALVE CONNECTION... -
Page 25: Setting Up System Communication With The Controller
Setting Up System Communication with the Controller Place the computer and monitor to the side of the unit and connect the keyboard and mouse. Connect the USB cable from the back of the DXF to the controller. Connect the USB1 cable from the back of the DXF to the controller. Connect the monitor cable to the monitor port on the computer. -
Page 26: Connecting The Utilities
Connecting the Utilities Connecting the Power Plug the SYSTEM POWER cord on the back of the DXF to an electrical outlet rated in accordance with the power input information on the back of the instrument. CAUTION: Whenever plugging or unplugging power cords, handle them by the plugs, not by the cords. -
Page 27: Connecting The Gas Lines
NOTE: Use one wrench to keep the fitting on the furnace stationary while tightening the hose end to it. Do the same for the next step. Connect one end of the second coolant line to the LN2 OUTLET (see Figure 3) fitting and connect the other end to a hood or vent. -
Page 28: Chapter 3: Operating The Dxf
Chapter 3: Operating the DXF Using the DXF All your DXF experiments will have the following general outline. In some cases, not all of these steps will be performed. Most of these steps are performed using the instrument control software. The instruc- tions needed to perform these actions can be found in the online help in the instrument control software;... -
Page 29: Startup And Shutdown Procedures
Startup and Shutdown Procedures Starting the DXF System The power switch is located on the back panel of the DXF. The power switch is used to turn the DXF sys- tem on and off. To power on the system: Check all connections between the DXF, the Environmental Module, the Solid State Detector Assembly, and the controller. -
Page 30: Running A Discovery Dxf Experiment
Running a Discovery DXF Experiment Preparing the Sample The method is applicable for testing homogeneous, solid, and opaque materials. The sample should have an electrically conducive surface. Materials greatly deviating from the above can be tested with special sample preparations–for non-electrical contact surfaces (polymers, ceramics, etc) a layer of silver paint must be applied, or you can sputter the sample with gold, platinum, silver, nickel. -
Page 31: Transparent Or Translucent Materials
Transparent or Translucent Materials The method requires that all of the energy from the flash be absorbed on one face of the sample. For mate- rials that are transparent or translucent, the energy from the light pulse will travel to different depths in the sample (depending on opacity) or may completely pass through in a completely transparent sample. - Page 32 Applying Graphite Spray The following is the procedure for coating samples with graphite spray: NOTE: Only one side (the bottom) of the sample should be coated with graphite spray. Place the samples onto a plain sheet of paper. Locate them in one line close to each other. Using a heat gun, gently warm the samples.
-
Page 33: Loading And Unloading The Sample
Loading and Unloading the Sample Turn off the LN2 supply. WARNING: Cartridges will be hot. Use caution when loading and unloading samples. Check the furnace temperature on the front panel; 60°C and below is safe to handle. AVERTISSEMENT: Les cartouches sont chaudes. Soyez prudent lors de la mise en place et de la décharge des échantillons. - Page 34 Lift the Solid State Detector up and swing it to the right side away from the sample area. Figure 14 Swing the Solid State Detector away from the sample area. Swing the locking arm back so that it rests against the side of the Solid State Detector, holding it in place. Figure 15 Locking arm holding the Solid State Detector away from the sample area.
- Page 35 The sample holder fits 1/2” (12.7 mm) O.D. samples. If there are screws in the four corners of the sample holder, remove them. If using 1” (25.4 mm) O.D. samples, remove the sample holder. Figure 17 1/2” (12.7 mm) O.D. sample holder cover. With tweezers, carefully place the sample into the sample holder.
- Page 36 10 Move the Solid Sample Detector back into place on top of the sample chamber, making sure that the tip of the pins reaches the center of the sample. Figure 20 Pins. 11 Move the locking arm back into place, aligning the locking arm with the groove in the top center of the Solid State Detector.
-
Page 37: Preparing The Instrument
Preparing the Instrument Evacuating the System All are equipped with purge capabilities. Back-fill with Purge Gas Open the needle valve and allow the gas to flow inside of the furnace for approximately ? minutes. DXF-200 Getting Started Guide Page 37... -
Page 38: Starting An Experiment
Starting an Experiment Access the instrument control software to create or choose the test procedure as well as enter sample and instrument information through the instrument control software. Consult online help for experimental instructions. To open the software, double-click the FlashLine icon on the computer desktop. Click Operation >... -
Page 39: Stopping An Experiment
Enter the test parameters and then click Start Test. Refer to online help for details on entering test parameters in the Test Information window. Figure 23 Test Information window. Stopping an Experiment If for some reason you need to discontinue the experiment, you can stop it at any point by clicking the Operation menu in the Flashline software and then selecting Stop Test. -
Page 40: Chapter 4: Maintaining The Dxf/Em
The primary maintenance procedures described in this chapter are the customer’s responsibility. Any fur- ther maintenance should be performed by a representative of TA Instruments or other qualified service per- sonnel. Consult the Help documentation installed with the instrument control software for further information. -
Page 41: Recommended Cleaning Supplies
The instrument is considered clean if the signal (max. temperature of thermo diagram) is larger than 200 millivolts. If, after cleaning the instrument and running a check test, the signal of thermo diagram is still smaller than 200 millivolts, contact TA Instruments Service. DXF-200 Getting Started Guide Page 41... -
Page 42: Maintenance Procedures
Maintenance Procedures Clean the Solid State Detector Pins The Solid State Detector pins can be worn down over time after repeated contact. Debris from the sample can also accumulate on the tips. Checking and cleaning the pins periodically is important because they must make good contact with the surface of the sample to obtain accurate results. -
Page 43: Clean The Light Pipe Assembly
Lift the Solid State Detector up and swing it slightly to the side away from the sample area. Swing the locking arm back so that it rests against the side of the Solid State Detector, holding it in place. Figure 26 Locking arm holding the Solid State Detector in place. Check the pin shape. -
Page 44: Clean The Xenon Lamp Assembly Optics
assembly located on the bottom of the EM. Remove the four screws from the Light Pipe Assembly panel. Figure 28 Remove the light pipe assembly. Remove the Light Pipe Assembly from the EM. Figure 29 Light Pipe Assembly. Inspect the assembly for debris, dust, and smoke. Using a clean, oil-free optical-grade air source, blow out all the dust/debris that is on the surface of the light pipe. -
Page 45: Replacement Parts
Replacement Parts Replacement parts for the DXF are listed below. Refer to the table below when ordering parts. Part Number Description 853866.901 In-Plane Test Kit, Stainless Steel, 25.4 mm OD, DXF-200 202417.001 Graphite Paint 202419.001 Silver Paint - Vial - 1 oz. 853189.901 Pin Detectors SOLID STATE PKG/2 853135.901...
Need help?
Do you have a question about the DISCOVERY XENON FLASH and is the answer not in the manual?
Questions and answers