Table of Contents
Advertisement
Quick Links
ZBM999901
9_2011
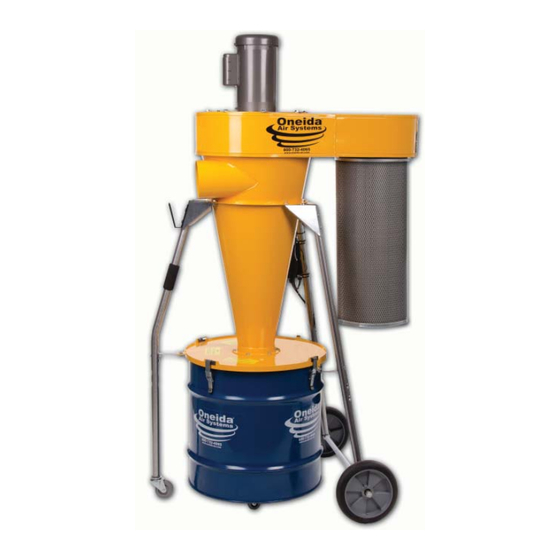
Powerful Portable Economical Made in the USA
Appearance may vary sligthly.
®
1.5hp Dust Gorilla Portable Dust Collector - XXP999901
1.800.732.4065
www.oneida-air.com
1001 W. Fayette St., Syracuse, NY 13204
Oneida Air Systems, Inc. was founded in 1993 to bring cost effective, state-of-the-art
dust collection systems and material handling ductwork to woodworking shops. OAS
designs and manufactures industrial grade dust collection systems that create a prac-
tical, safe and healthy work place environment.
Advertisement
Table of Contents

Related Manuals for Oneida Air Systems Gorilla XXP999901


Summary of Contents for Oneida Air Systems Gorilla XXP999901
- Page 1 1001 W. Fayette St., Syracuse, NY 13204 Oneida Air Systems, Inc. was founded in 1993 to bring cost effective, state-of-the-art dust collection systems and material handling ductwork to woodworking shops. OAS designs and manufactures industrial grade dust collection systems that create a prac-...
-
Page 2: Table Of Contents
Thank You for Choosing an Oneida Air Systems Product! OAS manufactures and sells dust collection equipment only. Our qualifi ed technicians and sales staff are available 8:30am - 5:00pm EST Mon. - Fri. to answer any questions concerning OAS products and dust collection. Call for duct- work design and ductwork quotes, including system pricing and shipping cost. -
Page 3: System Start-Up Information
I. System Start-Up Information 1. Read the installation and maintenance instructions as well as the recommended safety practices in this manual Warning Do not operate Fan / Blower unless Fan Housing is attached to Cyclone body and Dust Drum is in place. - Page 4 1.5hp Portable Collector The new Oneida Air Systems 1.5hp Portable dust col- lector offers you power and mobility at an ecomonical price. Included with this collector are: Part # Description An internal silencer that helps make our systems some of the quietest on the market.
-
Page 5: Parts List
Hardware List III. Parts List ASC000125 - Caulk Single (1) 1. BXI999901 -1.5hp Motor Assembly 2. BHX001801 - Fan Housing (1) AFB025175 - Carriage Bolt 1/4”- 20 x 1.75” (9) 3. SCX001801A - Cyclone (1) 4. SEX350600 - Drum Lid (1) 5. - Page 6 Bolt All hardware may not be shown because of Washer Gasket Material Motor Plate perspective. Check parts list for complete Clips - AFT051618 amounts. It is CRITICAL that this part of the clip is put on the Housing inside of the Fan Blower Housing and Cone as shown here.
-
Page 7: Dimensions
IV. Dimensions 35” 6” Dia. Inlet 77” 55” Gal. Steel Drum 26” 33” 3” 48” Systems Electrical Data 110 / 230V - 16 / 8 Amps Electrical Extension Cord Data Indoor/Outdoor Indoor Cord Type Appliance Wire Gauge 12.0 Length (Feet) 9.0 Plug Confi... -
Page 8: System Assembly
V. System Assembly Drum Lid Assembly Apply 1” gasket around rim of the under- side of drum lid. [Figure 3] It is always good to have a qualifi ed helper to Carefully align the ends so there is no gap be- tween them and it makes a tight seal against assist you during assembly. - Page 9 Cut 3 wooden blocks from a 2 x 4 that are Attach gusset 2 1/2” high. [Figure 8] to front leg using 2” Place blocks under drum so it lifts it and will not carriage bolt / gusset roll. [Figure 8A] / leg / 1/4”...
- Page 10 Put wheel nuts between 4” - 5” from Apply 1/2” gasket around outside of bolt each end of threaded axle. Next put axle holes in cyclone top as shown, making sure through rear leg eyebolts. Then loosely put jam there is no gap where ends butt together. nuts on each end followed by the wheels with hub on the inside.
- Page 11 With a helper and step stools, lift the Put gauge through supplied mounting plate motor assembly up with motor in front and with pre-cut 2 5/8” hole. Put the two bolts from carefully lower into hole making sure you gauge box through front of gauge. Put metal have proper bolt hole alignment.
- Page 12 Install Filter Grounding Wire Optional Loosen lower right screw on motor electri- For Optional Sensor - Install sensor into drum lid cal box. Put screw through ring terminal on end in pre-cut hole. Make sure the “O” ring is used on top of long wire, then put screw back in hole and re- side of the lid.
-
Page 13: Cleaning External Filter
VI. Directions for Cleaning External Filter All steps should be done with a dust mask and eye protection. Proper fi lter clean- ing should not be neglected. A dirty fi lter can affect dust collector operation and fi lter life. External Filter Cartridge Cleaning Intervals Remove fi... -
Page 14: Fan Motor Maintenance
VII. Fan Motor Maintenance Per Baldor specifications, their 2 pole motors (3600 RPM) motors are to be relubricated every 5500 hours. Table 1 - Service Conditions Table 2 - Lubrication Interval Multiplier Per Baldor specifications, add .30 ounces (8.4 grams) of Mobil Polyrex grease by weight or .6 cubic inches (2 teaspoons) of Mobil Polyrex grease by volume. -
Page 15: Troubleshooting
VIII. Troubleshooting Unplug unit before servicing or cleaning. 1.5hp Portable Owner’s Manual © O.A.S. 2010... -
Page 16: Fire Hazards
IX. Fire Hazards - Read Before Installing and Operating Oneida Collectors are designed for WOOD DUST only!! Wood shaping and cutting processes generate wood chips, shavings, and dust. These materials are considered combustible. Air borne wood dust below 420 microns in size (.017 of an inch) in certain concentration ranges when ignited can deflagrate (burn quickly). -
Page 17: Terms And Conditions
Returned Goods Policy Buyer must inform Oneida Air Systems of any shortage or damage, by so noting in writing, on the freight delivery bill prior to signing to indicate receipt of shipment. All claims covered under the limited warranty, are subject to inspection and investigation by Oneida Air Systems. Oneida Air Systems reserves the right to inspect and investigate all returned products before Buyer’s claim is settled.
Need help?
Do you have a question about the Gorilla XXP999901 and is the answer not in the manual?
Questions and answers