Advertisement
Quick Links
Click
here
to ask an associate for production status of specific part numbers.
MAX16165/MAX16166
Evaluation Kit
General Description
The MAX16165/MAX16166 evaluation kit (EV kit) monitors
up to five voltages and sequences up to four voltages. The
MAX16165 and MAX16166 provide an adjustable delay as
each power supply is turned on as well as monitor each
power supply voltage.
The MAX16166 EV kit comes with the MAX16166WPH+T
installed. This product is RoHS compliant.
Features
•
2.7V to 16.0V Wide Operating Voltage Range
•
Monitor up to Five Voltages
•
Sequence up to Four Voltages
•
Configurable for MAX16165 and MAX16166
•
EV Kit comes with LED Indicators for System Event
•
Onboard LDO's are used for Sequencing/Monitoring
•
Proven 4-Layer 1-oz Copper PCB Layout
•
Demonstrates Compact Solution Size
•
Fully Assembled and Tested
MAX16165/MAX16166 EV Kit Files
FILE
MAX16165/MAX16166 EV BOM
MAX16165/MAX16166 EV PCB LAYOUT
MAX16165/MAX16166 EV SCHEMATIC
Ordering Information
appears at end of data sheet.
319-100789; Rev 0; 8/21
Quick Start
Required Equipment
•
MAX16165/MAX16166 EV kit
•
25V, 1A DC Power supply
•
Oscilloscope
•
Digital voltmeter (DVM)
Procedure
The EV kit is fully assembled and tested. Follow the steps
and make the required hardware connections to start
operation of the kit.
Caution: Do not turn on the power supply until all
connections are completed.
1. Verify that shunt J1, J2, JSET_, JEN_, JIN_, JLOAD,
UVSET, and JPULLUP are configured as in
and
2. If the VDD is more than 5V, do not install shunt in J2.
3. Connect the positive terminal of power supply to the
VDD test point.
4. Adjust the voltage to 5V and turn on the VDD power
supply.
5. Check the FAULT indicator LED and make sure it is not
DESCRIPTION
turned on.
EVKIT BOM
6. Remove shunt from J1(2:3) and connect to J1(1:2) to
EVKIT Layout
initiate the power-on sequencing.
EVKIT Schematic
7. Verify that the status LEDs indicate the correct state of
all OUT_, DONE, and POK outputs during power-on
sequencing.
8. Once power-on sequencing is completed, remove
shunt from J1(1:2) and connect to J1(2:3) to initiate
power-down sequencing.
Evaluates: MAX16165/MAX16166
Table
3.
Table 1
Advertisement

Related Manuals for Analog Devices MAX16165


Summary of Contents for Analog Devices MAX16165
- Page 1 The MAX16165/MAX16166 EV kit • MAX16165 and MAX16166 provide an adjustable delay as 25V, 1A DC Power supply • each power supply is turned on as well as monitor each Oscilloscope •...
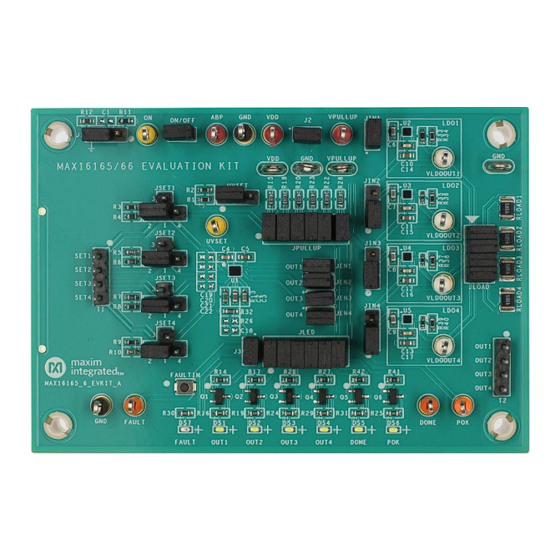
- Page 2 EV Kit Photo Figure 1. MAX16165/MAX16166 EV Kit Board Connections...
- Page 3 Evaluates: MAX16165/MAX16166 MAX16165/MAX16166 Evaluation Kit Table 1. MAX16165/MAX16166 EV Kit Jumper Description JUMPER SIGNAL SHUNT DESCRIPTION MAX16165 MAX16166 POSITION Power-up sequencing 2-3* Power-down sequencing VPULLUP Power-up and power-down sequencing using programmable Not Installed controllers 1-2* Connects VDD to VPULLUP If VDD > 5V, an additional power supply is needed for...
- Page 4 Evaluates: MAX16165/MAX16166 MAX16165/MAX16166 Evaluation Kit Sequencer only operation; DC-DC mode with feedback from JEN2 Not Installed LDO is disabled 1-2* Connects OUT3 with EN of U4 JEN3 Sequencer only operation; DC-DC mode with feedback from JEN3 Not Installed LDO is disabled...
- Page 5 UVSET The MAX16165/MAX16166 also monitor UVSET input for an undervoltage condition after power-up. UVSET is supplied with VDD through a resistor divider R1 and R2 on the EV kits. R1 and R2 are configured to obtain approximately 0.5V at the UVSET pin.
-
Page 6: Ordering Information
MAX16165/MAX16166 Evaluation Kit FAULT Input/Output FAULT is bidirectional. It is active low input and active low open-drain output. Refer to the MAX16165/MAX16166 data sheet for all conditions that assert a FAULT. Note: If extended fault pulse width is desired, mount R26 and C18 to avoid channel skipping during initialization. - Page 7 Evaluates: MAX16165/MAX16166 MAX16165/MAX16166 Evaluation Kit MAX16165/MAX16166 EV Kit Bill of Materials ITEM REF_DES MFG PART# MANUFACTURER VALUE DESCRIPTION TEST POINT; PIN DIA=0.125IN; TOTAL 5010 KEYSTONE ABP, VDD, LENGTH=0.445IN; BOARD HOLE=0.063IN; VPULLUP RED; GCM188R70J225KE22J MURATA 2.2UF CAP; SMT (0603); 2.2UF; 10%; 6.3V; X7R;...
- Page 8 Evaluates: MAX16165/MAX16166 MAX16165/MAX16166 Evaluation Kit PANASONIC 35.7K RES; SMT (0603); 35.7K; 1%; +/- ERJ-3EKF3572 100PPM/DEGC; 0.1000W VISHAY DALE RES; SMT (0603); 261K; 1%; +/- CRCW0603261KFK 261K 100PPM/DEGK; 0.1000W VISHAY DALE 45.3K RES; SMT (0603); 45.3K; 1%; +/- CRCW060345K3FK; 100PPM/DEGC; 0.1000W...
- Page 9 Evaluates: MAX16165/MAX16166 MAX16165/MAX16166 Evaluation Kit MAXIM MAX16166AHWP+ EVKIT PART - IC; PWRM; QUAD POWER MAX16166AHWP+ SUPPLY SEQUENCER AND SUPERVISOR; PACKAGE CODE: W201C2+2; PACKAGE OUTLINE DRAWING: 21-100553; WLP20 MAXIM MAX38903CANL+ IC; REG; 1.7V-5.5VIN; 1A LOW NOISE LDO MAX38903CANL+ U2-U5 LINEAR REGULATORS; WLP9 KEYSTONE TEST POINT;...
- Page 10 Evaluates: MAX16165/MAX16166 MAX16165/MAX16166 Evaluation Kit MAX16165/MAX16166 EV Kit Schematics www.analog.com Analog Devices | 10...
- Page 11 Evaluates: MAX16165/MAX16166 MAX16165/MAX16166 Evaluation Kit MAX16165/MAX16166 EV Kit PCB Layout MAX16165/MAX16166 EV Kit PCB Layout—Top Silkscreen MAX16165/MAX16166 EV Kit PCB Layout—Top MAX16165/MAX16166 EV Kit PCB Layout—Layer 2 MAX16165/MAX16166 EV Kit PCB Layout—Layer 3 www.analog.com Analog Devices | 11...
- Page 12 Evaluates: MAX16165/MAX16166 MAX16165/MAX16166 Evaluation Kit MAX16165/MAX16166 EV Kit PCB Layout—Bottom MAX16165/MAX16166 EV Kit PCB Layout—Bottom Silkscreen www.analog.com Analog Devices | 12...
-
Page 13: Revision History
Information furnished by Analog Devices is believed to be accurate and reliable. However, no responsibility is assumed by Analog Devices for its use, nor for any infringements of patents or other rights of third parties that may result from its use. Specifications subject to change without notice. No license is granted by implication or otherwise under any patent or patent rights of Analog Devices.
Need help?
Do you have a question about the MAX16165 and is the answer not in the manual?
Questions and answers