Pitney Bowes AddressRight DA700 Operating Manual
Hide thumbs
Also See for AddressRight DA700:
- Operator's manual (140 pages) ,
- Quick reference manual (2 pages)
Advertisement
Quick Links
Advertisement
Chapters

Related Manuals for Pitney Bowes AddressRight DA700


Summary of Contents for Pitney Bowes AddressRight DA700
- Page 1 AddressRight Printer ® DA700/DA750 Operating Guide...
- Page 2 Bowes Inc., and may not be lent, sold, hired out, or made available to others in any form, or be disposed of by way of trade in any form without the express written consent of Pitney Bowes, Inc. First edition, April, 1999. ©1999 Pitney Bowes Inc. All rights reserved. This book may not be...
-
Page 3: Table Of Contents
Table of contents ® AddressRight Printer DA700/DA750 Operating Guide Chapter 1, DA700/DA750 Overview Welcome to the DA700/DA750 ........1-2 Using This Guide ............1-2 System Requirements ..........1-3 Getting Help ..............1-4 Online Help .............. 1-4 Phone Support ............1-4 Before You Call ............ - Page 4 Table of contents AddressRight ® Printer DA700/DA750 Operating Guide 3. Set the Feed Angle ..........3-13 4. Set the Wire Frame Ramp ........3-15 5. Position the Feed Fence ........3-16 6. Load Material ............3-17 7. Adjust the Media Thickness Knob ..... 3-18 8.
- Page 5 Table of contents ® AddressRight Printer DA700/DA750 Operating Guide Appendix A, Control Panel Menus Using the Control Panel ..........A-2 Using the Menus ............A-3 Using the Main Menu .............A-5 Main Menu Diagram ............A-6 1. Address Layout ...........A-7 2. Print Quality ............A-11 3.
- Page 6 Table of contents AddressRight ® Printer DA700/DA750 Operating Guide This page is intentionally blank. Page iv SV61027C · Rev A...
- Page 7 Printer overview AddressRight ® Printer DA700/DA750 Operating Guide Chapter contents The Pitney Bowes DA700/DA750 is a versatile, easy-to-use desktop printer designed for addressing applications. This chapter explains what's in this guide, and tells you how to order supplies and where to get more information about using your DA700/DA750.
-
Page 8: Welcome To The Da700/Da750
Printer overview AddressRight ® Printer DA700/DA750 Operating Guide The Pitney Bowes DA700/DA750 color ink jet printer is a Welcome to desktop printer used to print addresses, graphics and the DA700/ other information, in color, on a wide range of material of DA750 Color various sizes, construction and composition. -
Page 9: System Requirements
Printer overview ® AddressRight Printer DA700/DA750 Operating Guide Chapter 5, Printer Maintenance Describes how to keep the printer clean and functioning properly. Chapter 6, Troubleshooting Contains a list of possible problems and their solutions. Appendix A, Control Panel Menus Explains the Main Menu and Setup Menu options avail- able on the DA700/DA750 control panel. -
Page 10: Getting Help
Click on Properties from Windows print dialog box. Right click on items in question for the "What's This" Help button. If you're using Pitney Bowes programs such as Envelope Designer™ or SmartMailer™, press the F1 key while you're using the program to display information about the open screen. -
Page 11: Before You Call
You'll find the latest information about our products and services as well as answers to frequently asked technical Options questions. Pitney Bowes offers several very useful options for your DA700/DA750: • Envelope Designer™ lets you create a profes- sional looking envelope in a matter of sec onds—you don't have to bother with the print... -
Page 12: Ordering Supplies
Printer overview AddressRight ® Printer DA700/DA750 Operating Guide Ordering You can order supplies for your DA700/DA750 printer directly through the Pitney Bowes Supply Line . To Supplies place an order, call: (800) 243-7824 Or visit our website at: www.pb.com\supplies\ The following supplies are available for your DA700/ DA750 printer: •... -
Page 13: Chapter 2, Getting Started With The Da700/Da750
Getting started with the DA700/DA750 printer ® AddressRight Printer DA700/DA750 Operating Guide Chapter contents This chapter explains how to unpack, assemble and connect your new printer. Unpacking the Printer ..... 2-2 Choosing a Location ....2-4 Important Safety Notes ... 2-4 Assembling the DA700/DA750 ...... -
Page 14: Unpacking The Printer
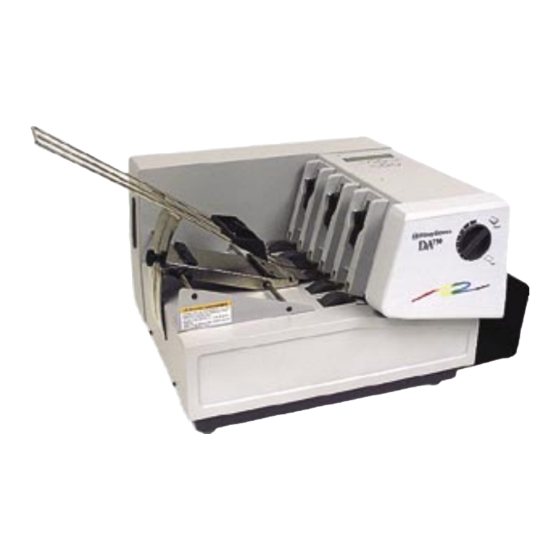
Getting started with the DA700/DA750 printer AddressRight ® Printer DA700/DA750 Operating Guide Unpacking As you remove the DA700/DA750 contents from the box, note the components of the printer, labeled below. the Printer Wire Frame Assembly Control Panel (LCD H-Block Display and Keypad) Separators Print Area Door Sliding... -
Page 15: Package Contents
Getting started with the DA700/DA750 printer ® AddressRight Printer DA700/DA750 Operating Guide Unpacking Package Contents the Printer • DA700/DA750 Printer (continued) • Output Stacker • Wire Frame with Material Prop, Washer and Retaining Knob (Input Material Stacker assembled) • Sliding Fence (long) •... -
Page 16: Choosing A Location For Your Printer
Getting started with the DA700/DA750 printer AddressRight ® Printer DA700/DA750 Operating Guide Choosing a Follow these guidelines and safety precautions when selecting a location for your printer: Location for Your Printer • Place the printer on a table or other stable, level surface within the cable's length (Parallel 10 feet max.;... -
Page 17: Assembling The Da700/Da750
If the machine has been Safety Notes dropped or has otherwise had the covers stressed in (continued) any way, report it to your Pitney Bowes Customer Service Representative. • To reduce the risk of fire and/or electrical shock, do not attempt to disassemble this machine. -
Page 18: Attach The Wire Frame To The Printer
Getting started with the DA700/DA750 printer AddressRight ® Printer DA700/DA750 Operating Guide Assembling Attach the Wire Frame to the Printer. the DA700/ 1. Hook the bottom edge of the wire frame under the DA750 deflector. The wire frame slides between the feed (continued) rollers and the paper deflector. -
Page 19: Install The Sliding Fence
Getting started with the DA700/DA750 printer ® AddressRight Printer DA700/DA750 Operating Guide Assembling Install the Sliding Fence the DA700/ The DA700/DA750 has two fences—a long one and a DA750 short one. Use the short fence when printing material (continued) smaller than a #10 envelope. Use the long fence for larger material. -
Page 20: Position The Output Stacker Tray
Getting started with the DA700/DA750 printer AddressRight ® Printer DA700/DA750 Operating Guide Assembling Position the Output Stacker Tray the DA700/ Printed material is deposited in the output stacker tray. DA750 The tray can stack up to 150 #10 envelopes. Slide it into (continued) position under the back of the printer as shown below. -
Page 21: Connect The Parallel Cable Or Serial Cable
Getting started with the DA700/DA750 printer ® AddressRight Printer DA700/DA750 Operating Guide Connecting Connecting the Parallel Cable or Serial Cable the DA700/ Use the parallel cable supplied to connect the DA700/ DA750 to DA750 to your computer, or use an approved serial Your cable. - Page 22 Getting started with the DA700/DA750 printer AddressRight ® Printer DA700/DA750 Operating Guide Connecting 3. Align the end of the cable connector labeled “Com- puter” with the printer port on your computer and the DA700/ push the cable connector into the port. DA750 to Your 4.
-
Page 23: Connect The Power Cord
Getting started with the DA700/DA750 printer ® AddressRight Printer DA700/DA750 Operating Guide Plugging in Connecting the Power Cord the Power 1. Connect the power cord to the printer at the interface Cord panel, shown below. Power Switch Power Receptacle 2. Plug the power cord into a grounded outlet. Please review the safety information on pages 2-4 and 2-5. -
Page 24: Install The Ink Jet Cartridges (Color & Black)
Getting started with the DA700/DA750 printer AddressRight ® Printer DA700/DA750 Operating Guide Install the Ink Jet Cartridges Installing and Removing the The printer uses Ink Jet Cartridges for printing (DA750 Ink Jet uses color and black; DA700 uses black only). You must Cartridge install a black and a color cartridge in the DA750 (a black only for the DA700) before you can print. - Page 25 Getting started with the DA700/DA750 printer ® AddressRight Printer DA700/DA750 Operating Guide Installing and 6. Gently insert the cartridge (color to the right, black to the left-DA750 only) into the carriage at approxi- Removing the mately a 20 degree angle with copper strip to the Ink Jet bottom and in first.
-
Page 26: Removing The Ink Jet Cartridges
Getting started with the DA700/DA750 printer AddressRight ® Printer DA700/DA750 Operating Guide Installing and 3. Press the Replace Print Cartridge key on the control panel. This moves the carriage to the middle of the Removing the printer. Do not move the cartridge by hand. Ink Jet Cartridge (continued) - Page 27 Features and adjustments AddressRight ® Printer DA700/DA750 Operating Guide Chapter contents In this chapter you'll learn about key features of the DA700/DA750 printer and how to adjust it to meet the requirements of your print jobs. Printer Features ....... 3-2 DA700/DA750 Throughput ..
-
Page 28: Printer Features
Features and adjustments ® AddressRight Printer DA700/DA750 Operating Guide Printer The DA700/DA750 has the following features: Features Speed (Throughput): Refer to chart on next page. Print Qualities: Draft, Letter, Executive Internal Fonts: 13 (14 including Barcode) Optional Font Card Font Point Size: 4 to 30 Material Thickness: 0.003"... -
Page 29: Da700/Da750 Throughput
Features and adjustments ® AddressRight Printer DA700/DA750 Operating Guide DA700/DA750 Throughput Throughput specifications for the printer have the following parameters in common: 18 average characters per line; 10 pt character size; roman font; normal print width; bold off; parallel interface; each line terminated with CR LF;... -
Page 30: Material Thickness
Features and adjustments ® AddressRight Printer DA700/DA750 Operating Guide Printer Material Thickness Thickness refers to the size of the material that is pro- Features cessed through the printer. The DA700/DA750 can handle (continued) material from .003" up to .250" thick. Media Size The DA700/DA750 can print on the following range of material sizes. - Page 31 Features and adjustments ® AddressRight Printer DA700/DA750 Operating Guide Printer Other printer features include: Features • Ink Jet technology with shuttling head. (continued) • Interface to a standard IBM® compatible computer. • Prints USPS POSTNET certified bar code. • LCD menu display available in seven languages. •...
-
Page 32: Setting Up A Job
Features and adjustments ® AddressRight Printer DA700/DA750 Operating Guide Setting Up A Setting up a print job means adjusting the printer to accommodate the width, height, thickness and weight of your material. The setup adjustments and the quality of your material determine how reliably your printer feeds the material. - Page 33 Features and adjustments ® AddressRight Printer DA700/DA750 Operating Guide Setting Up A 1. H-Block Separators Adjust to the thickness of your material. The gap be- tween the H-Block separator fingers and the feed rollers (continued) should be just enough to allow a single piece to feed through the printer.
- Page 34 Features and adjustments ® AddressRight Printer DA700/DA750 Operating Guide Setting Up A If you have the DA700/DA750 print driver loaded on your computer, you can easily perform these functions from within your software application. (continued) 8. Stacker Tray Printed material is deposited in the stacker (catch) tray. The tray holds about 5"...
-
Page 35: Set The Separator Gap
Features and adjustments ® AddressRight Printer DA700/DA750 Operating Guide Setting Up A 1. Set the Separator Gap Whenever you switch from one material type to another, (continued) you need to set the gap between the separators and the feed roller before printing begins. NOTE: There are three positions of the "H"... - Page 36 Features and adjustments ® AddressRight Printer DA700/DA750 Operating Guide Setting Up A 4. Lower only the H-Blocks that come in direct contact with the material and let them touch the material. (continued) 5. Lock each separator in place. When lowering the H- Blocks, check that the material is between the sepa- rator tabs and the feed roller.
-
Page 37: Center The Wireframe Under The Material
Features and adjustments ® AddressRight Printer DA700/DA750 Operating Guide Setting Up A 2. Center the Wire Frame under the Material This adjustment helps eliminate skewing. (continued) 1. Unlock the feed carriage assembly by pushing the locking lever down. 2. Adjust the feed carriage by aligning with the center of the media. -
Page 38: Set The Feed Angle
Features and adjustments ® AddressRight Printer DA700/DA750 Operating Guide 3. Set the Feed Angle Setting Up A The height of the wireframe input stacker depends on the (continued) type of material you're running: • Heavy material—adjust to a low angle •... - Page 39 Features and adjustments ® AddressRight Printer DA700/DA750 Operating Guide Setting Up A The center of the knob aligns with 1 – —— number 1 for a typical 3" x 5" post card. (continued) 2 – —— 3 – The center of the knob aligns with ——...
-
Page 40: Set The Wire Frame Ramp
Features and adjustments ® AddressRight Printer DA700/DA750 Operating Guide Setting Up A 4. Set the Wire Frame Ramp Slide Ramp (continued) Upward—Slide the ramp to the top of the Wire Frame. Slide Ramp Down—With the Feed Gap properly set for one piece of media, slide the ramp down. -
Page 41: Position The Feed Fence
Features and adjustments ® AddressRight Printer DA700/DA750 Operating Guide Setting Up A 5. Position the Feed Fence Your printer comes with two feed fences—a long one and (continued) a short one. Use the long fence for #10 envelopes and larger materials. Use the short fence for materials smaller than a #10 envelope. -
Page 42: Load Material
Features and adjustments ® AddressRight Printer DA700/DA750 Operating Guide Setting Up A 6. Load Material Once your printer is set up, you can load material and make a test print. (continued) To avoid misfeeds, follow these instructions: Make sure the input area is free of dust and other matter. -
Page 43: Adjust The Media Thickness Knob
Features and adjustments ® AddressRight Printer DA700/DA750 Operating Guide 7. Adjust the Media Thickness Knob Setting Up A The media thickness knob sets the distance between the printhead and the material. Use it to compensate for (continued) different material thicknesses and to increase clarity of the printing. - Page 44 Features and adjustments ® AddressRight Printer DA700/DA750 Operating Guide Setting Up A A Note about Print Quality The DA700/DA750 is designed to feed and print on a (continued) range of materials with various finishes and coatings. However the sharpness of the print may vary with differ- ent materials, depending on how absorbent the surface is, as well as other qualities.
-
Page 45: Adjust The Exit Rollers
Features and adjustments ® AddressRight Printer DA700/DA750 Operating Guide Setting Up A 8. Adjust the Exit Rollers Adjust the exit rollers so they overlap the left and right (continued) edges of the material by 1/4". Rotate the release lever to vertical then slide the rollers from side to side to make the adjustment and press the lever down to lock. - Page 46 Features and adjustments ® AddressRight Printer DA700/DA750 Operating Guide Setting Up A Output Stack Height The output stacker holds up to five inches of material (continued) before it becomes necessary to remove the stack from the bin. The optional W760 stacker increases capacity to 300 #10 envelopes.
-
Page 47: Print A Test Piece
Features and adjustments ® AddressRight Printer DA700/DA750 Operating Guide Setting Up A 9. Print a Test Piece 1. Make sure material is loaded properly. (Or you (continued) can use a single test piece if you'd like to check that your setup adjustments are okay.) 2. - Page 48 Features and adjustments ® AddressRight Printer DA700/DA750 Operating Guide This page is intentionally blank. Page 3-22 SV61027C · Rev A...
- Page 49 DA700/ DA750 printer driver from a com- puter. It also briefly explains Envelope Designer Plus, the Pitney Bowes envelope design software that comes with the printer. Printer Software ....... 4-2 Installing the Software .... 4-2 Selecting Printer Properties ..4-9 Using the Printer Properties Windows ........4-10...
-
Page 50: Printer Software
Your printer works with the Pitney Bowes DA700/DA750 driver. If you have not previously installed the printer driver on your computer, do so now from the Envelope Designer™... - Page 51 Using the DA750 with your computer AddressRight ® Printer DA700/DA750 Operating Guide Installing 2. Click OK at the "ADDRESSRight Printing System" screen. An "Installing" files window displays briefly. Software (continued) 3. Click on the "ADDRESSRight Printer Driver" selec- tion. If you will be using Envelope Designer™ Plus to create your envelope designs, click the "Envelope Designer Plus"...
- Page 52 Using the DA750 with your computer ® Operating Guide AddressRight Printer DA700/DA750 Installing 5. Click OK to accept the default destination directory. Software (continued) 6. Click OK to accept the default folder name of Pitney Bowes Printing. An "Installing" files window displays briefly.
- Page 53 Using the DA750 with your computer AddressRight ® Printer DA700/DA750 Operating Guide 7. Click Next at the "Create a Printer" screen. Installing Software (continued) 8. Click Next at the "Add Printer Utility Step 1" screen. 9. Click Next to accept the default of LPT1 for local port at the "Add Printer Utility Step 2"...
- Page 54 Software (continued) 11. Verify or edit the name you want for the printer ("Pitney Bowes DAxxx"). Select whether you want this printer to be your default printer. Leave the Print Test Page response as "No". Click Finish. NOTE: If this is NOT a new install, (i.e., If you are updating an existing Envelope Designer™...
- Page 55 Using the DA750 with your computer AddressRight ® Printer DA700/DA750 Operating Guide Installing 12. The "Pitney Bowes Envelope Printer Accelerator Setup" windows displays. Read the window carefully and click Next. Software (continued) 13. At the "3rd Party Envelope Printing Setup" screen, you need to make a choice: •...
- Page 56 Using the DA750 with your computer ® Operating Guide AddressRight Printer DA700/DA750 Installing 14. Click OK at the "Successful Configuration" screen that acknowledges the creation of a virtual printer (for the accelerator). Software (continued) 15. An "Install" screen displays for creating a shortcut. Click Yes if you want to create a shortcut to Envelope Designer™...
-
Page 57: Selecting Printer Properties
1. Click the "Start" button in the task bar, then select "Settings". 2. Click "Printers." The Printer window displays. 3. Right click the Pitney Bowes icon, then left click the Properties option. The Properties window opens and displays seven tabs, each of which allows access to different printer options. -
Page 58: Using The Printer Properties Window
Using the DA750 with your computer AddressRight ® Printer DA700/DA750 Operating Guide Selecting NOTE: An explanation of items in each windows is also available by doing the following: Printer Properties • Right click an item to display the "What's This" (continued) button. - Page 59 Using the DA750 with your computer AddressRight ® Printer DA700/DA750 Operating Guide Using the Use the Comment area to make a statement about the printer. For example, you might want to indicate what the Printer printer should be used for and when it is available. Properties Window If this printer is shared, the comment entered in this area...
- Page 60 The window shown here is a standard Windows driver dialog, not developed by Pitney Bowes and not sup- ported by Pitney Bowes. The settings in this tab should not be changed as Pitney Bowes does not support networking it’s Envelope print-...
- Page 61 Using the DA750 with your computer AddressRight ® Printer DA700/DA750 Operating Guide Using the To display the Port window, left click the Port tab in the Properties window. Printer Properties Window (continued) The displayed list shows the available ports, the associ- ated port monitor, and the printers that use the ports.
- Page 62 Using the DA750 with your computer AddressRight ® Printer DA700/DA750 Operating Guide Using the To display the Advanced window, left click the Advanced tab in the Properties window. Printer Properties Window (continued) To make the printer available 24/7, select the "Always available"...
- Page 63 Using the DA750 with your computer AddressRight ® Printer DA700/DA750 Operating Guide Using the The name of the installed driver displays in the "Driver" area. This usually matches the name of the print device Printer However, for the DA700/Da750, you will see "Pitney Properties Bowes W700/W790"...
- Page 64 Using the DA750 with your computer AddressRight ® Printer DA700/DA750 Operating Guide Using the When the option, "Print spooled documents first", is selected, the printer operates at maximum efficiency by Printer selecting to printer documents that have completed Properties spooling regardless of their designated priority. Window To direct the printer to keep printed documents in the queue, select the "Keep printed documents"...
- Page 65 Using the DA750 with your computer AddressRight ® Printer DA700/DA750 Operating Guide To display the Color Management window, left click the Using the Color Management tab in the Properties window. Printer Properties Window (continued) To allow the system to select the best colors from the available profile, choose the "Automatic"option.
- Page 66 Using the To display the Security window, left click the Security tab in the Properties window. Printer Properties Window (continued) Pitney Bowes does not support Networking. Therefore, adding or removing permissions should not be used. Page 4-18 SV61027C · Rev A...
- Page 67 Device Settings tab in the Properties window. Printer Properties Window (continued) Pitney Bowes recommends that you leave the manufac- turer-set default as it is in this window and refer to your envelope printing application to change envelope sizes. SV61027C · Rev A Page 4-19...
-
Page 68: Selecting The Da700/Da750 Printer From A Windows Application
Using the DA750 with your computer AddressRight ® Printer DA700/DA750 Operating Guide Selecting the The following steps explain how to select the DA700/ DA750 printer from a Windows software application. The DA700/DA750 steps are similar for most applications. You can also refer Printer from a to your application's documentation for specific instruc- Windows... -
Page 69: Envelope Designer
Application (continued) Envelope The Pitney Bowes Envelope Designer™ Plus is an easy- to-use program that helps you create professional-looking Designer™ envelope layouts quickly. With Envelope Designer Plus Plus you can create and position a mailing address, return address, single-line message, barcode and graphics. - Page 70 Using the DA750 with your computer AddressRight ® Printer DA700/DA750 Operating Guide This page is intentionally blank. Page 4-22 SV61027C · Rev A...
- Page 71 Printer maintenance AddressRight ® Printer DA700/DA750 Operating Guide Chapter contents This chapter describes the maintenance procedures you should perform on a regular basis to keep your printer running trouble-free. Preventive Maintenance..5-2 Cleaning ........5-2 Print Quality Problems .... 5-2 Exit Rollers .......5-3 Sensor ........
-
Page 72: Preventive Maintenance
® Printer DA700/DA750 Operating Guide Preventive The Pitney Bowes DA700/DA750 Ink Jet Printer is de- signed for trouble-free service with a minimal amount of Maintenance care. You should schedule regular cleaning of the Feed Rollers, Exit Rollers and Lower Guide. -
Page 73: Exit Rollers
Printer maintenance ® AddressRight Printer DA700/DA750 Operating Guide Exit Rollers If the right and left exit rollers are misaligned, that is, contact printed surfaces, they can become contaminated with ink. Use water to dampen a soft cloth and remove the ink from the rollers. Sensor A film and/or dust can build up on the sensors and cause misfeeds of the material. - Page 74 Printer maintenance AddressRight ® Printer DA700/DA750 Operating Guide CMYK Your DA750 printer allows black (K) to print with color (CMY) at the same time. To ensure proper Printing printing, the black and color cartridges need to align (DA750 ONLY) together. Follow this procedure align the cartridges: 1.
-
Page 75: Cmyk Printing
Printer maintenance ® AddressRight Printer DA700/DA750 Operating Guide CMYK When the "ALIGN INK CARRIDGES" prompt displays, press (+ ): Printing (DA750 ONLY continued) 6. When the prompt for horizontal color alignment dis- plays, insert an envelope into the printer and press ENTER. - Page 76 Printer maintenance AddressRight ® Printer DA700/DA750 Operating Guide CMYK Printing (DA750 ONLY continued) 8. Press the (+) or (-) buttons to scroll through the selec- tions (1-15) and choose the number that represents the best horizontal alignment of the upper and lower lines (for the color and black cartridges, respectively).
- Page 77 Printer maintenance ® AddressRight Printer DA700/DA750 Operating Guide CMYK Printing (DA750 ONLY continued) NOTE: The number you selected is highlighted (underlined) and all lines on the envelope should now be aligned. 10. Press MENU to return to the alignment choice window 11.
- Page 78 Printer maintenance AddressRight ® Printer DA700/DA750 Operating Guide CMYK Printing (DA750 ONLY continued) 13. Press (+) or (-) to scroll through the selections (1-15) and choose the number that represents the best vertical alignment of the upper and lower lines (for the color and black artridges, respectively).
- Page 79 Printer maintenance ® AddressRight Printer DA700/DA750 Operating Guide 15. Press MENU twice to return to the normal ON LINE screen. SV61027C · Rev A Page 5-9...
- Page 80 Printer maintenance AddressRight ® Printer DA700/DA750 Operating Guide This page is intentionally blank. Page 5-10 SV61027C · Rev A...
- Page 81 Troubleshooting ® AddressRight Printer DA700/DA750 Operating Guide Chapter contents This chapter lists some common printer problems and offers suggestions on how to fix them. Problems and Solutions ..6-2 Feed Problems ......6-2 Print Quality Problems .... 6-3 Interface Problems ....6-5 Motor Problems .......
-
Page 82: Problems And Solutions
Also make sure the wire frame is centered under the material. See Chapter 3.. Reason: Dirty feed rollers. Solution: Clean the feed roller with the Pitney Bowes Multi_Purpose Cleaning Kit (Number 902-0). DO NOT use any other solvents or detergents. They could damage the feed rollers. Reason: Paper dust present (yellow or white residue), blocking feed sensor. - Page 83 Troubleshooting AddressRight ® Printer DA700/DA750 Operating Guide Problem Multifeed (Feeds Doubles) or Skewing Print Quality Problems Reason: Separators (H-blocks) not set correctly. Also feed fence set incorrectly. Solution: Adjust H-blocks to thickness of material. See page 3-10. Check feed fence position. See page 3-16.
-
Page 84: Print Quality Problems
Troubleshooting AddressRight ® Printer DA700/DA750 Operating Guide Problem Address Printing is not Sharp Print Quality Problems Reason: Incorrect media thickness knob setting. Also, (continued) unsuitable material. Solution: Check whether envelope thickness knob is adjusted too high (page 3-18). Print quality is less sharp when using Tyvek, recycled or glossy media. -
Page 85: Interface Problems
If the problem still persists, call Pitney Bowes for service. Clear memory (see page A-17). Cycle power. Problem Motor Turning but No Feed Roller Movement Motor Problems Reason: Mechanical problem. Solution: Call Pitney Bowes for Service. SV61027C · Rev A Page 6-5... -
Page 86: Barcode Problems
Troubleshooting AddressRight ® Printer DA700/DA750 Operating Guide Problem Barcode (Lower Right) is not Printing Barcode Problems Reason: Barcode not enabled Solution: Turn barcode ON using Envelope Designer™ Plus, or the DA700/DA750 print driver or the printer’s control panel menus. Reason: Missing ZIP Code. -
Page 87: Other Problems
Troubleshooting AddressRight ® Printer DA700/DA750 Operating Guide Barcode Problem Address Too High Problems Reason: Address field is within 1/10" of the top edge of (continued) the media, or material may be jamming. Solution: Move address field down to DMM specifications, or correct the jamming. - Page 88 Troubleshooting AddressRight ® Printer DA700/DA750 Operating Guide Problem Shuttle Jam Other Problems Reason: Envelope thickness knob is set too low for (continued) material. Solution: Open the print area door assembly of the printer, and adjust the media thickness knob. See page 3-18.
- Page 89 Appendix A – Control panel menus ® AddressRight Printer DA700/DA750 Operating Guide Chapter contents The printer menus are used to control how your printed material looks. This appendix describes each menu and its options. Using the Control Panel ..A-2 Using the Menus ....
-
Page 90: Using The Control Panel
Appendix A – Control panel menus ® AddressRight Printer DA700/DA750 Operating Guide Using the Use the buttons on the control panel to get to the printer menus, define the print options, run a print job, Control Panel position the print carriage and turn the printer ON LINE and OFF LINE. -
Page 91: Using The Menus
Appendix A – Control panel menus ® AddressRight Printer DA700/DA750 Operating Guide Enter Press to select the currently dis- Using the played menu option. Control Panel (continued) Cartridge/+(plus) With the printer OFFLINE, press to move the ink cartridge holder to the center of the printer. - Page 92 Appendix A – Control panel menus ® AddressRight Printer DA700/DA750 Operating Guide Using the To select an option: Menus 1. Press the ON LINE button until the LCD message (continued) displays OFF LINE. 2. To access the Main Menu, press the Menu button. 3.
-
Page 93: Using The Main Menu
Appendix A – Control panel menus ® AddressRight Printer DA700/DA750 Operating Guide Using the The Main Menu options are: Main Menu 1. Address Layout 2. Print Quality 3. Font 4. Barcode 5. Address Recovery 6. Clear Counter 7. Job Settings NOTE: The settings you define in a software application such as SmartMailer™... - Page 94 Appendix A – Control panel menus ® AddressRight Printer DA700/DA750 Operating Guide Using the Main Menu Menu Options Main Menu (continued) A. DISTANCE TO RIGHT 1. ADDRESS LAYOUT B. DISTANCE TO BOTTOM C. LINE SPACING D. ORIENTATION E. ORIENTATION CONTROL 2.
-
Page 95: Address Layout
Appendix A – Control panel menus ® AddressRight Printer DA700/DA750 Operating Guide Use the Address Layout option to set up the way an 1. Address address appears on the printed material. The print- Layout able width is limited to 9.4” from the right side of the mail piece. - Page 96 Appendix A – Control panel menus ® AddressRight Printer DA700/DA750 Operating Guide 1. Address B. Distance to Bottom (Bottom Margin) Use this option to set the distance from the top address line to Layout the bottom of the envelope. For #10 envelopes this (continued) should be about two inches.
- Page 97 Appendix A – Control panel menus ® AddressRight Printer DA700/DA750 Operating Guide 1. Address C. Line Spacing Press the + or – buttons to increase or decrease the Layout Line Spacing (i.e., 3, 4, 6, 8 lines/inch or Automatic), (continued) defined in lines per inch.
- Page 98 Appendix A – Control panel menus ® AddressRight Printer DA700/DA750 Operating Guide 1. Address To use the Address Layout option: Layout 1. Press the ON LINE button until the display reads (continued) OFF LINE. 2. Press the Menu button to display the Main Menu. 3.
-
Page 99: Print Quality
Appendix A – Control panel menus ® AddressRight Printer DA700/DA750 Operating Guide 2. Print Quality Use the print quality option to select the resolution of the printed addresses—Executive, Letter or Draft. A. Executive Quality Black - 600 x 600 DPI Color - 300 x 300 DPI (DA750 only) This is the darkest of the three print qualities. - Page 100 Appendix A – Control panel menus ® AddressRight Printer DA700/DA750 Operating Guide 2. Print Quality To use the Print Quality option: (continued) 1. Press the ON LINE button until the display reads OFF LINE. 2. Press the Menu button to display the Main Menu. 3.
-
Page 101: Font Selection
Appendix A – Control panel menus ® AddressRight Printer DA700/DA750 Operating Guide The DA700/DA750 has thirteen available fonts (type- 3. Font faces, plus barcode): Courier, Sans Serif, Roman, Selection Baxter, Hancock, Marina, Quincy, Silicon, Springer, Stencil, Windmill, Alpine, OCR A and Code 39. All fonts are scalable from 4 to 30 point size, and can be printed in regular, bold, italic. - Page 102 Appendix A – Control panel menus ® AddressRight Printer DA700/DA750 Operating Guide 3. Font E. Italic Italic characters have decreased stroke weight, print at Selection an oblique angle and print somewhat lighter than (continued) standard or bold typefaces. Use italic to provide emphasis and add flair to address text that requires a finished, polished appearance.
-
Page 103: Barcode
Appendix A – Control panel menus ® AddressRight Printer DA700/DA750 Operating Guide 4. Barcode Use this option to include a USPS-certified barcode on your mailpieces. The DA700/DA750 can print a 5- or 11-digit barcode. If you select Off, it means that if the computer sends a 5-digit ZIP Code, it won’t print a barcode;... - Page 104 Appendix A – Control panel menus ® AddressRight Printer DA700/DA750 Operating Guide 4. Barcode 5. Press the Enter button at the 5-digit barcode prompt and use + or – to turn the option ON or OFF. (continued) 6. When you finish making your selections, press the Menu button several times to back out of the menu until the printer displays OFF LINE.
-
Page 105: Address Recovery
Appendix A – Control panel menus ® AddressRight Printer DA700/DA750 Operating Guide 5. Address Use this option to direct the printer’s memory to go back a certain number of addresses when an error occurs in Recovery order to reprint the address. The options on this menu are: A. -
Page 106: Clear Counter
Appendix A – Control panel menus ® AddressRight Printer DA700/DA750 Operating Guide 3. Press the + or – buttons to scroll through the 5. Address Address Recovery options until the desired option Recovery (A. Get Address or B. Clear Memory) is displayed (continued) on the LCD panel. -
Page 107: Job Settings
Appendix A – Control panel menus ® AddressRight Printer DA700/DA750 Operating Guide 7. Job The DA700/DA750 Printer can hold eight job presets in memory. This eliminates the need for changes to the Settings printer setup when you change print jobs. The options on this menu are: A. - Page 108 Appendix A – Control panel menus ® AddressRight Printer DA700/DA750 Operating Guide 7. Job To use this option to direct the printer to Load or Save the Job Setting as a certain number: Settings (continued) 1. Press the + or – buttons to scroll through the Main Menu options until the Job Settings option appears on the LCD panel.
-
Page 109: Using The Setup Menu
Appendix A – Control panel menus ® AddressRight Printer DA700/DA750 Operating Guide To access the Setup Menu, the printer must be OFF Using the LINE. (The LCD display toggles between ON LINE Setup Menu and OFF LINE). If the printer is ON LINE, press the ON LINE button once so the LCD displays OFF LINE. - Page 110 Appendix A – Control panel menus AddressRight ® Printer DA700/DA750 Operating Guide Using the Setup Menu Menu Options Setup Menu (continued) 1. HEAVY MEDIA MODE 2. TEST PRINT HEAD 3. PURGE PRINT HEAD 4. LINES PER ADDRESS A. BAUD RATE 5.
-
Page 111: Heavy Media Mode
Appendix A – Control panel menus ® AddressRight Printer DA700/DA750 Operating Guide 1. Heavy The only time you need to turn this mode on is when you are using long, heavy envelopes. This option Media Mode increases motor torque and slows down the feed rate. This option is normally OFF. -
Page 112: Purge Print Head
Appendix A – Control panel menus AddressRight ® Printer DA700/DA750 Operating Guide 2. Test Print 3. Press + for Yes to print the test pattern, or press – for No to cancel. If you press +, “Please Head wait...Test pattern is printing” displays. The printer (continued) prints a diagonal line across the material. -
Page 113: Lines Per Address
Appendix A – Control panel menus ® AddressRight Printer DA700/DA750 Operating Guide 4. Lines Per Use this option to set the number of lines in the ad- dress field. Address 1. Press the + or – buttons to scroll through the Setup Menu options until the Lines Per Address option1. -
Page 114: Communications
Appendix A – Control panel menus AddressRight ® Printer DA700/DA750 Operating Guide Transmitting data from the computer to the DA700/ 5.Communications DA750 is by way of the parallel interface or the serial interface. The printer automatically senses the inter- face through which data is being sent. When the computer uses the DA700/DA750’s parallel interface no communication settings are required. - Page 115 Appendix A – Control panel menus ® AddressRight Printer DA700/DA750 Operating Guide A. Baud Rate 5.Communications The Baud Rate choices are (1200), (2400), (4800), (continued) (9600) and (19200). B. Parity Parity is used to determine the integrity of data that is sent.
-
Page 116: Hex Dump Mode
Appendix A – Control panel menus AddressRight ® Printer DA700/DA750 Operating Guide 6. Hex Dump The information provided here is for those customers who are technically inclined. Mode The Hex Dump Mode option causes the printer to print all commands and data it receives from the computer in a hexadecimal format. - Page 117 Appendix A – Control panel menus ® AddressRight Printer DA700/DA750 Operating Guide 6. Hex Dump Mode (continued) 96 112 " & ′ < – • > Hex Chart SV61027C · Rev A Page A-29...
- Page 118 Appendix A – Control panel menus AddressRight ® Printer DA700/DA750 Operating Guide 6. Hex Dump EXAMPLE: The capital letter A is a Hex 41. Find the letter A on the Mode above chart, and look towards the top of the chart (continued) (MSB) and locate the Hex number 4.
-
Page 119: Language
Appendix A – Control panel menus ® AddressRight Printer DA700/DA750 Operating Guide 7. Language The DA700/DA750 has several language sets installed. The options on the language menu are: A. Symbol Set B. Inch / Millimeter C. Menu Language. A. Symbol Set The symbol set contains the International Standards Organization (ISO) character set substitution tables. - Page 120 Appendix A – Control panel menus AddressRight ® Printer DA700/DA750 Operating Guide B. Inch / Millimeter 7. Language This option selects the printer Measurement system (continued) — Inch or Millimeter. C. Menu Languages This option changes the LCD control panel menu to the language you want.
-
Page 121: Envelope Feed Delay
Appendix A – Control panel menus ® AddressRight Printer DA700/DA750 Operating Guide Use this option to feed very glossy material or if extra 8. Envelope ink drying time is needed. This option slightly reduces Feed Delay the overall throughput of the printer. To use this option: 1. -
Page 122: Auto Envelope Eject
Appendix A – Control panel menus AddressRight ® Printer DA700/DA750 Operating Guide 9. Auto Use this option to automatically eject the last envelope in your job. Envelope Eject To use this option: 1. Press the + or – buttons to scroll through the Setup Menu options until 9. -
Page 123: Rom Revision Number
Appendix A – Control panel menus ® AddressRight Printer DA700/DA750 Operating Guide 10. ROM This option is extremely useful whenever it is neces- sary to verify the Firmware Revision installed in the Revision printer. It is also useful to determine if your printer Number requires an upgrade. - Page 124 Appendix A – Control panel menus AddressRight ® Printer DA700/DA750 Operating Guide This Page is intentionally blank. Page A-36 SV61027C · Rev A...
-
Page 125: Appendix B, Specifications
Appendix B – Specifications ® AddressRight Printer DA700/DA750 Operating Guide Chapter contents This Appendix contains detailed hardware and material specifications for the DA700/DA750 printer. SV61027C · Rev A Page B-1... -
Page 126: Equipment Specifications
Appendix B – Specifications AddressRight ® Printer DA700/DA750 Operating Guide Equipment Physical Dimensions 13" (33 cm) high; 19" (48 cm) wide; 17" (43 cm) deep Specifications (without wireform). Weight 50 lbs. (23 kg), including high-capacity print cartridges and catch bin. Electrical Voltage: 120 volts AC +/- 10%. - Page 127 AddressRight Printer DA700/DA750 Operating Guide Equipment Below is a table of the Microsoft operating systems currently supported and the dates Pitney Bowes Specifications currently expects to stop providing support for the (continued) drivers that run in conjunction with those systems.
- Page 128 Appendix B – Specifications AddressRight ® Printer DA700/DA750 Operating Guide Equipment Fonts • Resident Fonts Specifications Courier, Sans Serif, Roman, Baxter, Dingbat, (continued) Hancock, Marina, Quincy, Silicon, Springer, Stencil, and Windmill. (All fonts are scalable from 4 to 30 pt size.) •...
- Page 129 Appendix B – Specifications ® AddressRight Printer DA700/DA750 Operating Guide Barcode Printing Position The DA700/DA750 can print a barcode in one of three positions: • lower right of the envelope • above the address block • below the address block. Barcode Printing Types The DA700/DA750 can print the following barcodes: 1-Dimensional...
- Page 130 FIM barcode to the defined standards. FIM is used to “face” first class mail with certain types of IBI (information-based indicia) mail. NOTE: Pitney Bowes Envelope DesignerTM Plus soft- ware does not support the creation of FIM barcode. Throughput (Refer to the chart on page 3-3)
- Page 131 Appendix B – Specifications ® AddressRight Printer DA700/DA750 Operating Guide Equipment Effective Print Area The printable width is 9.4 inches measured from the Specifications right side of the mailpiece. The printable height is 15 (continued) inches measured from the bottom edge of the mailpiece.
- Page 132 Appendix B – Specifications AddressRight ® Printer DA700/DA750 Operating Guide Equipment Print Position Accuracy • For a #10 envelope Specifications (Acclaim #10 WW Commercial, Regular): (continued) Horizontal: within +/- 1.5mm Vertical: within +/- 1.5mm Skew: within +/- 1 degree • For other media: Horizontal: within +/- 3.0mm Vertical:...
-
Page 133: Material Specifications
(continued) Operator position: no more than 65 dBa referenced to 20 µpa. Recommended Usage Pitney Bowes has tested this machine under many different conditions, and recommends that you do not exceed the usage levels specified below: • Monthly usage is 250,000 pieces (86,000 pieces per... - Page 134 Appendix B – Specifications AddressRight ® Printer DA700/DA750 Operating Guide Material Material Size and Thickness Specifications Width Height Thickness (continued) Minimum 3" (76mm) 5" (127mm) .003" (.0762mm) Maximum 15.5" (394mm) 15" (381mm) .250" (6.35mm) Also see the table on page B-10 Material Notes Envelopes have a flap along the long edge and are processed by the printer non-flap edge first.
- Page 135 Appendix B – Specifications ® AddressRight Printer DA700/DA750 Operating Guide Material A catalog may consist of multiple pages bound by adhesive or tabs on the feed edge or at 90 degrees with Specifications respect to the feed edge. (continued) Sheet stock may consist of 16 to 28 lb. bond as well as 60 to 80 lb.
- Page 136 Appendix B – Specifications AddressRight ® Printer DA700/DA750 Operating Guide This page is intentionally blank. Page B-12 SV61027C · Rev A...
-
Page 137: Index
Index ® AddressRight Printer DA700/DA750 Operating Guide SV61027C · Rev A Page i-1... - Page 138 Index AddressRight ® Printer DA700/DA750 Operating Guide 5-Digit On / Off A-15 Clear Memory A-17 CMYK Printing 5-4 Communications A-26 Baud Rate A-27 Address High 6-7 DTR handshaking A-26 Address Layout Line Termination A-27 Setting with Menu A-6 Parallel interface A-26 Address Recovery Parity A-27 Specification B-3...
- Page 139 Index ® AddressRight Printer DA700/DA750 Operating Guide Interface Centronics Parallel B-2 Feed Angle 3-12 Interface Panel 3-7 Feed Fence 3-15 Interface Problems 6-5 Feed Gap, Intermittent Feed 6-2 setting 3-9 Internal Fonts 3-2 Feed Problems 6-2 Feed Roller Doesn't Move 6-5 Floor Assembly and Top Cover Paper 6-7 Cleaning 5-3...
- Page 140 Index AddressRight ® Printer DA700/DA750 Operating Guide Media Size 3-4 Preventive Maintenance 5-2 Media Thickness Knob 3-17, 5-2 Print Memory Card Error 6-8 No printing 6-3 Menu Languages A-31 Print Driver Misfeeds 6-2, 6-3 Installation 4-2 Motor Problems 6-5 Print Head Multifeed (Feeds Doubles) 6-3 Purge A-23 Test A-22, A-24...
- Page 141 Index ® AddressRight Printer DA700/DA750 Operating Guide ROM Revision Number A-35 Specifications Using Menu to View A-35 Address Recovery B-3 Agency Approvals B-2 Approved Media B-9 Barcode Printing B-4 Selecting the DA700/DA750 Printer From a Cartridge Fonts B-4 Windows Application 4-15 Control Language B-2 Sensor Downloadable Fonts B-4...
- Page 142 Index AddressRight ® Printer DA700/DA750 Operating Guide Test Print Head A-23, A-24 Throughput B-6, 3-3 Troubleshooting 6-2 Address Printing is not Sharp 6-4 Address Smudging 6-4 Address too High 6-7 Addresses "Walking" 6-5 Barcode (Lower Right) is not Printing 6-6 Intermittent Feed 6-2 Memory Card Error 6-8 Motor Turning but no Feed Roller Move-...
- Page 143 At Pitney Bowes, we offer integrated mail and document management solutions that can significantly improve your communication flow, increase revenue and, ultimately, drive shareholder value. Our solutions include: Pitney Bowes Mail Management Document Management 5500 Explorer Drive Mississauga, ON L4W 5C7...
Need help?
Do you have a question about the AddressRight DA700 and is the answer not in the manual?
Questions and answers