Pitney Bowes AddressRight DA700 Quick Reference Manual
Hide thumbs
Also See for AddressRight DA700:
- Operator's manual (140 pages) ,
- Operating manual (143 pages)
Advertisement
Quick Links
Download this manual
See also:
Operator's Manual
for your AddressRight
Checklist for Running Mail
Set the correct gap. To do this, raise the H blocks
by flipping up the levers, then place the material
between the H blocks and the Feed Rollers.
Flip the levers down to lower the H blocks.
Center the wireframe under the material and
adjust the angle (steeper for short material or
lower for flats).
Slide the wire frame ramp to contact rear of the
material and slightly lift the rear edge.
Set the side guide close to the edge of material,
but not tight to the edge.
Raise thickness adjustment knob to thickest
setting.
Open cover and place material in "print zone" at
back of printer. With material inserted here, turn
the thickness adjustment knob away from
thickest setting until rollers start to grab the
material.
Continue turning knob one more mark on the
knob label.
Adjust exit rollers over the edge of the material
but keep out of printing areas.
Fill input area with media.
Press the test print button to ensure feeding of
the material.
SV61030 Rev. A 3/03 ©2003 Pitney Bowes Inc. All rights reserved. Printed in USA
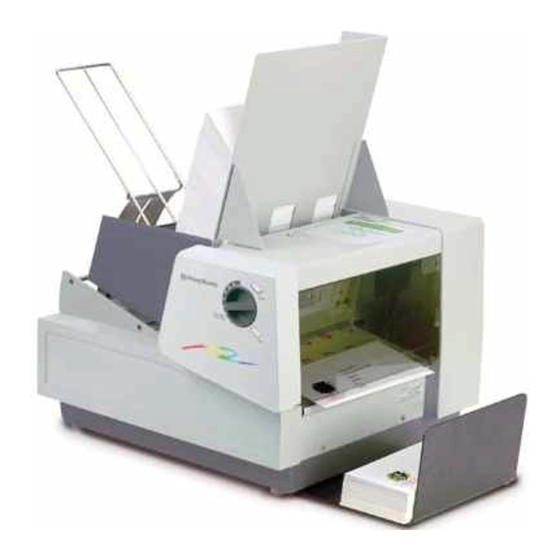
Quick Reference Guide
TM
Printer DA700/DA750
Adjust this ramp to
slightly lift the material
Loosen
knob to
adjust
wireframe
angle
Flip this
lever to
center
wireframe
Side Guide
Open this cover to
place material in the
"print zone" under
the printhead.
Thickness Adjustment Knob
H Block Lever
Feed Rollers
1
Advertisement

Related Manuals for Pitney Bowes AddressRight DA700


Summary of Contents for Pitney Bowes AddressRight DA700
- Page 1 Adjust exit rollers over the edge of the material but keep out of printing areas. Fill input area with media. Press the test print button to ensure feeding of the material. Thickness Adjustment Knob SV61030 Rev. A 3/03 ©2003 Pitney Bowes Inc. All rights reserved. Printed in USA...
-
Page 2: Troubleshooting Problems
Checklist for Running Mail (continued) Create envelope layout, matching size of material to be used. Attach envelope layout to database of addresses in your application. Start mail run printing from the application. Troubleshooting Problems Remember: All material must be consistent in size and thickness.
Need help?
Do you have a question about the AddressRight DA700 and is the answer not in the manual?
Questions and answers