Table of Contents
Advertisement
Quick Links
Advertisement
Table of Contents

Subscribe to Our Youtube Channel
Related Manuals for KERN DLT-N


Summary of Contents for KERN DLT-N
- Page 1 KERN & Sohn GmbH Ziegelei 1 Phone: +49-[0]7433- 9933-0 D-72336 Balingen Fax: +49-[0]7433-9933-149 E-Mail: info@kern-sohn.com Internet: www.kern-sohn.com Operating manual Electronic Moisture Analyser KERN DLT-N Version 2.1 12/2014 DLT_N-BA-e-1421...
-
Page 2: Table Of Contents
KERN DLT-N Version 2.1 12/2014 Operating manual Electronic Moisture Analyser Contents Technical data ....................5 Appliance overview ..................7 Overview ..........................7 Tablet ............................8 Basic instructions ..................9 Proper use ..........................9 Improper Use ........................9 Warranty ..........................9 Monitoring of Test Resources .....................9 Basic Safety Precautions ................ - Page 3 Operating elements ..................27 Start screen ........................27 Work screen ........................29 Simple weighing / taring ................30 Weighing: ..........................30 Taring: ..........................30 Default tare (pre tare) ......................30 User profile ....................31 Setup menu ....................32 Heating module settings ....................33 10.1 Balance settings .........................
- Page 4 General information concerning moisture analysis ......... 68 Application ......................... 68 15.1 Basics ..........................68 15.2 Adjustment to existing measuring method ............... 68 15.3 Preparing a sample ......................69 15.4 Sample material ........................70 15.5 Sample size / originally weighted in quantity ..............70 15.6 Drying temperature ......................
-
Page 5: Technical Data
1 Technical data Data DLT 100-3 Radiator Halogen (1 x 400 W) 35°C - 160°C Temperature range Choice of steps at 1°C Maximum load (Max) 160 g Warm-up time Minimum for drying 0.5 g Weighing mode 0.001g Readability (d) Moisture analysis mode 0.01 % Weighing mode 0.001g... - Page 6 Shutoff criterion • Manual Press stop button • Time Drying is finished after the set time, adjustable 1 – 99 minutes • Autostop % when the set weight loss (%) per time unit is lower than the nominal value (both values adjustable) •...
-
Page 7: Appliance Overview
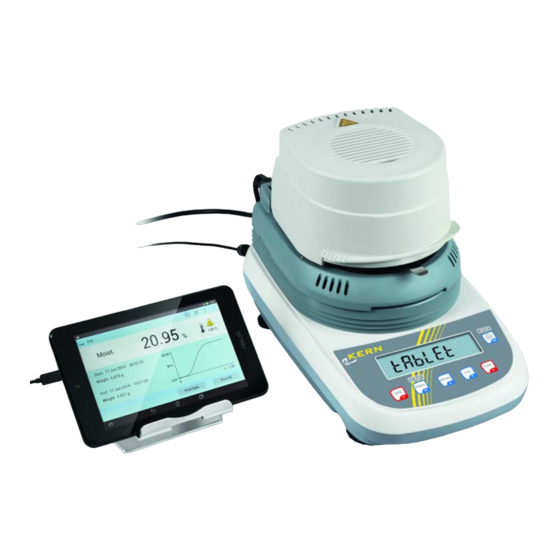
2 Appliance overview The instrument comprises a drying unit (integrated balance + heating module) and a tablet serving as terminal. 2.1 Overview Pos. Designation Sample chamber Halogen lamp Temperature sensor Sample dish Heating module Balance Levelling screw Table mount Tablet DLT_N-BA-e-1421... -
Page 8: Tablet
2.2 Tablet Front side: Rear side: 1 Touch screen 1 Audio loudspeaker 2 Front camera 2 Volume key 3 On / off key 4 Loudspeaker / headset port 5 Microphone 6 Micro USB 2.0 port 7 Rear camera 8 MicroSD card slot DLT_N-BA-e-1421... -
Page 9: Basic Instructions
Information is available on KERN’s home page (www.kern-sohn.com) with regard to the monitoring of balance test substances and the test weights required for this. In KERN's accredited DKD calibration laboratory test weights and balances may be calibrated (return to the national standard) fast and at moderate cost. -
Page 10: Basic Safety Precautions
4.1 Pay attention to the instructions in the Operation Manual Carefully read this operation manual before setup and commissioning, even if you are already familiar with KERN balances. All language versions contain a non-binding translation. The original German is binding. - Page 11 CAUTION The moisture analyzer operates using heat! Maintain sufficient space in the environment of the instrument to prevent heat build-up (distance from the instrument 20cm, upwards 1m). The heat extractor of the sample must never be covered, blocked, taped up or altered in any other way. Never place combustible materials on, under or next to the instrument, as the environment of the instrument heats up to a high temperature.
-
Page 12: Transport And Storage
5 Transport and storage 5.1 Testing upon acceptance When receiving the appliance, please check packaging immediately, and the instrument itself when unpacking for possible visible damage. 5.2 Packaging / return transport Keep all parts of the original packaging for a possibly required return. - Page 13 On the installation site observe the following: Remove explosion prone and easily flammable material in the immediate vicinity. Emerging vapours, sample dish and all parts of the sample chamber are hot! Protect the instrument against direct draughts due to open windows and doors.
-
Page 14: Unpacking And Placing
6.2 Unpacking and placing 1. Drying unit Take the instrument carefully out of its packaging, remove the plastic jacket and install it at the designated work space. The instrument is supplied part-assembled. Immediately after unpacking check if the delivered items are complete. Assemble the separate component parts according to their sequence. -
Page 15: Scope Of Delivery / Serial Accessories
5. Level instrument with foot screws until the air bubble of the water balance is in the prescribed circle. Check levelling regularly. 5. Tablet Remove the tablet carefully from the packaging, remove plastic cover and install at intended place of installation, using the table mount. Charge the rechargeable battery. -
Page 16: Connections
6.4 Connections 1. Drying unit 1. Connection of connecting cable “balance / heating module“ 2. Connection net adapter „Balance“. 3. Power supply „heating module“. 4. Connection RS 232 „Bluetooth Adapter“ 5. Connection of connecting cable “balance / heating module“ 6. Main switch „heating module“ 7. - Page 17 Housing screws Housing screws (for access remove the foot screws) 10. Adjustable foot screws 11. Rigid foot screw DLT_N-BA-e-1421...
- Page 18 2. Tablet Rear side: 1 Audio loudspeaker 2 Volume key 3 On / off key 4 Loudspeaker / headset port 5 Microphone 6 Micro USB 2.0 port 7 Rear camera 8 MicroSD card slot DLT_N-BA-e-1421...
-
Page 19: Mains Connection
6.5 Mains connection Power is supplied to the integrated balance via the external power unit. The stated voltage value must be the same as the local voltage. Only use original KERN mains adapters. Using other makes requires consent by KERN. - Page 20 If not, activate it by following the steps below: In weighing mode, press and hold pressed until the audio signal stops. Release the key and the menu item “units“ will appear. Press repeatedly until “tbL mode“ appears. ...
- Page 21 The start screen will appear. Ensuring Bluetooth connection When enabled, the icon for Bluetooth will be shown in the top right corner. To start application “moisture analysis“, use DLT_N-BA-e-1421...
- Page 22 Wait for Bluetooth connection, whereupon the start screen will appear. Setting operator language On delivery the display is set to German. Setting additional languages: Tap <Settings>. Tap <Language & input>. Tap <Language>. DLT_N-BA-e-1421...
- Page 23 In dropdown menu select the desired language. Initial Commissioning In order to obtain exact results with the electronic balances, your balance must have reached the operating temperature (see warming up time chap. 1). During this warming up time the weighing system must be connected to the power supply (mains, accumulator or battery).
-
Page 24: Call-Up Weighing Mode
6.8 Connection of peripheral devices Before connecting or disconnecting of additional devices (printer, PC) to the data interface, always disconnect the moisture analyser from the power supply. Only use accessories and peripheral instruments by KERN, as they are ideally tuned to the instrument. DLT_N-BA-e-1421... -
Page 25: Adjust Balance
Adjustment in adjustment mode “external user define“ can also be carried out, based on weights of different nominal values, however, from a metrological point of view this does not produce best results. • Info about test weights can be found on the Internet at: http://www.kern- sohn.com. Call function: ... - Page 26 During the flashing display put the required adjustment weight carefully in the centre of the sample dish. After successful adjustment the balance automatically returns to weighing mode. Take away adjustment weight To view/issue an adjustment protocol, call the following menu item (See chap 10.5 ): <Settings>...
-
Page 27: Operating Elements
7 Operating elements In “tablet mode” the keys of the drying unit will be disabled (with the exception of ON/OFF). Use the tablet for all actions. 7.1 Start screen DLT_N-BA-e-1421... - Page 28 Call-up function menu: Status display Tap and hold: Set standby temperature: User specific shortcut keys (M1- M5) for calling up the 5 most frequently used drying programs Function keys (Pre tare, zero setting / tare, print) Link to android service programs ...
-
Page 29: Work Screen
7.2 Work screen The work screen is shown at the start of measuring, see chap. 11. Drying process active Instructions for the performance of tasks during measuring Weighing guide; only shown when function is enabled, see chap. 11.1.4 Enter tare value numerically Start drying;... -
Page 30: Simple Weighing / Taring
8 Simple weighing / taring In order to obtain exact weighing results, the integrated balance must have reached its operating temperature (see warming up time chap. 1). 8.1 Weighing: Ensure weighing mode Wait for zero display, reset to zero using 0/T. -
Page 31: User Profile
9 User profile In this menu 10 user profiles can be created, processed or deleted. Each user will be assigned to a profile with his own specific settings (basic settings of the instrument, hole data memory). Factory setting is „Default“, this cannot be deleted or renamed. ... -
Page 32: Setup Menu
10 Setup menu In this menu item the user-specific basic settings of the instrument take place. The settings are stored together with the active user profile and remain valid if working with that profile. If a user profile is called up, the respective settings are automatically loaded, see chap. -
Page 33: Heating Module Settings
10.1 Heating module settings Tap <Heater parameters>, see chap.: 10. The available settings will be displayed. Settings: <Standby-temperature> Switched off Standby The numeric input window will be Temperature displayed. Enter required temperature selectable 35°C – 100°C. To import press <OK>. The display returns to the previous screen. - Page 34 < Stability test > Settings: Stability control before start of measurement switched off Stability control before start of measurement switched off < End acoustic signal> Settings: Switched off When turned on, an audio signal will be sounded as soon as the test is finished.
-
Page 35: Balance Settings
10.2 Balance settings Tap <Weighing parameters>, see chap: 10. The available settings will be displayed. Settings: < Filter > Filter 1 Setting for dosage This menu item allows the balance to be set according to Filter 2 The balance reacts quickly and in a specific ambient conditions and sensitive manner, very quiet set-up measuring purposes. -
Page 36: Peripheral Equipment
Tap <Peripheral>, see chap: 10. The available settings will be displayed. Settings: < Printer selection > DPP-250 Setting for KERN YKC-01 DPP-350 < Print at stability > Settings: Stability check before data transfer on Stability check before data transfer off Settings: <Print heading>... -
Page 37: Adjustment
10.4 Adjustment Tap < Calibration settings > see, chap: 10. The available settings will be displayed. < Calibration data > View or print adjustment protocol: < Calibration mode > Settings: External Here the adjustment takes place near the default maximum load of the balance Standard (recommended adjustment weight see... -
Page 38: Colour Of Display
10.5 Colour of display Tap <Appearance >, see chap: 10. The available settings will be displayed. Select desired colour: DLT_N-BA-e-1421... -
Page 39: Service Menu
10.6 Service menu Tap <Service >, see chap: 10. The available settings will be displayed. The changes to service menu settings described below must be made by expert staff with profound knowledge of balances. < Backup and reset system data > <... -
Page 40: Drying Parameters
You will find examples taken from actual use in our application manual, available from our KERN home page (www.kern-sohn.com). The instrument offers the possibility to set the drying parameters sample-specific manually or to load a suitable drying program with the required drying parameters from the database. -
Page 41: Setting The Heating Profile
11.1.1 Setting the heating profile This function offers different heating profiles to adapt the drying characteristic optimally to the used sample. in dropdown menu < Heating profile > (see chap. 11.1). The available heating profiles are displayed: • Standard • Fast •... - Page 42 3. Gentle drying This heating profile is suitable for the soft drying of substances, which tend to skin formation (e.g. substances containing Display pictogram during drying sugar or volatile substances). Skin formation will then affect the evaporation of the trapped moisture. The temperature is permanently increased and reaches the selected drying temperature only after finishing the so called ramp duration.
- Page 43 4. Step-by-step drying This heating profile is suitable for drying substances which consist of several components (such as etheric oils), which Display pictogram during drying evaporate at different temperatures or of substances which present a specific behaviour when being warmed up. 3 steps can be selected.
-
Page 44: Shutoff Criterion
11.1.2 Shutoff criterion A switch-off criterion defines when the instrument has to finish the drying process. The switch-off criteria make sure that the measurements are always finished under the same conditions thus providing repeatable measurements. Tap< Shutoff Criterion > in dropdown menu (see chap. - Page 45 Selectable parameters: Variation: 0.1 - 10.0% Time unit: 1 – 99 s To import press <OK>. This switch-off criterion is based of the Absolute auto stop weight loss (mg) per time unit. Measurement is finished, when the set weight value per time unit is lower than the nominal value, both values being freely adjustable [mg / sec].
-
Page 46: Preheating (Before Weighing-In)
11.1.3 Preheating (before weighing-in) If needed, the function „preheating“ can be enabled for preheating the sample chamber prior to beginning the actual measurement. A preheated device may affect the consistency of the results as the device keeps the same temperature status for each measurement. Preheating will take place up to the point of measuring, in standby mode (For setting see chap. -
Page 47: Weighing Assistance
11.1.4 Weighing assistance The weigh-in aid facilitates the weighing-in of the samples on a nominal value with adjustable tolerance range. This is especially useful, when samples with the same weight are processed. This will increase reproducibility of the measurement results. If all samples are weighed-in within the tolerance range, this will increase repeatability. - Page 48 Return to menu by DLT_N-BA-e-1421...
-
Page 49: Result Display
11.1.5 Result display This function will define the unity where the measuring results are displayed and printed out. Calculation: Display shows the moisture content of the sample as a % M: Moisture content percentage of the wet weight (W = wet weight = starting weight = 100%) Wet weight W –... - Page 50 Settings: Tap < Units > in dropdown menu (See chap. 11.1). Selectable display types: Moisture (%M) Dry weight (%R) Atro (%A) Residual weight (g) Note: You can switch over during or after weighing to the available units, see chap. 12 “Switch over result display“.
-
Page 51: Save Drying Parameters In Database
11.2 Save drying parameters in database Tap < Moisture Determination >. Tap <Database parameters setup>. The dropdown menu for data records will appear. The database will be empty when started up for the first time. To create a new data record (drying program), tap the icon in the top right corner. -
Page 52: Creating A New Drying Program (Data Record)
11.2.1 Creating a new drying program (data record): Call parameter dropdown menu, see chap. 11.2 Tap <Record name> and the input window will appear. Enter name (such as maize silage) for the new drying program (max. 30 characters) and import by pressing <OK>. -
Page 53: Change / Delete Drying Programs (Data Record)
11.2.2 Change / delete drying programs (data record) Tap <Moisture Determination>. Tap <Database parameters setup>. The dropdown menu for data records will appear. Highlight the data record to be edited by tapping on it. To highlight all data records, tap icon and select <... -
Page 54: Carrying Out Measurement
12 Carrying Out Measurement During the first start-up set the drying parameters as described in chap. 11. (1) Start-up Turning on moisture meter, see chap. 6.6. In order to obtain exact results, the instrument must have reached its operating temperature (see warm-up time chap. - Page 55 <Manual parameter setting> After setting all drying parameters, tap the control button the top right corner. The work screen will appear, showing the previously set parameters. < Database parameter settings > Load desired drying program from the dropdown menu by tapping. to search names in the dropdown menu.
- Page 56 Shortcut keys Tap shortcut key (M1 –M5). The work screen for the selected drying program will appear. DLT_N-BA-e-1421...
- Page 57 (3) Carrying Out Measurement Step 1: Preheat Work screen without preheating, Work screen with preheating, see chap.11.1.3 see chap.11.1.3 Sample display: Work screen with weighing The display may prompt you to close the sample guide disabled, see chap: 11.1.4 chamber.
- Page 58 Working with the weigh-in aid: The bar graph display moves from the left to the right and proceeds equally to the weight loaded onto the weighing balance. yellow: Weighed-in < lower weight value green Target weight within the weight limits red: Weighed-in >...
- Page 59 Step 4: Display during drying process You can watch the drying process on the display unit. The drying progress is shown continuously as a graphic display. The display shows the selected settings. To interrupt the drying process tap control button Display of results, tap for switching over Current measured value in % Current temperature...
- Page 60 Switch over display of result Tap result display of result and import desired unit into dropdown menu (such as [g] ). Switching in graphic display The display may be zoomed in or out by tapping the diagram. DLT_N-BA-e-1421...
- Page 61 Step 6: End of measurement, display/printout measuring results The end of the drying process will be indicated by an audio signal, provided this has been enabled in the menu (menu settings <end audio signal “ON”>), see chap. 10.1) whereupon heating will be turned off. ...
- Page 62 Sample protocols (KERN YKC-01): DLT_N-BA-e-1421...
- Page 63 Step 7: Save measurement results (max. 300 measurement results) Tap control button Enter data record name and designation and import by pressing The database results will be displayed. DLT_N-BA-e-1421...
-
Page 64: Call Up / Edit / Delete Measurement Results
13 Call up / edit / delete measurement results 13.1 Calling measurement results Tap <results>. Tap <database results>. The list of data records will be displayed. Select data record. The selected measurement result will be displayed. DLT_N-BA-e-1421... -
Page 65: Changing / Deleting Measurement Results
13.2 Changing / deleting measurement results Tap <results>. Tap <database results>. The list of data records will be displayed. Highlight the data record to be edited by tapping To highlight all data records, tap icon and select < Select all > ... -
Page 66: Glp
14 GLP Tap <GLP settings>. Select desired setting. 1. <Manual setting> Manual setup < >. Selectable parameters: Id Balance Id Project Id User Tap the respective control button, the numeric input window will appear. Import entry with , the display returns to <OK>... - Page 67 Tap <Record name> and the input window will appear. Enter designation (max. 30 characters) and import by pressing <OK>. Then enter all the other parameters: Id Balance Id Project Id User To save new data record to database, press The list of data records will be displayed.
-
Page 68: General Information Concerning Moisture Analysis
The radiation applied in the KERN DLT penetrates mainly the sample in order to be transformed inside it into heat energy that is, warming from the inside to the outside. A minor amount of radiation is reflected by the sample, a reflection that is less in dark samples than in light-coloured ones. -
Page 69: Preparing A Sample
15.4 Preparing a sample Prepare one sample at a time for measuring. This prevents the sample from exchanging moisture with its surroundings. If several samples have to be taken at the same time, they should be packed in airtight boxes so that they do not undergo changes during storage. -
Page 70: Sample Material
15.5 Sample material Easy to determine are usually samples with the following characteristics: Grainy to powdery, pourable solids Thermally stable materials, emitting the moisture to be determined easily without other substances evaporating at the same time Liquids that vaporize to leave a dry substance without developing a film Difficult to determine may be samples that are: ... -
Page 71: Drying Temperature
15.7 Drying temperature Bear in mind the following factors when setting the drying temperature: 15.7.1 Surface of the sample: Compared with powdery or grainy samples, liquid and spreadable samples have a smaller surface for the transmission of heat energy. The use of a glass fibre filter improves the heat application. 15.7.2 Colour of sample: Light-coloured samples reflect more heat radiation than dark ones and therefore require a higher drying temperature. -
Page 72: Table Of Applications
15.8.3 Table of applications: Drying Solid Weight Drying Moisture period body Material Sample temperature (approx.) (°C) (approx.) (approx.) (min) ABS (Novodur P2H-AT) 0.11 Accumulator lead 0.19 Acryl granulate 10-15 0.18 Activated carbon 13.33 Activated carbon 6.12 Sliced pineapple 14.4 6.71 Sliced apple (dry) 10-15 76.5... - Page 73 Drying Solid Weight Drying Moisture period body Material Sample temperature (approx.) ( °C) (approx.) (min) (approx.) Setting lotion 0.01 98.76 Setting lotion (extra strong) 97.85 Hair styling gel 37.0 94.71 Oat flakes 9.35 Hazelnut cores Hazelnut cores (peeled) 3.74 Hydranal sodium tatrate – 2 15.67 –...
- Page 74 Drying Solid Weight Drying Moisture period body Material Sample temperature (approx.) ( °C) (approx.) (approx.) (min) Paper PA 6 (Ultramide B3WG5) 0.05 PA 6.6 (Ultramide B3WG5) 0.15 PBTP (Crastin SK645FR) 0.05 PC (Macrolon 2805) 10-12 0.08 PC/ABS (Babyblend T65MN) 9-11 0.12 Pepper, black, powder 7.97...
- Page 75 7.32 Wheat spring water Sausage casing 78.56 Toothpaste 34.28 Pulp 7.32 Cement 8-12 Sugar 11.9 Sugar beets 13.4 30.94 You will find further examples taken from actual use in our application manual, available from the KERN home page (www.kern-sohn.com). DLT_N-BA-e-1421...
-
Page 76: Servicing, Maintenance, Disposal
Remove any spilt sample material immediately. 16.2 Servicing, maintenance The instrument may only be opened by trained service technicians who are authorized by KERN. Ensure that the integrated balance is regularly calibrated, see chap. Monitoring of test resources. 16.3 Disposal... -
Page 77: Instant Help
17 Instant help Fault Possible cause Display is not lit up. • The instrument is not switched on. • The rechargeable battery is empty. The display does not change when a sample is being loaded • Sample dish / dish holder is fitted incorrectly. •...
Need help?
Do you have a question about the DLT-N and is the answer not in the manual?
Questions and answers