
Related Manuals for Panda-Audio Future Impact v3


Summary of Contents for Panda-Audio Future Impact v3
- Page 1 Analog Modeling MIDI Synthesizer for bass, guitar, keyboard and other instruments User Guide Version 3.60 June 10, 2021 Written by Peter Kenney and Andras Szalay Panda-Audio Ltd. www.panda-audio.com Product website: www.pandamidi.com...
-
Page 2: Table Of Contents
A Quick Word About Firmware Detailed Manual The Instrument Modes The Boot Menu Updating the Firmware of the Future Impact v3 Firmware Update Failure The Future Impact v3 Editor Suite Installing the Future Impact v3 Editor Suite Connecting to the Future Impact v3 Editor Suite... - Page 3 The Editor The Program Display On-Screen Keyboard Block Reset & Randomize Tool VCO & Flexi Copy Tool Alternative Editor Skin Editor Parameters VCO Block Foldover Distortion Distortion Block Envelopes Block Envelope Mode Behavior VCF Block VCF INPUT Attack/Release Distortion FILTER LFO Block MIDI Block Main Mixer Block...
- Page 4 Tutorials FI as a Replacement for Standard Single-Effect Pedals FI as Envelope Filter FI as Chorus FI as Flanger FI as Phaser FI as Tremolo FI as Vibrato FI as Reverb FI as Delay FI as Octaver FI as Pedal Wah MIDI Setting the MIDI Channel MIDI Thru...
-
Page 5: What's In The Box
What’s in the Box? Box contents: ● A Future Impact v3 pedal; ● A Quick-Start Guide. Items required but not included: ● A 9V stabilized, 100mA, center-negative, Roland-Boss-type power supply; ● A compatible MIDI interface and two MIDI cables for use with either a PC (Windows 7 and above) or MAC (OS X 10.6 (Snow Leopard) and above). -
Page 6: Introduction
Joe Zawinul, Chick Corea, Jan Hammer, Keith Emerson and countless others. The Future Impact v3 (FI) is an incredibly versatile pedal and the range of sounds it is capable of producing is quite staggering. In addition to producing synthesizer sounds such as basses, leads and pads, it can function as an octaver, chorus, flanger, phaser, distortion, envelope filter, traditional wah-wah, tremolo, reverb, delay, etc. -
Page 7: Main Features
Main Features ● 99 editable onboard sounds; many more available via the companion Editor Suite; ● Synth triggered either by an instrument’s audio signal or any MIDI-capable device; ● Super-fast and accurate pitch tracking over the full range of 6-string bass or guitar; ●... -
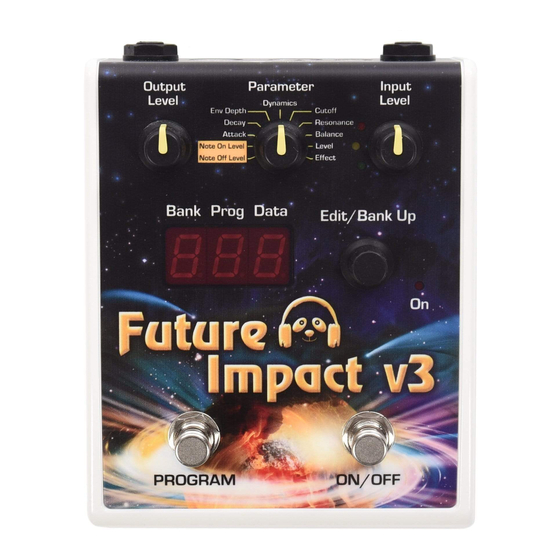
Page 8: Top Panel Controls And Display
Top Panel Controls and Display Connections Go to Table of Contents... -
Page 9: Quick-Start Guide
Quick-Start Guide The Future Impact v3 will let you play amazing and authentic synth lines from your bass, guitar, keyboard or practically any other instrument. You can choose from 99 onboard sounds that you can quickly shape to your taste using the Top Panel Controls. -
Page 10: Operating The Future Impact V3
Operating the Future Impact v3 The FI has 99 sounds (programs) distributed across 10 banks: bank 0 has 9 sounds, all other banks have 10. Step up through the banks by pressing the EDIT/BANK UP dial (by hand only). Press and hold this dial and turn it to quickly move up or down to any bank. -
Page 11: Editing The Sounds
Upper line only Sharp by > 10 cents Upper and middle lines Sharp by > 3 cents Middle line only In tune (within ±3 cents) Lower and middle lines Flat by > 3 cents Lower line only Flat by > 10 cents Note 1: While in Tuner mode, the display will be blank if there is no input signal. -
Page 12: Description Of The Parameters
Description of the Parameters NOTE OFF LEVEL (global): Sets the volume threshold of the input signal below which the synth stops sounding. A lower value allows you to sustain notes longer. A higher value allows better articulation of staccato notes. NOTE ON LEVEL (global): Sets the volume threshold of the input signal above which the synth begins sounding. -
Page 13: A Quick Word About Firmware
If a number lower than 3.60 is shown then you will need to update the firmware; please see the dedicated section on Updating the Firmware of the Future Impact v3 in the Detailed Manual below to learn how to do this. Go to Table of Contents... -
Page 14: Detailed Manual
We hope that your Future Impact v3 brings you many years of joyful music-making! The Panda Team Go to Table of Contents... -
Page 15: The Instrument Modes
The Instrument Modes In order to get the best performance from the FI, it is very important to set the correct instrument mode for your instrument. If your instrument is not among those listed below then choose either Bass or Guitar, whichever one best fits the pitch range of your instrument. Bass is the default setting. -
Page 16: The Boot Menu
The FI’s audio input is decoupled from the pitch-detection circuit and all envelope triggering. Your instrument’s audio signal can still be routed through the VCF Block and the Effects Block, but the envelopes and synthesizer notes will only be triggered via the MIDI input. Note: The Distortion Block cannot be used. - Page 17 The items of the Boot Menu and their settings are given below. ● RESET ALL (“rS”) Value: 0, 1. (Default on reset is 0.) Change to 1 to immediately reset all Boot Menu settings to their default values. All sound para meters will be reset to their default value (5) upon power-on. The program loaded at power-on will be reset to 1.
-
Page 18: Updating The Firmware Of The Future Impact V3
If set to 1 then all information received via MIDI IN will be passed to MIDI OUT (with the exception of CC6 (Data Edit), NRPN controllers and SysEx data). Updating the Firmware of the Future Impact v3 You should always make sure the latest firmware version is installed on your FI (now v3.60). -
Page 19: Firmware Update Failure
The online updater also allows you to write the latest default factory soundset to your pedal after the firmware has been installed. Important: If you are upgrading to v3.60 from a pre-v3 version then you must allow the online updater to write the factory soundset to the pedal after the firmware update has been installed;... -
Page 20: The Future Impact V3 Editor Suite
The Future Impact v3 Editor Suite The FI v3 Editor Suite is the place where all the magic happens. It can best be thought of as the control room of the pedal. If you want to move beyond the 99 onboard sounds and fully immerse yourself in the fascinating world of subtractive synthesis then this is where to do that. -
Page 21: Installing The Future Impact V3 Editor Suite
Open With>Disk Image Mounter from the pop-up menu. Once the DMG file has been verified, it will open automatically. Now drag the FIEditor program into the Applications folder. Connecting to the Future Impact v3 Editor Suite First connect your compatible interface to your computer, then launch the Editor Suite. -
Page 22: The Menu Bar
Important: The FI’s MIDI OUT must only ever be connected to the computer’s MIDI IN using the FI Input Device option. If you were to connect the FI’s MIDI OUT to the computer’s MIDI IN using the Keyboard Input Device option then that input device’s MIDI Thru feature would cause an infinite MIDI loop. - Page 23 You can save a program to your computer using any name up to 32 characters in length. (In order to write a program to the FI, the name must begin with a two-digit prefix between 01 and 99. This prefix determines the slot on the FI to which the program will be written.
- Page 24 ● Save Program from FI to File: Allows you to save a single program from the FI to your computer. Note: Any modifications to a program’s parameters made on the pedal using the PARAMETER and EDIT dials will not be preserved when saving programs from the FI to files.
-
Page 25: The Edit Menu
At the end of the process, which should take less than a minute, “Update successful!” will be shown and the LED will go back to blinking slowly. If there is a problem during the update the Editor Suite will display “Error!” and the update will be stopped - the LED might be on, off or blinking quickly. -
Page 26: The View Menu
The View Menu The size of the Editor Suite window can be chosen here. (The window can also be resized by left-clicking and dragging the lower-right corner.) The Editor Interface sub-menu offers three options: ● Space is the classic skin (depicted in the Editor section);... -
Page 27: The Manager
The Manager This is a powerful new feature for v3.60 and one that FI users have been requesting for a very long time. The Manager is a subsection of the Editor Suite devoted entirely to easy program management. Using a drag-and-drop interface, it allows you to display and rearrange the sounds currently stored on your pedal;... -
Page 28: File Commands
to the left of tile 01 to audition the sound (as long as none of the Program Commands checkboxes is ticked) or you can switch to the Editor view to make changes to the sound’s parameters. The Note Button plays MIDI note number 48 (the C one octave below Middle C) at full velocity and uses the same MIDI channel as the On-Screen Keyboard. - Page 29 ○ LOCAL: Click here to browse FI files stored on your computer; ○ GLOBAL: Click here to browse FI files hosted on the Future Impact Program Database site directly within the Manager. Upon clicking this button, you will be prompted for your username and password as shown in the image below. (If you have not yet registered, you will need to visit the Program Database site...
-
Page 30: Bank Commands
empty, and if the number of selected program files exceeds the number of available empty tiles, then only the first files that fit will be sent. Note: In the case where you want to send multiple program files and multiple tiles are selected in the Tile Window, the files will be sent starting from the lowest-numbered empty selected tile and will continue filling the empty tiles in numerical order from that point on, regardless of whether they are selected or not. -
Page 31: Program Commands
Note: It is important to always save to a different folder each time, otherwise there will be duplication of the slot numbers, which will prevent you from correctly loading or writing the program files later. ● UPLOAD TO FI DATABASE: Click to begin the upload process. You will first be prompted to save the contents of the Tile Window locally (unless you have already done so). - Page 32 Important: When using the Program Commands to edit a tile’s name or category information or to change its numerical location (including when copying), only its program file data will be saved; any adjustments made using the PARAMETER and EDIT dials will not be saved, so you must make a note of these before you press the UPLOAD TO FI button.
-
Page 33: The Editor
The Editor The FI is a very complex device with over 100 fully-adjustable parameters per sound. These are mostly adjusted in the Editor using sliders but there are a few pushbuttons too. In order to get an overview we recommend you first familiarize yourself with the panel layout in the image above (or in that of the Alternative Editor Skin) and investigate the... -
Page 34: The Program Display
The Program Display This area in the upper-left corner of the Editor is used to show the currently-loaded sound. The name and category is shown in the long window. The faux-LCD window shows the program number (but is blank if the program was loaded via the Manager’s Tile Window). The four load/save/write commands of the File Menu are duplicated here as LOAD, SAVE,... -
Page 35: Block Reset & Randomize Tool
as it will produce different key velocity values depending on where you press the key; higher velocities are at the bottom, lower velocities at the top. To the left of the keyboard is an icon for setting its MIDI channel; either left-click and drag up and down, or right-click and use the pop-up menu. -
Page 36: Alternative Editor Skin
Click on the VCO button to show the VCO checkboxes; click on the FLEXI button to show the FLEXI checkboxes. Select a single source from the left side and the destination(s) from the right side, then press COPY. Alternative Editor Skin Instead of the classic Future Impact Editor skin, you can use this photorealistic LCD skin. -
Page 37: Editor Parameters
Editor Parameters The bulk of the interface of the Editor consists of sliders and pushbuttons which control the various sound-shaping parameters within a program. These are organized into distinct logical groupings called blocks and are (with a few exceptions) labelled with a “watermark” text indicating the block’s name. - Page 38 ● PITCH BEAT (-63…63): This is also a detuning control, but instead of detuning by a fraction of a semitone, it detunes by a fixed number of Hz. To illustrate this function let’s use the example of two oscillators pitched in unison, but slightly detuned in order to create a beating between them.
- Page 39 ● PULSE WIDTH LFO FRQ (1...127) : Each oscillator has its own dedicated LFO (low frequen cy oscillator) for modulating the pulse width of the square wave. Here you can adjust the LFO frequency. (See the LFO Frequency Lookup Table in the Appendix for details of the actual frequencies).
-
Page 40: Foldover Distortion
Foldover Distortion This is a special feature of the FI. Depending on the implemented algorithm, when a signal processor is over loaded it will either clip the peak of the signal or it will fold over. While clipping is often used to generate a moderate amount of overtones, foldover generates a very high overtone content. -
Page 41: Envelopes Block
The Distortion Block is also the source of the Attack/Release Distortion. See the detailed explanation of Attack/Release Distortion in the VCF INPUT section of the VCF Block. Moving from left to right, the sliders of the Distortion Block are as follows: ●... - Page 42 ● ATTACK sets the time the envelope takes to rise from zero to maximum after a note is played. ● DECAY sets the time the envelope takes to decay from maximum back down to the level set by the SUSTAIN. ●...
-
Page 43: Envelope Mode Behavior
Envelope Mode Behavior There are 3 different envelope behavior modes: VINTAGE, RESTART and RESET. In VINTAGE mode the envelopes are the same as those found in pre-v3 versions of the FI firmware. (Here the D and S sliders of the VCA envelope and the S and R sliders of the VCF envelopes are greyed out and cannot be used.) In this mode, all three envelopes have a linear ramp and are triggered each time you play a note. -
Page 44: Vcf Block
VCF Block The Voltage-Controlled Filter (VCF) is one of the most important sound-shaping tools in a synthesizer. Basically it removes certain frequencies from a sound, thus altering its harmonic content. Depending on the type of filter used, the frequencies above, below or at a specified “cutoff”... -
Page 45: Attack/Release Distortion
Attack/Release Distortion As mentioned earlier, the synthesizer signal passes through the VCA and its loudness contour is controlled by the VCA envelope. If you set a long attack time on the VCA envelope, then the synth sound will fade in slowly after a note is played. By contrast, the loudness contour of the distortion signal is ordinarily only controlled by the volume envelope of your instrument. - Page 46 For everything else we recommend using NEW mode which is the Future Impact’s far superior filter implementation. ● VCF FILTER SLOPE PUSHBUTTON (12 dB / 24 dB): Toggles the filter mode between 12 dB/octave and 24 dB/octave. This adjusts how drastically the frequencies around the filter’s cutoff point are attenuated.
- Page 47 The four filter types are as follows: 1. Lowpass - Attenuates the frequencies above the cutoff; 2. Highpass - Attenuates the frequencies below the cutoff; 3. Bandpass - Attenuates the frequencies on either side of the cutoff; 4. Notch - Attenuates the frequencies at the cutoff. ●...
-
Page 48: Lfo Block
LFO Block The FI has a dedicated Low Frequency Oscillator (LFO) for modulating the cutoff frequency of the VCF and the pitch of the VCOs. This can be used to create pitch vibrato and filter “wobbles”. Moving from left to right, the sliders of the LFO Block are as follows: ●... -
Page 49: Midi Block
MIDI Block The parameters in this block are relevant only if the FI is being played using its MIDI IN port or if it is being synchronized to a MIDI clock signal via the MIDI IN port. Moving (roughly) from left to right, the sliders (or pushbutton switches, where indicated) of the MIDI Block are as follows: ●... -
Page 50: Main Mixer Block
Sync of LFO4 for details. The range of MIDI Sync is 30-480 BPM. If the incoming clock signal is outside that range then it will be limited to the border value closest to it. (A program that uses MIDI Sync defaults to 120 BPM if no MIDI clock signal is detected at the point it is loaded.) ●... -
Page 51: Effects Block
Note: In order to hear the sound coming from the VCF, both the VCF LIN and the VCF LOG sliders must be set to non-zero values. The INSTR and VCF signals can be further controlled via MIDI using CC92 and CC2 respectively. -
Page 52: Effect 1: Overdrive
Effects Chain Order The four effects run in series from left to right. To the right of the Delay tab there is another tab: Clicking on this swaps the order of the EQ and Overdrive effects. If any of the effects is turned off then its tab’s border will become dim. Being able to quickly disable a single effect in this way means you can roughly adjust each effect individually, turn on the required combination to check the sound and then make any fine adjustments. -
Page 53: Effect 2: Equalizer
Effect 2: Equalizer The Equalizer consists of a bass shelf tone control, two parametric band equa li zer stages, and a treble shelf tone control. Moving from left to right, the sliders unique to this effect are as follows: ● BASS FRQ (0...127): Adjusts the frequency of the bass shelf filter in the range of 50...270 Hz. -
Page 54: Effect 3: Chorus
Above the Equalizer panel there are two small icons: The left one selects the panel with sliders (described above); the right one selects the panel with the graphical view. The icon for the currently-selected panel type is illuminated in red. Using the mouse within the graphical view, you can adjust the frequency of a filter stage by clicking and dragging the yellow dot left and right. - Page 55 Moving from left to right, the sliders unique to this effect are as follows: ● LFO A FRQ, LFO B FRQ (0.00Hz...8.60Hz): Adjusts the frequency of the two LFOs. ● LEVEL1, LEVEL2 (-64...63): Adjusts the output level of the two delay lines. The ampli tude can be negative, which is important for flanger sounds if the delay value is very small, or if the two delay values are very close to each other.
-
Page 56: Effect 4: Delay
Effect 4: Delay This is a tape-style delay. Unlike the Chorus, here the delay lines are much “darker” than the dry signal due to having a greater proportion of the high frequencies filtered out. It is a classic effect often used with synthesizers.. The functions of the Delay are identical to those of the Chorus except for the behavior of the DELAY1 and DELAY2 sliders and their maximum delay time. -
Page 57: Tap Tempo
Note 2: If the combined setting of the BPM value of the incoming MIDI clock and the note value of a delay slider would result in a delay time that exceeds 600ms, then the delay will be limited to 600ms. Note 3: The DELAY1 and DELAY2 sliders are reset when switching between the Chorus and Delay and vice versa. -
Page 58: Adjusting Effects On The Fi With The Parameter And Edit Dials
Adjusting Effects on the FI with the PARAMETER and EDIT Dials Setting the DATA digit on the FI’s display to default (5) using the EDIT dial will reproduce the effects settings exactly as they were saved in the Editor. The EDIT dial will only adjust the last active effect in the chain. When OVERDRIVE is last in the chain, turning the EDIT dial towards 9 will increase DRIVE;... - Page 59 relatively simple one and basically consists of choosing a source and a destination. There are then a few choices to be made which alter how and to what degree the source modulates the destination. This will all be explained below later. The four Flexi Controllers are situated towards the right in the upper portion of the Editor screen.
- Page 60 ● RANGE CTRL: Click this window to open a pop-up menu with the list of Range Controls: Above the list is a POLARITY button. This selects whether the range control is applied positively or negatively. By default it is positive (+). Click the button to change the polarity.
- Page 61 ● CURVE: Click and drag up and down in the window to select one of the Flexi Controller’s sixteen available transformation curves. Double-click it to reset it to the default linear curve. The various curves alter how the modulation from the control source is applied to the destination.
-
Page 62: A Flexi Controller In Action
upper or lower limit of its travel, then continuing to move the left slider in the same direction will cause the distance between the two sliders to become compressed. This compressed range will now be “remembered”; when moving the left slider back in the other direction again, this new, shorter distance between the two sliders will be maintained. -
Page 63: More On Flexi Range Control
Make sure mode is set to QUANTIZE by clicking in Flexi 1’s MODE window. Select a linear curve from the curve window by dragging the graphic. Now, play a C and you will hear that VCO2 plays a steady C, whereas VCO1 plays chromatically from E down to C. -
Page 64: Special Flexi-Only Modulation Sources
Special Flexi-Only Modulation Sources There are eight modulation sources in the list which can only be used with Flexi Controllers - they are not found elsewhere in the Editor. Six are LFOs and two are noise sources. They are explained below. ●... -
Page 65: Midi Clock Sync Of Lfo4
● White Noise and Pink Noise: The white noise generator generates random, non-consecutive values. The noise is sampled at the frequency of VCO3 LFO. When used with a Flexi Controller set to continuous, this can be used to modulate pitch or filter cutoff for classic sci-fi computer sample-and-hold effects. -
Page 66: Some Ideas For Uses Of Flexi Controllers
this slider are also reset to their minimum values, namely the cutoff of the filter for the pink noise and the actual pulse width LFO frequency of VCO4. Furthermore, whenever LFO4 MIDI Sync is active, the ranges of both the pink noise filter cutoff parameter and the actual pulse width LFO frequency of VCO4 are limited to steps 1-12 of the usual 127. -
Page 67: Midi Controllers As Flexi Controller Sources And Range Controls
MIDI Controllers as Flexi Controller Sources and Range Controls If, when selecting a Flexi source or a Range Control, you choose a MIDI controller that has a default assignment in the FI, then that default assignment will be overridden. The default assignments and their respective default values are shown below: MIDI CC / Name Default Assignment in the FI Default Value... -
Page 68: Building Your First Sound
Building Your First Sound Loading a pre-existing sound and playing around with the various parameters can be a very good way to learn how to manipulate sounds to your liking, but at some point you will probably want to start creating your own sounds. This next section will give you a few pointers on how to do just that. -
Page 69: Distortion Sounds
filter.) Click the Slope button to set it to 24dB and raise the cutoff (VCF FRQ) slider to 122. You should now hear a sawtooth wave alongside the sound of your instrument. Lower the filter cutoff back down to 64 and you’ll hear the sawtooth sound become more muted. Now raise the A and D sliders of the VCF envelope to 64. - Page 70 also raise the DISTORTION TONE slider to 127 and you should notice a marked increase in volume. If it’s still not enough, try raising the VCF LIN and VCF LOG sliders. Now experiment with the positions of the DISTORTION GRADE and TONE sliders. You may need to back off some of the volume sliders at high GRADE settings.
-
Page 71: Tutorials
Tutorials FI as a Replacement for Standard Single-Effect Pedals As we mentioned all the way back in the introduction, the FI can perform the function of a number of single-effect pedals (sometimes more than one at a time). In this section we’ll explain how to set up the pedal to achieve that via a few examples. -
Page 72: As Chorus
FI as Chorus A chorus is achieved by taking the dry signal (instrument, synth or both) and then using a delay line to create a copy of that signal. The delay time of the copied signal is then modulated using an LFO which causes its pitch to fluctuate. When paired with the original signal in a 50/50 mix, the tuning differences create the characteristic shimmering sound. -
Page 73: As Tremolo
This effect can be achieved on the FI by using the EQ section in conjunction with Flexi Controllers. Start by using just the dry instrument signal turned up to 127 in the Main Mixer. Switch on the EQ section and turn on its INSTR slider. Using the graphical EQ interface, space out the two yellow circles for the mid frequencies then drag both down to create two notches. -
Page 74: As Delay
Start by using just the dry instrument signal turned up to 127 in the Main Mixer. In the Chorus, set the INSTR slider to around 22. Now, starting with LFO A FRQ and moving to the right, set the remaining parameter sliders to the following two combinations: ●... -
Page 75: Midi
MIDI Setting the MIDI Channel The MIDI channel can be set to a number between 1 and 16 or it can be set to “All”. When set to a number between 1 and 16, the FI will only respond to messages received on that channel. -
Page 76: Midi-Related Performance Features
MIDI-Related Performance Features Expression By default, an expression pedal (or keyboard mod wheel) sending MIDI CC1 controls the depth of the LFO to the VCO and the VCF as detailed in the Block. As mentioned in previous sections, there are various other parameters available for expression control, such as filter cutoff, synth volume, input instrument volume, master volume and portamento time. -
Page 77: Midi Implementation
MIDI Implementation The FI will respond to the following standard MIDI messages received on the selected MIDI channel: MIDI CC / Default Function in Default Notes Name the FI Value Note On --- Active only in MIDI Mode. Also switches the FI into MIDI mode. - Page 78 VCF volume of Main 127 Adjusts (logarithmically) the VCF volume Mixer of the Main Mixer. When CC2 is at maximum (127) then VCF volume of Main Mixer corresponds to the preset value in the program. This differs from Volume Control (CC7) in two aspects: 1.
- Page 79 Program DOWN --- If ≥64 then the program number first steps down by one, then it starts scrolling (as when holding the Program footswitch). If <64 then it stops again. FI ON/OFF toggle --- If ≥64 then the FI flips between ON and OFF.
-
Page 80: Compatible Midi Interfaces
Compatible MIDI Interfaces Below is a list of the MIDI interfaces we have tested for use with the Future Impact v3 Editor Suite. Unless otherwise stated, these work for patch editing/transfer and firmware updates. Name Remarks Panda-Audio midiBeam All work perfectly. -
Page 81: Specifications
Specifications Technical specifications: ● Size: 155 x 125 x 65 mm (6.1 x 4.9 x 2.6 inch); ● Weight: 600g (1.32lb); ● Power: 9V stabilized, 100mA, Roland-Boss-type, center-negative supply (not included); ● True bypass (relay switching); ● Super-high-performance DSP; ● All algorithms calculated with 32-bit accuracy; ●... - Page 82 Features: ● Covers the full range of 24-fret 4, 5 and 6 string bass guitars; ● 99 Programs; 9 Programs in Bank 0, 10 Programs in each of Banks 1…9; ● Factory Programs 21-29 are Deep Impact compatible; ● Sounds can be designed and archived with the PC/Mac Editor Suite software; ●...
- Page 83 Requirement for using the FI: ● A 9V stabilized, 100mA, center-negative, Roland-Boss-type power supply. Additional requirement for sound editing: ● A MIDI interface and two MIDI cables for use with a PC (Windows 7 and above) or MAC (OS X 10.6 (Snow Leopard) and above). (Minimum screen resolution - 1280x900.) Go to Table of Contents...
-
Page 84: Appendix
Appendix Go to Table of Contents... -
Page 85: Algorithm Block Diagrams
Algorithm Block Diagrams Go to Table of Contents... - Page 86 Go to Table of Contents...
- Page 87 Go to Table of Contents...
-
Page 88: Vcf Frequency Lookup Table
VCF Frequency Lookup Table Note Note Freq Note Freq Note Freq Note Freq (Hz) (Hz) (Hz) (Hz) 65.41 130.81 261.63 523.25 69.30 138.59 277.18 554.37 73.42 146.83 293.66 587.33 77.78 155.56 311.13 622.25 82.41 164.81 329.63 659.26 87.31 174.61 349.23 698.46 92.50 185.00... - Page 89 VCF Frequency (continued) Note Note Freq Note Freq Note Freq Note Freq (Hz) (Hz) (Hz) (Hz) 1046.50 2093.00 4186.01 8372.02 1108.73 2217.46 4434.92 8869.84 1174.66 2349.32 4698.64 9397.27 1244.51 2489.02 4978.03 1318.51 2637.02 5274.04 1396.91 2793.83 5587.65 1479.98 2959.96 5919.91 1567.98 3135.96 6271.93...
-
Page 90: Lfo Frequency Lookup Tables
LFO Frequency Lookup Tables VCO1-4 Pulse Width LFO and VCO LFO3 Value Frequency Value Frequency Value Frequency Value Frequency (Hz) (Hz) (Hz) (Hz) 0.03 0.63 1.23 1.83 0.06 0.66 1.26 1.86 0.09 0.69 1.29 1.89 0.12 0.72 1.32 1.92 0.15 0.75 1.35 1.95... - Page 91 VCO1-4 Pulse Width LFO and VCO3 LFO (continued) Value Frequency Value Frequency Value Frequency (Hz) (Hz) (Hz) 2.43 3.03 3.63 2.46 3.06 3.66 2.49 3.09 3.69 2.52 3.12 3.72 2.55 3.15 3.75 2.58 3.18 3.78 2.61 3.21 3.81 2.64 3.24 2.67 3.27 2.70...
-
Page 92: Vco4 Lfo
VCO4 LFO Value Frequency Value Frequency Value Frequency Value Frequency (Hz) (Hz) (Hz) (Hz) 0.12 2.52 4.92 7.32 0.24 2.64 5.04 7.44 0.36 2.76 5.16 7.56 0.48 2.88 5.28 7.68 0.60 3.00 5.40 7.80 0.72 3.12 5.52 7.92 0.84 3.24 5.64 8.04 0.96... - Page 93 VCO4 LFO (continued) Value Frequency Value Frequency Value Frequency (Hz) (Hz) (Hz) 9.72 12.12 14.52 9.84 12.24 14.64 9.96 12.36 14.76 10.08 12.48 14.88 10.20 12.60 15.00 10.32 12.72 15.12 10.44 12.84 15.24 10.56 12.96 10.68 13.08 10.80 13.20 10.92 13.32 11.04 13.44...
- Page 94 EU Directives on the Protection of the Environment RoHS This product is compliant with the EU Directive 2002/95/EG for the Restriction of the use of Certain Hazardous Substances in Electrical and Electronic Equipment. No lead (Pb) cadmium (Cd), mercury (Hg), hexavalent chromium (Cr + 6), PBB or PBDE is intentionally added to this device.
-
Page 95: Warranty And Return Policy
Warranty and Return Policy If your Future Impact v3 breaks or malfunctions as a result of any defective electronic parts or due to a design fault of ours, we will repair or replace it during the warranty period, which is two years from the date of original purchase. -
Page 96: Frequently-Asked Questions (Faqs)
Frequently-Asked Questions (FAQs) Here are twenty things we get asked time and time again by users. Please read through them to see if your question is covered and follow the links to the main manual where applicable. ● I can no longer open the Editor Suite; what has happened and how do I fix this? In earlier versions, if you closed the Editor and then moved or deleted the last program file that was loaded (or its parent folder), then this could prevent the Editor... - Page 97 Note: You must first make a note of any adjustments made using the PARAMETER and EDIT dials as these are not stored as part of the program data. Connect your FI to your computer using a compatible MIDI interface from the list of tested devices using the instructions shown in the...
- Page 98 A second way is via the Manager feature of the Editor Suite. Connect your FI to your computer using a compatible MIDI interface from the list of tested devices using the instructions shown in the Connecting to the Future Impact v3 Editor Suite section of this manual. Launch the Editor Suite. Switch to the Manager view.
- Page 99 it will not function correctly. Back up any custom program files you want to keep before updating the firmware. If you do not want to lose any edits made using the PARAMETER and EDIT dials then you must manually make a note of these as these are not stored as part of the program data - they are stored on the pedal slots themselves.
- Page 100 ● What is the difference between the FI I and the FI v3? The two pedals are absolutely identical, other than the differing decal on the top. ● Can I load the v3.60 firmware onto my FI I? Yes! An FI I can be upgraded to the v3.60 firmware free of charge. Please refer to the question above entitled “How do I update my pedal’s firmware?”...
Need help?
Do you have a question about the Future Impact v3 and is the answer not in the manual?
Questions and answers