Table of Contents

Related Manuals for Panda-Audio Future Impact v3


Summary of Contents for Panda-Audio Future Impact v3
- Page 1 Analog Modeling MIDI Synthesizer for bass, guitar, keyboard and other instruments User Guide Version 3.00 October 24, 2019 Written by Andras Szalay and Peter Kenney Panda-Audio Ltd. www.panda-audio.com Product website: w ww.pandamidi.com...
- Page 2 Box contents: ● A Future Impact v3 pedal; ● A Quick-Start Guide. Items required but not included: ● A 9V stabilized, 100mA, center-negative, Roland-Boss-type power supply. ● A MIDI interface and two MIDI cables for use with a PC (Windows 7 and above) or MAC (OS X 10.6 (Snow Leopard) and above).
- Page 3 Email: info@panda-audio.com Warranty If your Future Impact v3 breaks or malfunctions as a result of any defective electronic parts or due to a design fault of ours, we will repair or replace it during the warranty period, which is two years from the date of original purchase.
- Page 4 Joe Zawinul, Chick Corea, Jan Hammer, Keith Emerson and countless others. The Future Impact v3 (FI) is an incredibly versatile pedal and the range of sounds it is capable of producing is quite staggering. In addition to producing synthesizer sounds such as basses, leads and pads, it can function as an octaver, chorus, flanger, phaser, distortion, envelope filter, traditional wah-wah, tremolo, reverb, etc.
-
Page 5: Main Features
Main Features ● 99 editable onboard sounds; many more available via the included Editor software; ● Super-fast and accurate pitch tracking over the full range of 6-string bass or guitar; ● 4 VCOs each with saw, square (with variable pulse width) and triangle waveforms; ●... - Page 6 New features for version 3.00 Table of Contents Top Panel Controls and Display Connections Quick-Start Guide Setting up the Future Impact v3 Operating the Future Impact v3 Tuner Editing the Sounds Description of the Parameters Configuring the Future Impact v3...
- Page 7 Effects Block Effect 1: Overdrive Effect 2: Equalizer Effect 3: Chorus Adjusting effects on the FI with the PARAMETER and EDIT dials Flexi Controllers More on Flexi Range Control Special Flexi-only Modulation Sources Pulse Width Settings Some ideas for uses of Flexi Controllers MIDI Controllers as Flexi Controller Sources and Range Controls Block Adjust Mode Building your first sound...
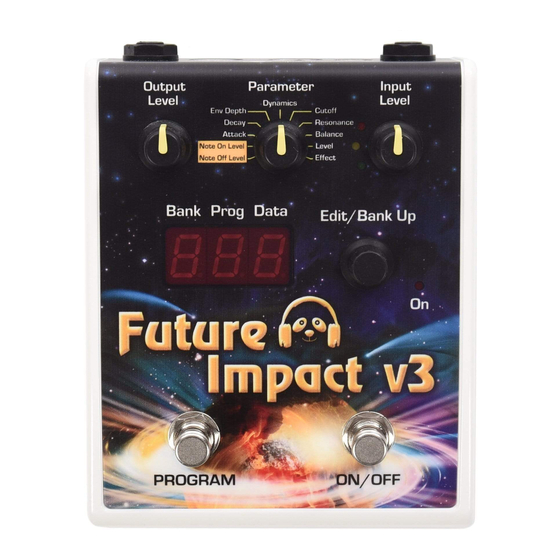
- Page 8 Top Panel Controls and Display Connections...
- Page 9 Quick-Start Guide The Future Impact v3 will let you play amazing and authentic synth lines from your bass, guitar or keyboard. You can choose from 99 onboard sounds that you can quickly shape to your taste. By using the pedal in conjunction with the included Editor software, you can branch out further and download many more free sounds created by experienced sound designers and other enthusiasts in the music community.
- Page 10 Operating the Future Impact v3 The FI has 99 sounds (programs) distributed across 10 banks: bank 0 has 9 sounds, all other banks have 10. You can step up through the banks by p ressing the EDIT/BANK UP dial.
- Page 11 Note: While in tuner mode, the display will be blank if there is no input signal. The tuner is calibrated to the Tune Base value. This can be adjusted in the range of 428Hz...440Hz...452Hz. See the E diting the Configuration Parameters...
- Page 12 E ffects Block section of this manual. Configuring the Future Impact v3 This is done via a boot menu. Only the two most immediately important parameters of this menu are shown here; the c omplete list...
- Page 13 The final part takes you through all of the controls and functions of the Editor in detail. Editing the Configuration Parameters As already mentioned, the Future Impact v3 has 99 onboard programs whose many parameters can be fully edited with the Editor software. As you may recall from the E diting Sounds...
- Page 14 press, the number will scroll down in the same manner. In this program mode, incrementing and decrementing the program number will seamlessly step over the bank borders so that you can access any of the 99 programs using just the one footswitch.
- Page 15 EDIT dials, you can manually set the tune base to 440 (or any other desired value). ● INSTRUMENT MODE (“InS”) Value: bSS (Bass), SPL (Split), Gtr (Guitar), Snt (Synth), EUI (EWI). (Default on reset is bSS.) ○ Bass Mode: The pitch tracking is optimized and limited for the pitch range of the bass guitar.
- Page 16 ■ Any notes that are now played via MIDI will be set to transpose down by 50 cents upon exiting Detune Mode. Pressing the ON/OFF switch again will exit Detune Mode and the altered (detuned) scale can now be played. Note that the detuned scale will not be stored in flash memory, but must instead be initialized “on the fly”...
- Page 17 The Future Impact v3 Editor The FI v3 Editor is the place where all the magic happens. It can best be thought of as the control room of the pedal. If you want to move beyond the 99 onboard sounds and fully immerse yourself in the fascinating world of subtractive synthesis then this where to do that.
- Page 18 The FI is a very complex device with over 100 fully-adjustable parameters per sound. These are mostly adjusted using sliders but there a few pushbuttons too. In order to get an overview we recommend you first familiarize yourself with the panel layout in the image above (or the one found ...
- Page 19 If you want to be able to write programs to the FI then you need two MIDI connections between the FI and your computer: 1. MIDI OUT of the interface → MIDI IN of the FI; 2. MIDI OUT of the FI → MIDI IN of the interface. If you just want to audition, edit and create sounds and save them to your computer (without writing them to the FI) then only connection 1 is needed.
- Page 20 ● Select Directory: Specifies the location that the editor uses for loading and saving program files. ● Load Program from File to Editor: Loads a program from your computer into the FI editor. The program file format of FI 3.0 is much more advanced than that of previous versions.
- Page 21 1. Gaps can be filled w ith the Default - the slots in the FI corresponding to the gaps will be overwritten with the lowest-numbered program in the directory; 2. Gaps can be s kipped - the slots in the FI corresponding to the gaps will be ignored and the original programs in those slots will be untouched.
- Page 22 follow the steps below to install the update: 1. Connect a MIDI interface to the PC (see remarks about MIDI interfaces at the end of this description). Connect the FI bidirectionally to the interface, with two MIDI cables: ○ MIDI interface MIDI OUT (assigned to Output Device) → FI MIDI IN; ○...
- Page 23 devices carefully enough to ensure they don’t suffer from data loss when sending large packages. While these poorly-tested MIDI interfaces can be used for all other functions of the FI Editor, they cannot be used for updating the firmware. Do not worry, even if an error occurs during the update process, it will not damage your FI in any way;...
- Page 24 Note: The on-screen keyboard only triggers the s ynthesizer p ortion of a sound. Therefore any program whose sound is partially (or entirely) constructed from your instrument’s audio signal will not play back as expected when using this keyboard. Parameters The bulk of the interface of the FI Editor consists of sliders and pushbuttons which control the various sound-shaping parameters within a program.
- Page 25 ● PITCH BEAT (-63…63): This is also a detuning control, but instead of detuning by a fraction of a semitone, it detunes by a fixed number of Hz. To illustrate this function let’s use the example of two oscillators pitched in unison, but slightly detuned in order to create a beating between them.
- Page 26 containing all the overtones of the harmonic series; the higher the frequency of the overtone, the lower its amplitude is. This gives a bright and buzzy sound. ● AMPLITUDE SQR (0…127): Adjusts the volume of the square wave. This waveform contains only the odd-numbered overtones of the harmonic series.
- Page 27 Foldover distortion can also happen between separate oscillators when the sum of the amplitudes (i.e. VOLUME sliders) of all four of the FI’s oscillators exceeds 127. In clean default sounds the oscillator master volumes are set to 32, thus avoiding foldover. The effect of foldover distortion between oscillators that are tuned to different frequencies (either coarsely or finely) is rather unpredictable so leaves a lot of room for experimentation.
- Page 28 Note: When the FI is played solely via its MIDI IN port, the Distortion block has no function. This is because it is only driven by the audio input signal of your instrument connected at the INPUT socket. Envelopes Block Envelopes are configurable control signals which are used to adjust parameters over time.
- Page 29 ● NOISE A/D (1...127): Changes the volume of the noise source dynamically over time. * The sustain stages of the two ADSR envelopes actually start their range from 0. Note: The VCF and NOISE envelopes can be freely assigned to many other parameters when used as a control source with a Flexi Controller.
- Page 30 The RESTART and R ESET m odes differ only in how they behave when a new trigger event occurs before the envelope generator has completed its previous envelope sequence: In R ESTART mode the envelope will begin a new attack stage from w hatever level it was at immediately before the note was played;...
- Page 31 VCF INPUT Moving from left to right, the sliders in this section are as follows: ● VCF INPUT INSTR (0...127 ) : Sets the volume of the direct audio signal of your instrument. Unity gain is at 127. ● VCF INPUT DIST (0...127 ) : Sets the volume of the signal coming from the Distortion block.
- Page 32 FILTER The rightmost four sliders in the filter section adjust the depth of control signals which modulate the filter’s cutoff frequency. The remaining sliders and buttons adjust the filter’s character and behavior. Moving from left to right, the sliders (or pushbutton switches, where indicated) in this section are as follows: ●...
- Page 33 excellent way to generate sounds with vowel-like formants resembling the human voice. ● RESO (7…127): Adjusts the resonance peak (or “Q”) of the filter on a scale of Q=0.7...12.7. Higher values boost the frequencies at the filter’s cutoff point creating a characteristic peak. ●...
- Page 34 ● PITCH FOLLOW (ON/OFF): If switched to ON then the filter cutoff will be modulated by the pitch of the note being played. The filter cutoff tracks the input pitch 1:1. That is, playing a note one octave higher will double the cutoff frequency; playing one octave lower will halve the cutoff frequency.
- Page 35 MIDI Block The parameters in this block are relevant only if the FI is played using its MIDI IN port. The FI actually has two separate internal modes for when it is used with an instrument via the audio input or when it is used via MIDI IN; switching between these modes happens automatically.
- Page 36 one note at a time. LOWER: Whichever note is lowest will be played. UPPER: Whichever note is highest will be played. FIRST: Whichever note was pressed first will be played. LAST: Whichever note was pressed last will be played. ● PBD RANGE (0…24): Sets the pitch bend range (both up and down) in semitones when the pitch bend wheel is used.
- Page 37 avoid clicks (especially on sudden large changes of MIDI value). (See Remark 2 in the M IDI Implementation section for more details.) Effects Block This block contains three effects: Overdrive, EQ and Chorus. They can be used simultaneously. Chorus is fixed at the end of the chain but the order of the other two can be changed at will.
- Page 38 If any of the effects is turned off then its tab’s border will become dim. This way you can roughly adjust each effect individually, turn on the required combination to check the sound and then make any fine adjustments. The three effects will be explained in turn below. Effect 1: Overdrive Moving from left to right, the sliders of this effect are as follows: ●...
- Page 39 ● BASS SLOPE (0...127): Adjusts the steepness of the bass filter in a range of 3...10dB/octave. ● BASS BOOST (-20…+20): Boosts or cuts the bass by up to 20dB. ● MID1 FRQ, MID2 FRQ (0…127): Adjusts the center frequency of the equalizer stages in the range of 170...7000Hz. ●...
- Page 40 This effect is very flexible; in addition to Chorus, it can be configured as a Flanger, Slapback Echo or simple Reverb merely by setting the parameters differently. It consists of two delay lines and two LFOs. Both LFOs can modulate both delay lines simultaneously by arbitrary amounts using four fully-independent modulation depth controls.
- Page 41 When CHORUS is last in the chain, turning the EDIT dial towards 9 will increase both the INSTR and VCF blends; turning towards 1 will decrease them. When EQ is last in the chain, the EDIT dial functions as a “tilt EQ”. Turning the EDIT dial towards 9 will simultaneously boost the treble and cut the bass in 2dB steps (leaving the mid controls unchanged);...
- Page 42 ● SOURCE: Click here to open a pop-up menu with the list of control sources. Click on a source to select it. (The full list of Control Sources is given h ere in the appendix.) To close the menu without selecting a source, click on the X or anywhere in the panels above the menu screen.
- Page 43 begin blinking to indicate it is waiting for a destination to be chosen. Click on a parameter’s slider to select it as a destination and the button will remain lit. (If no destination is chosen within 10 seconds, the blinking light will time out.) When clicked, the single slider will split into two, forming a ...
- Page 44 as a Flexi destination, the graphical EQ panel will be disabled for as long as the assignment remains in place. There is a C OPY option in the lower left part of the screen to copy all parameters (except the destination) of one Flexi Controller to one or more of the other Flexi controllers.
- Page 45 More on Flexi Range Control In the above example, you may have noticed that, interesting as they were, the modulations we set up using the Flexi controller caused the sound to repeat the same way each time we played a note, using any given setting. This is because we used an envelope; an envelope, along with the LFOs and noise sources, belongs to a group of sources that we cannot control directly as we play.
- Page 46 Note: The PULSE WIDTH OFFSET behaves differently than might otherwise be expected when used to control the pulse width of the VCO3/VCO4 LFOs. Ordinarily, when PULSE WIDTH OFFSET is used to control the square waves of the VCO s , the waveform is symmetrical at 0 and is a narrow pulse at 127.
- Page 47 ● Use the EQ to create two peaks similar to as described above but instead control with the VCF envelope (alongside the filter(s)) to create 3- and 4-peak filters; ● Use an envelope to raise the volume of an oscillator to push it into foldover distortion; This can give sounds which sound similar to those made using “hard-sync”;...
- Page 48 The default values are recalled (all of them at once) when one of the following occurs: 1. The FI is powered on; 2. The editor changes one of the Flexi sources; 3. A Program Change. Block Adjust Mode In the lower right corner of the editor there are 12 checkboxes. These correspond to the four VCO blocks, the VCF block, a combination of the ENVELOPES and LFO blocks, a combination of the DISTORTION and MAIN MIXER blocks, the EFFECTS block and the four FLEXI Controllers.
- Page 49 For synth sounds, we recommend only using a single oscillator at first until you have become familiar with the controls. Adding multiple oscillators adds complexity and you will need to be careful with the levels if you want to avoid f oldover distortion...
- Page 50 VCO until you are comfortable with the controls. Don’t be afraid to try things out - let your ears be your guide. We hope that your Future Impact v3 brings you many years of joyful music-making!
-
Page 51: Midi Implementation
MIDI Implementation The FI will respond to the following standard MIDI messages: MIDI CC / Default Function in Default Notes Name the FI Value Note On --- Active only in MIDI Mode. Also switches the FI into MIDI mode. Note Off --- Active only in MIDI Mode. - Page 52 Filter cutoff 64 Deviates ±1, ±2 or ±4 octaves from the cutoff value set by the VCF FRQ slider in the program. Range is set by V CF CONTROL RANGE in the b oot menu Remark 1: Modulation (CC1) is routed to both VCF and VCO LFO Modu l a t ion. This means, that the depth set in the program will be reached if CC1 is at maximum (127).
-
Page 53: Specifications
generate and send out a Program Change command. However, the externally-received Program Change command will appear on the MIDI OUT anyway due to MIDI THRU. Specifications Technical specifications: ● Size: 155 x 125 x 65 mm (6.1 x 4.9 x 2.6 inch) ●... - Page 54 Features: ● Covers the full range of 24-fret 4, 5 and 6 string bass guitars; ● 99 Programs; 9 Programs in Bank 0, 10 Programs in each of Banks 1…9; ● First 9 programs Deep Impact compatible; ● Sounds can be designed and archived with the PC Editor software; ●...
- Page 55 Requirement for using the FI: ● A 9V stabilized, 100mA, center-negative, Roland-Boss-type power supply. Additional requirement for sound editing: ● A MIDI interface and two MIDI cables for use with a PC (Windows 7 and above) or MAC (OS X 10.6 (Snow Leopard) and above). (Minimum screen resolution - 1280x900.)
- Page 56 Appendix...
- Page 57 Algorithm Block Diagrams...
- Page 60 The Editor Panel...
- Page 61 Flexi Control Sources Flexi transformation curves Flexi Range Controls...
- Page 62 Compatible MIDI interfaces Below is a list of the MIDI interfaces we have tested for use with the Future Impact v3 Editor. Unless otherwise stated, these work for patch editing/transfer and for firmware updates. Name Remarks Panda-Audio midiBeam All work perfectly.
- Page 63 FI as a replacement for standard single-effect pedals As we mentioned all the way back in the introduction, the FI can perform the function of a number of single-effect pedals (sometimes more than one at a time). In this section we’ll explain how to set up the pedal to achieve that via a few examples.
- Page 64 FI as chorus A chorus is achieved by taking the dry signal (instrument, synth or both) and then using a delay line to create a copy of that signal. The delay time of the copied signal is then modulated using an LFO which causes its pitch to fluctuate. When paired with the original signal in a 50/50 mix, the tuning differences create the characteristic shimmering sound.
- Page 65 This effect can be achieved on the FI by using the EQ section in conjunction with Flexi Controllers. Start by using just the dry instrument signal turned up to 127 in the Main Mixer. Switch on the EQ section and turn on its INSTR slider. Using the graphical EQ interface, space out the two yellow circles for the mid frequencies then drag both down to create two notches.
- Page 66 Start by using just the dry instrument signal turned up to 127 in the Main Mixer. In the chorus, set the INSTR slider to around 22. Now, starting with LFO A FRQ and moving to the right, set the remaining parameter sliders to the following two combinations: ●...
- Page 67 Warranty and Return Policy You must never send back a device without consulting us by email first. A device should be returned to us only after consultation and if we have explicitly requested that it be returned. You must pay for the cost of shipping the device back to us. It is up to you which shipping service you use for the return, but it is your responsibility to ensure that we receive the device.
- Page 68 To change the order of the patches, you need to change the two-digit numerical prefixes at the beginning of the names of the files you wish to move. The prefix corresponds to the slot number on the pedal that the program will be sent to. When you have renamed the programs you wish to rearrange (taking care to avoid any duplication of prefix numbers) then click ...
- Page 69 LFO modulation depth to the filter cutoff and the oscillators’ pitch is controlled by MIDI CC1. You can again use a third-party product to attach an expression pedal and send the relevant CC messages to the FI You can also plug in a MIDI keyboard to the FI’s MIDI IN port and use the keyboard’s mod wheel.
- Page 70 the FI in the sense of being able to set the oscillators to different pitches to give a polyphonic output. With the clever use of Flexi Controllers routed to oscillator pitches, you can even change the chord quality on the fly. If you are using the FI purely as a substitute for a single-effect pedal such as chorus, distortion, flange, etc.
Need help?
Do you have a question about the Future Impact v3 and is the answer not in the manual?
Questions and answers