ATEN CN8000A - Single Port KVM Over IP Quick Start Guide
- User manual (207 pages) ,
- User manual (203 pages) ,
- User manual (205 pages)
Advertisement
Package Contents
- 1 CN8000A Single Port KVM over IP
- 1 Custom KVM Cable
- 1 Custom Console Cable
- 1 Laptop USB Cable
- 1 Power Adapter
- 1 Mounting Kit
- 1 User Instructions
Overview
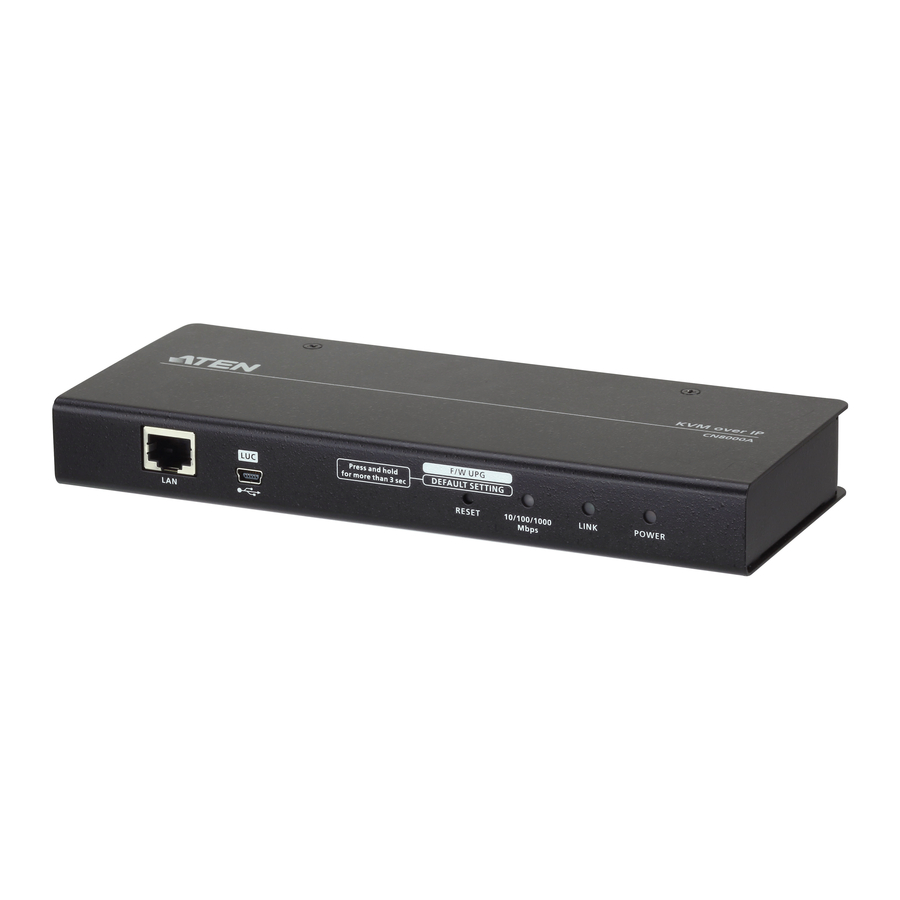
Front View


CN8000A Single Port KVM over IP
- LAN Port
- LUC (Laptop USB Console) Port
- Firmware Upgrade/Reset Switch
- 10/100/1000 Mbps LED
- Link LED
- Power LED
Rear View

- Power Jack
- PC/KVM Port
- PS/2 – USB Console Port
- PON (Power Over the NET™) Port
- RS-232 Port
Installation


Rack Mounting
To rack mount the CN8000A:
- Remove the two original screws from the bottom of the unit.
- Using the screws provided with the rack mount kit, screw the mounting bracket to the bottom of the CN8000A.
- Screw the bracket into any convenient location on the rack.

Note: Rack screws are not provided. Use screws that are appropriate for your rack.
DIN Rail Mounting
To mount the CN8000A on a DIN rail:
- Screw the mounting bracket to the back of the CN8000A as described in steps 1 and 2 of the Rack Mounting procedure.
- Use the large screws supplied with the rack mount kit to screw the DIN rail brackets to the mounting brackets.
- Hang the CN8000A on the DIN rail.
Setup

- Use the Custom Console Cable provided with this package to connect the CN8000A's PS/2-USB Console Port, to the local console keyboard, monitor and mouse.
![warning]()
Note: The Custom Console Cable comes with connectors for both PS/2
and USB keyboards & mice. You can use any combination of PS/2
and USB connections for the keyboard and mouse.
- Use the Custom KVM Cable provided with this package to connect the CN8000A's PC/KVM Port to the keyboard, video and mouse ports of the computer or KVM switch that you are installing.
![warning]()
Note: The CN8000A can connect to a server or KVM switch that uses a USB or PS/2 connection. - (Optional) If you want to connect a PON device for remote power management, plug its cable into the PON (Power Over the NET™) port.
- (Optional) If you want to connect a serial console device or modem, plug its cable into the RS-232 port.
- (Optional) If you want to use a laptop as a console, use the Laptop USB Cable included with this package to connect the laptop's USB port to the CN8000A's LUC (Laptop USB Console) port.
- Plug a Cat 5e/6 Ethernet cable into the CN8000A's LAN port and connect it to the LAN/WAN.
- Plug the power adapter cable into the CN8000A's power jack, then plug the power adapter into an AC power source.
This completes the hardware installation, and you are ready to start up.
Support and Documentation Notice
All information, documentation, fi rmware, software utilities, and specifi cations contained in this package are subject to change without prior notifi cation by the manufacturer.
Technical Support
www.aten.com/support

Scan for more information
EMC Information
FEDERAL COMMUNICATIONS COMMISSION INTERFERENCE STATEMENT:
This equipment has been tested and found to comply with the limits for a Class A digital device, pursuant to Part 15 of the FCC Rules. These limits are designed to provide reasonable protection against harmful interference when the equipment is operated in a commercial environment. This equipment generates, uses, and can radiate radio frequency energy and, if not installed and used in accordance with the instruction manual, may cause harmful interference to radio communications. Operation of this equipment in a residential area is likely to cause harmful interference in which case the user will be required to correct the interference at his own expense.
FCC Caution: Any changes or modifi cations not expressly approved by the party responsible for compliance could void the user's authority to operate this equipment.

Operation of this equipment in a residential environment could cause radio interference. This device complies with Part 15 of the FCC Rules. Operation is subject to the following two conditions:(1) this device mat not cause harmful interference, and(2) this device must accept any interference received, including interference that may cause undesired operation.

Before proceeding, download the Installation and Operation Manual by visiting the website, www.aten.com and navigating to the product page. The manual includes important warnings, loading specifi cations and grounding instructions.
Operation
Browser
To operate the CN8000A from a web browser, do the following:
- Open a web browser and enter the IP address of the CN8000A you want to access.
![warning]()
Note: The CN8000A's default setting is for DHCP but if after one minute it fails to fi nd a DHCP server, it will use the default IP Address:192.168.0.60 - At the Login page, enter a valid Username and Password, and then click Login to continue.
![warning]()
Note: If you are logging in for the fi rst time, use the default Username: administrator; and default Password: password. For security purposes, we strongly recommend that you change the default username and password.
- After you have successfully logged in, the CN8000A Main Screen appears.
- To access the computer, click the Viewer icon in the left column near the bottom.
Mouse Setup
If you use a PS/2 KVM cable to connect to the server, perform the following mouse setting procedures:
Windows
- You must use the generic mouse driver supplied with Windows.
- XP and higher -- middle position; Enhance pointer precision: off
Sun / Linux Systems:
Open a terminal session and issue the following command:
Sun: xset m 1
Linux: xset m 0 or xset m1

Documents / Resources
References
Download manual
Here you can download full pdf version of manual, it may contain additional safety instructions, warranty information, FCC rules, etc.
Download ATEN CN8000A - Single Port KVM Over IP Quick Start Guide
Advertisement


Need help?
Do you have a question about the CN8000A and is the answer not in the manual?
Questions and answers