
Related Manuals for ESAB Caddy TA33


Summary of Contents for ESAB Caddy TA33
- Page 1 TA33, TA34 Caddyt Instruction manual Èíñòðóêöèÿ ïî ýêñïëóàòàöèè 0460 447 074 080124 Valid for program version 1.03...
- Page 2 Ðóññêèé ..........ENGLISH .
-
Page 3: Table Of Contents
Ðóññêèé 1 ÂÂÅÄÅÍÈÅ ............1.1 Ïóëüò... -
Page 4: Ââåäåíèå
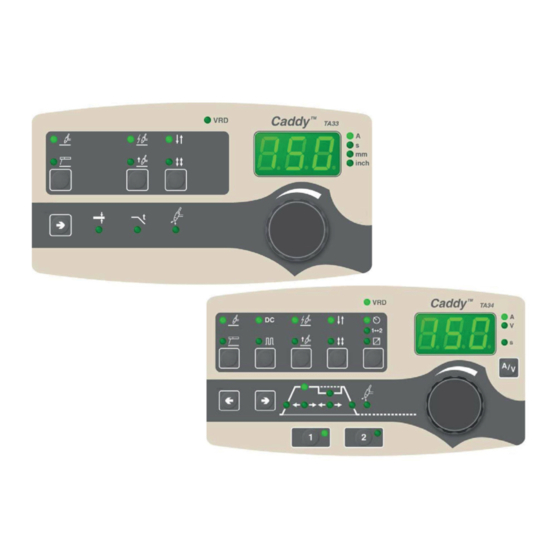
ÂÂÅÄÅÍÈÅ Äàííîå ðóêîâîäñòâî îïèñûâàåò ïóëüòû óïðàâëåíèÿ TA33, ÒÀ34 . Îáùèå ñâåäåíèÿ ïî ýêñïëóàòàöèè ïðèâåäåíû â èíñòðóêöèè ê èñòî÷íèêó ïèòàíèÿ. Ïðè ïîäà÷å ñåòåâîãî ïèòàíèÿ íà óñòðîéñòâî íà÷èíàåòñÿ ñàìîïðîâåðêà ñâåòîäèîäíûõ èíäèêàòîðîâ è äèñïëåÿ, ïðè ýòîì íà äèñïëåå îòîáðàæàåòñÿ âåðñèÿ ïðîãðàììû; â äàííîì ïðèìåðå... - Page 5 âûáîðà íàñòðàèâàåìîãî ïàðàìåòðà, òîëùèíû ìàòåðèàëà , ñïàäà òîêà èëè ïîäà÷è ãàçà ïîñëå ãàøåíèÿ äóãè Ïðèìå÷àíèå! Êíîïêà èñïîëüçóåòñÿ òàêæå è äëÿ âûçîâà ñêðûòûõ ôóíêöèé, ñì. ñòð. 1 1. Ïóëüò óïðàâëåíèÿ TA34 Ðó÷êà óïðàâëåíèÿ äëÿ ââîäà çíà÷åíèÿ ñèëû òîêà (A) èëè âðåìåíè (ñ) Äèñïëåé...
-
Page 6: Ñâàðêà Tig
Îáîçíà÷åíèå ïàðàìåòðà, îòîáðàæàåìîãî íà äèñïëåå: ñèëà òîêà (À), íàïðÿæåíèå (Â), âðåìÿ (ñ) Âûáîð ïàðàìåòðà, îòîáðàæàåìîãî íà äèñïëåå âî âðåìÿ ñâàðêè: ñèëà òîêà (A) èëè íàïðÿæåíèå (V). Èíäèêàöèÿ âûáðàííîãî íàñòðàèâàåìîãî ïàðàìåòðà, ñì. ñòð. 7. Êíîïêà ñïðàâà èñïîëüçóåòñÿ òàêæå äëÿ äîñòóïà ê ñêðûòûì ôóíêöèÿì, ñì. -
Page 7: Îáúÿñíåíèå Ñèìâîëîâ È Ôóíêöèé
Îáúÿñíåíèå ñèìâîëîâ è ôóíêöèé Ñâàðêà ìåòîäîì TIG Ïðè ñâàðêå TIG ïðîèñõîäèò ðàñïëàâëåíèå ìåòàëëà ñâàðèâàåìîé äåòàëè ñ ïîìîùüþ ýëåêòðè÷åñêîé äóãè, âîçáóæäàåìîé íà âîëüôðàìîâîì ýëåêòðîäå, êîòîðûé ñàì íå ïëàâèòñÿ. Çîíà ñâàðêè è ñàì ýëåêòðîä çàùèùåíû àòìîñôåðîé èç çàùèòíîãî ãàçà. Ïîñòîÿííûé òîê ×åì áîëüøå òîê, òåì áîëüøå ðàçìåð çîíû ñâàðêè è ëó÷øå ïðîíèêíîâåíèå â ñâàðèâàåìóþ... - Page 8 Òîê èìïóëüñà Áîëüøåå èç äâóõ çíà÷åíèé òîêà ïðè èìïóëüñíîì ðåæèìå. Òîê Äëèòåëüíîñòü ôîíà Òîê èìïóëüñà Ôîíîâûé Äëèòåëüíîñ òîê òü èìïóëüñà Âðåìÿ Ñâàðêà ìåòîäîì TIG â èìïóëüñíîì ðåæèìå. Äëèòåëüíîñòü èìïóëüñà ×àñòü ïåðèîäà èìïóëüñà, â òå÷åíèå êîòîðîé âêëþ÷åí òîê èìïóëüñà. Òîê ôîíà Ìåíüøåå...
- Page 9 LiftArct Ôóíêöèÿ Lift Arct (”Ïîäíÿòü äóãó”) âîçáóæäàåò äóãó, êîãäà ýëåêòðîä êàñàåòñÿ ñâàðèâàåìîé äåòàëè, à çàòåì ïðèïîäíèìàåòñÿ íàä íåé. Âîçáóæäåíèå äóãè ñ ïîìîùüþ ôóíêöèè LiftArc . Øàã 1: ýëåêòðîä êàñàåòñÿ äåòàëè. Øàã 2: íàæàò êóðêîâûé âûêëþ÷àòåëü, è íà÷èíàåò òå÷ü íåáîëüøîé òîê. Øàã 3: ñâàðùèê îòâîäèò ñâàðî÷íóþ...
- Page 10 4-òàêòíûé ðåæèì  4-òàêòíîì ðåæèìå ïðåäâàðèòåëüíàÿ ïîäà÷à ãàçà íà÷èíàåòñÿ, êîãäà êóðêîâûé âûêëþ÷àòåëü íà ñâàðî÷íîì ïèñòîëåòå íàæèìàåòñÿ, à âîçáóæäåíèå äóãè ïðîèñõîäèò ïðè åãî îòïóñêàíèè. Ïðîöåññ ñâàðêè ïðîäîëæàåòñÿ äî òåõ ïîð, ïîêà ïåðåêëþ÷àòåëü íå áóäåò ñíîâà íàæàò. Êîãäà âûêëþ÷àòåëü îòïóñêàåòñÿ, äóãà ãàñèòñÿ è íà÷èíàåòñÿ çàêëþ÷èòåëüíàÿ ïîäà÷à ãàçà (ïðè âêëþ÷åíèè ñîîòâåòñòâóþùåãî...
-
Page 11: Ñêðûòûå Ôóíêöèè Tig
Èçìåíåíèå ïàðàìåòðîâ êóðêîâîãî ïåðåêëþ÷àòåëÿ Ýòà ôóíêöèÿ ïîçâîëÿåò ïåðåéòè îò îäíîãî íàáîðà ñîõðàíåííûõ ïàðàìåòðîâ ñâàðêè ê äðóãîìó, ïóòåì äâîéíîãî íàæàòèÿ íà ñïóñêîâîé ìåõàíèçì ñâàðî÷íîãî ïèñòîëåòà. Ïðèìåíèìî òîëüêî äëÿ ñâàðêè ìåòîäîì TIG. Áëîê äèñòàíöèîííîãî óïðàâëåíèÿ Íàñòðîéêè äåëàþòñÿ ñ áëîêà äèñòàíöèîííîãî óïðàâëåíèÿ. Ïåðåä ââîäîì â äåéñòâèå áëîê äèñòàíöèîííîãî óïðàâëåíèÿ äîëæåí áûòü ïîäêëþ÷åí... -
Page 12: Ñâàðêà Mma
Ìèêðîèìïóëüñ Äëÿ âûáîðà ìèêðîèìïóëüñà íåîáõîäèìî, ÷òîáû ìàøèíà íàõîäèëàñü â ðåæèìå ñâàðêè èìïóëüñíûì òîêîì . Ïðîäîëæèòåëüíîñòü èìïóëüñà è ïàóçû â íîðìàëüíîì ðåæèìå óñòàíàâëèâàåòñÿ â ïðåäåëàõ 0,01 2,50 ñåêóíä. Ïðè ìèêðîèìïóëüñàõ ýòî âðåìÿ ìîæåò áûòü ñîêðàùåíî äî 0,001 ñåêóíä. Ïðè âêëþ÷åííîì ìèêðîèìïóëüñíîì ðåæèìå ïðîìåæóòêè âðåìåíè ìåíåå 0,25 ñåêóíä... -
Page 13: Ñêðûòûå Ôóíêöèè Mma
Àêòèâíàÿ ïàíåëü Íàñòðîéêè äåëàþòñÿ ñ ïàíåëè óïðàâëåíèÿ. Áëîê äèñòàíöèîííîãî óïðàâëåíèÿ Íàñòðîéêè äåëàþòñÿ ñ áëîêà äèñòàíöèîííîãî óïðàâëåíèÿ. Ïåðåä ââîäîì â äåéñòâèå áëîê äèñòàíöèîííîãî óïðàâëåíèÿ äîëæåí áûòü ïîäêëþ÷åí ê ðàçúåìó äëÿ áëîêà äèñòàíöèîííîãî óïðàâëåíèÿ, êîòîðûé èìååòñÿ íà ìàøèíå. Ïîñëå ââîäà â äåéñòâèå áëîêà äèñòàíöèîííîãî óïðàâëåíèÿ, ïàíåëü... -
Page 14: Çàïîìèíàþùåå Óñòðîéñòâî Ïàðàìåòðîâ Ñâàðêè
Ðåãóëÿòîð ñâàðêè Ñâàðî÷íûé ðåãóëÿòîð ïðåäñòàâëÿåò ñîáîé îðãàí ðåãóëèðîâàíèÿ, ïîçâîëÿþùèé ïîëó÷èòü áîëåå èíòåíñèâíóþ, áîëåå êîíöåíòðèðîâàííóþ è ñïîêîéíóþ äóãó. Îíà áûñòðåå âîññòàíàâëèâàåòñÿ ïîñëå êàïåëüíîãî êîðîòêîãî çàìûêàíèÿ, ÷òî óìåíüøàåò ðèñê ïðèëèïàíèÿ ýëåêòðîäà. Arc Plust (0) ðåêîìåíäóåòñÿ ê ïðèìåíåíèþ ñ ýëåêòðîäàìè îñíîâíîãî òèïà Arc Plust II (1) ðåêîìåíäóåòñÿ ê ïðèìåíåíèþ ñ ðóòèëîâûìè ýëåêòðîäàìè è... -
Page 15: Ïåðå÷Åíü Êîäîâ Íåèñïðàâíîñòåé
Ïîòåðÿí êîíòàêò áëîêà ïàðàìåòðîâ ñâàðêè ñ áëîêîì îõëàæäåíèÿ. Ïðîöåññ ñâàðêè ïðåêðàùàåòñÿ. Äåéñòâèå: Ïðîâåðüòå ýëåêòðè÷åñêóþ ñõåìó. Åñëè íåèñïðàâíîñòü íå óñòðàíÿåòñÿ, âûçîâèòå ñïåöèàëèñòà ïî îáñëóæèâàíèþ. ÇÀÊÀÇ ÇÀÏÀÑÍÛÕ ×ÀÑÒÅÉ Çàïàñíûå ÷àñòè ìîæíî çàêàçòú ó áëèæàéøåãî ê Âàì ESAB, (ñì. ïåðå÷åíú íà ïîñëåäíåé ñòðàíèöå äàííîé áðîøþðû). - - 15 - - bi19d2ra... - Page 16 ENGLISH 1 INTRODUCTION ........... 1.1 Control panel .
-
Page 17: Introduction
INTRODUCTION The manual describes the use of TA33, TA34 control panel. For general information about operation see instruction manual for the power source. When mains power is supplied the unit runs a self diagnosis of the LEDs and the display, the program version is displayed and in this example the program version is 0.18. - Page 18 Control panel TA34 Knob for setting of current (A) or time (s) Display Choice of welding method TIG eller MMA Choice of TIG-- / MMA--welding with direct current or TIG--welding with pulsed current Choice of HF start or LiftArct Choice of 2--stroke or 4--stroke Setting from panel , welding data change with torch trigger switch...
-
Page 19: Tig Welding
TIG WELDING Settings Function Setting range TA33 TA34 HF / LiftArc t HF or LiftArct 2/4--stroke 2 stroke or 4 stroke Gas pre flow time 0 -- 5 s Slope up--time 0 -- 10 s Slope down time 0 -- 10 s Gas post flow time 0 -- 25 s Current... - Page 20 Parameter settings 1. Slope up 2. Welding current 3. Pulse time 4. Background current 5. Background time 6. Slope down 7. Gas post flow time Slope up The slope up function means that, when the TIG arc strikes, the current rises slowly to the set value.
- Page 21 LiftArct The LiftArct function strikes the arc when the electrode is brought into contact with the workpiece and then lifted away from it. Striking the arc with the LiftArc function . Step 1: the electrode is touched on to the workpiece. Step 2: the trigger switch is pressed, and a low current starts to flow.
- Page 22 4- -stroke With 4 stroke, the gas pre--flow starts when the welding gun trigger switch is pressed in and the arc is struck when it is released. The welding process continues until the switch is pressed in again, the arc is extinguished when the switch is released the gas post flow starts (if selected).
-
Page 23: Hidden Tig Functions
Remote control unit Settings are made from the remote control unit. The remote control unit must be connected to the remote control unit socket on the machine before activation. When the remote control unit is activated the panel is inactive. Hidden TIG functions There are hidden functions in the control panel. -
Page 24: Mma Welding
MMA WELDING Settings Function Setting range TA33 TA34 Current 16 -- max. A Hotstart 0 -- 99 Arc force 0 -- 99 Drop welding 0=OFF or 1=ON Weld regulator ArcPlust 1=OFF or 0=ON Active panel OFF or ON Remote control unit OFF or ON These functions are hiddenfunctions, see description point 3.3. -
Page 25: Hidden Mma Functions
Hidden MMA functions There are hidden functions in the control panel. To access the functions, press for 5 seconds. The display shows a letter and a value. Select function by pressing the right arrow. The knob is used to change the value of the selected function. -
Page 26: Welding Data Memory
WELDING DATA MEMORY Two different welding data settings can be stored in the control panel memory. Press button for 5 seconds to store the welding data in the memory. The welding data is stored when the green indicator lamp starts to flash. To switch between the different welding data memories press button The welding data memory has a back--up battery so that the settings remain even if the machine has been switched off. -
Page 27: List Of Fault Codes
The welding data unit has lost contact with the cooling unit. The welding process stops. Action: Check the wiring. If the fault persists, send for a service technician. ORDERING SPARE PARTS Spare parts may be ordered through your nearest ESAB dealer, see the last page of this publication. - - 27 - -... -
Page 28: Íîìåð Çàêàçà
0460 447 091 Instruction manual SI 0460 447 092 Instruction manual LT 0460 447 027 Instruction manual RU, GB Instruction manuals and the spare parts list are available on the Internet at www.esab.com - - 28 - - Edition 080124 bi19o... - Page 29 - - 29 - -...
- Page 30 - - 30 - -...
- Page 31 - - 31 - -...
- Page 32 - - 32 - - backpage...
Need help?
Do you have a question about the Caddy TA33 and is the answer not in the manual?
Questions and answers