Advertisement
Quick Links
®
iBoard
READ INSTRUCTIONS CAREFULLY BEFORE
START ING INSTALLATION. REMOVE CONTENTS
FROM BOX AND VERIFY ALL PARTS ARE PRE-
SENT. ASSISTANCE IS RECOMMENDED.
*BODY FRAME MOUNT
*DRILLING IS REQUIRED
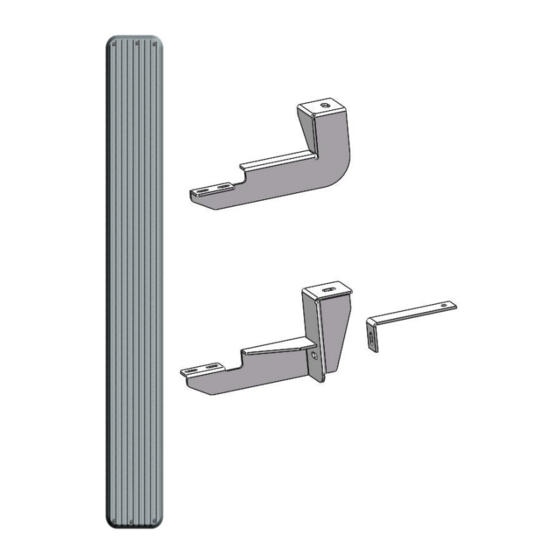
PART LIST
Driver Front Mounting
Bracket (DFM)
Driver Rear Mounting
Bracket (DRM)
iBoard
by APS
Driver/Passenger Rear Support
Bracket (DRS/PRS)
Customer Support: info@iboardauto.com
®
Fastener Size
6mm
8mm
10mm
12mm
14mm
Front
Passenger Rear Mounting
1
PART#: IB-014A-B
Tightening Torque (ft-lbs)
6-7
16-18
31-32
56-58
92-94
Passenger Front Mounting
Bracket (PFM)
Bracket (PRM)
Rev. 20210801
Advertisement

Subscribe to Our Youtube Channel
Related Manuals for APS iBoard IB-014A-B


Summary of Contents for APS iBoard IB-014A-B
- Page 1 ® ® iBoard by APS PART#: IB-014A-B Fastener Size Tightening Torque (ft-lbs) READ INSTRUCTIONS CAREFULLY BEFORE START ING INSTALLATION. REMOVE CONTENTS FROM BOX AND VERIFY ALL PARTS ARE PRE- SENT. ASSISTANCE IS RECOMMENDED. 16-18 10mm 31-32 12mm 56-58 *BODY FRAME MOUNT...
- Page 2 iBoard ® M10X1.5- M12 Lock Washer M10 Large Flat Washer M12 Large Flat Washer 35mm Hex Bolt M12X1.75-120mm Hex Bolt M6X1-20mm M6 Nylon M6 Large Flat M10 Lock Washer M10 Hex Nut Square Head Bolt Washer Lock Nut IMPORTANT ALERT: GM uses a very strong thread-locking compound on all body bolts. Use of an air assisted impact ratchet can cause damage to the threads on factory body mount bolts and the internal nut assembly because of this thread locking compound.
- Page 3 iBoard ® STEP 3 Move to the rear mounting location. Repeat Step 2 for the Driv- er Rear Mounting Bracket installation, (Fig 3). Do not fully tighten hardware at this time. Select (1) Driver Rear Support Bracket (DRS/PRS). Attach the short end of the Support Bracket to the back of the Driver Rear Mounting Bracket with (1) M10X1.5-35mm Hex Bolt, (2) M10 (Fig 4) Slip M6X1-20mm Square Head Bolts Into The Bottom...
- Page 4 iBoard ® STEP 7 Repeat Steps 1-7 for other side Running Board installation. The installation is completed. Front (1) M10X1.5-35mm Hex Bolt (2) M10 Large Flat Washers (1) M10 Lock Washer (1) M10 Hex Nut Attention (Fig 6) Driver Rear Support Bracket Installation Do periodic inspections to the installation to make sure that all hardware is secure and tight.
Need help?
Do you have a question about the iBoard IB-014A-B and is the answer not in the manual?
Questions and answers