Table of Contents
Advertisement
Quick Links
Advertisement
Table of Contents

Related Manuals for PowerMax TDA-255


Summary of Contents for PowerMax TDA-255
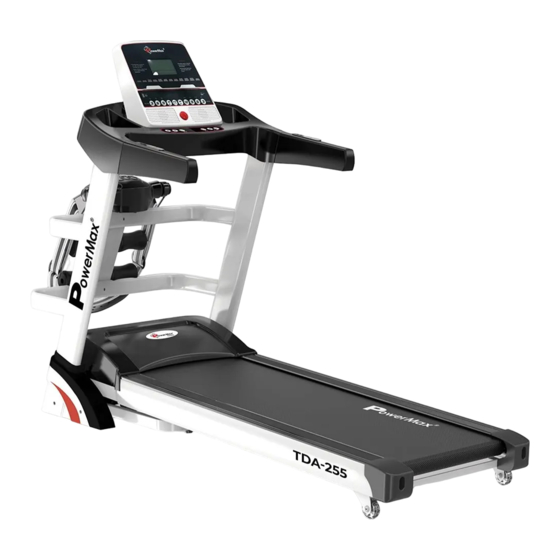
- Page 1 TDA-255 Multi-Function Treadmill User Manual OWNER’S MANUAL Read all instructions carefully before using this product. Retain this owner's manual for the future's reference. Product may be slightly different with photos, it is subject to actual product. Thank you for purchasing the product.
-
Page 2: Table Of Contents
TABLE OF CONTENTS WARRANTY QUALITY ASSURANCE COMMITMENT CAUTION SPECIAL ATTENTION GROUND PROTECTION SYSTEM ASSEMBLY INSTRUCTION PACKING LIST EXPLODED VIEW PART LIST INSTALLATION STEPS PRODUCT DRAWING INSTRUCTIONS LCD TREADMILL TROUBLESHOOTING OF CIRCUIT FAULT www.powermaxfitness.net... -
Page 3: Warranty
1 YEAR LIMITED WARRANTY PowerMax Fitness warrants to the original purchaser that this product is free from defects in material and workmanship when used for the purpose intended, under the conditions that it has been installed and operated in accordance with PowerMax Fitness's Owner's Manual. PowerMax Fitness's obligation under this warranty is limited to replacing or repairing, free of charge, any parts which may prove to be defective under normal home use. -
Page 4: Quality Assurance Commitment
Thank You for Purchasing the Product. You Will Be Healthier After Using. QUALITY ASSURANCE COMMITMENT We make sure that this product is made from high quality materials. we will be responsible for maintenance if you use the product in right way Warranty: one year (since the day you brought), please contact after—sale service, when you have some problems with the treadmill. -
Page 5: Special Attention
SPECIAL ATTENTION Keep machine away from dust to avoid strong static. Please cut electric power off after using. • Please maintain good ventilation when running. • Please clamp security lock cable on your clothing to make sure the machine stops at •... -
Page 6: Ground Protection System
----accident or injury may occur. Avoid drinking water or pouring water when operating. • may cause electric shock and fire. Forbidden! • People who seldom do exercise shouldn’t' t suddenly do intense exercise. • After eating or when feel tired, do not use the machine. •... -
Page 7: Assembly Instruction
ASSEMBLY INSTRUCTION Please read the installation carefully before installing Remove all the items and put them on the ground Check the accessories according to the packing list When you are carrying something, please pay attention to the whole Install the product according to the instructions The product must be approved by the installation, if necessary, please professional to install Do not damage the product PACKING LIST... - Page 8 www.powermaxfitness.net...
-
Page 9: Exploded View
EXPLODED VIEW All the parts are showed in the following picture www.powermaxfitness.net... -
Page 10: Part List
PART LIST Items Items pedestal sidebar upright post floor mat control holder wheel incline holder Rubber sleeve motor holder but ton main frame Round cushion stator Round cushion massager holder pipe stopper sit-up holder pipe stopper Running board Sponge sheath running belt Button of the power cord The front roller... -
Page 11: Installation Steps
INSTALLATION STEPS Step 1: installation of electronic meter 1. Put the machine on the flat ground, set the column and console up in the direction shown as bellow. 2. Hold left& right columns, use Allen wrench 63# to lock the console frame on the columns with screw 78#. - Page 12 Step 3: installation of massager holder 1. get out the holder from the packaging, use screw62# and gasket78# to make the massager holder hold on the upright post. 2. AS show in the picture, use screw62#, gasket78#, nut81# to fix the sit-up holder stand on the massager holder 3.
-
Page 13: Product Drawing
PRODUCT DRAWING Multi-Function Treadmill www.powermaxfitness.net... -
Page 14: Instructions
INSTRUCTIONS The instructions of treadmill: For the consideration of your safety, a power socket with ground wire must be used when the treadmill is working. 1. Insert the plug into the socket and turn on the power switch (the light turns into red). Make sure a beep is heard and the window on the dashboard is showed. - Page 15 The instructions of massage machine: For the consideration of your safety, a power socket with ground wire must be used when the massage machine is working. The main frame of the machine (A) must be unfolded to avoid falling forward during the massage.
- Page 16 The instructions of folding: Fold the treadmill. Fold the treadmill to save space. Turn off the power switch and pull the plug before folding the machine. Lift the treadmill till the gas spring tube gets stuck. Lay down the treadmill. Lightly step on the gas spring tube to lay down the treadmill slowly.
-
Page 17: Lcd Treadmill
LCD TREADMILL USER MANUAL 1. LCD DISPLAY WINDOW • Speed Display Window Speed window display present speed on treadmill running, the scope of speed display: 0.8-15.0KM/H. Window displays time countdown of 3, 2, 1 after pressing start button. Window displays after press program or setting key •... - Page 18 is distance countdown mode, 50. 0 is calories countdown mode. Runner can adjust speed and incline at mode selection, press START button to start treadmill after mode setting finished. • START key is to start running, user can start treadmill running by pressing the button anytime in the condition of safe key pull on.
- Page 19 5. MOBILE MODE A. Press START button at standby status, treadmill begin to run on 0 incline at 1.0KMH speed, other windows begin to count forwardly, user can change incline and speed by pressing INCLINE+, INCLINE- or SPEED+, SPEED-. B. Press MODE button at standby status, the device enters countdown mode, TIME window displays 15:00 and twinkles, then press INCLINE+, INCLINE-, or SPEED+, SPEED-, user can set running time range from 5:00 to 99.9 minutes C.
- Page 20 7. PROGRAM INSTRUCTION Each program is divided into 20 phases averagely according to time, each phase has its own speed and incline www.powermaxfitness.net...
-
Page 21: Troubleshooting Of Circuit Fault
8. PHYSICAL FITNESS TEST X. FUNCTION OF SAFETY LOCK Pull out safety lock in any case, the treadmill will make emergency stop, at the same time, SPEED window shows --- and buzzers make sounds, the machine cannot be made other operation except treadmill be shut down, put on safety lock again, treadmill will restore standby status. - Page 22 Adjust magnetron B. Magnetron disconnect proper position EOI— A. Signal wire missed or Connect signal wire poor contact communication B. Signal wire breaking short failure (driver Change signal wire circuit or open circuit doesn’t t C. Signal line fault Change electronic meter accept electronic meter' s signal E013—...
- Page 23 C. Motor inside is short Change motor circuit D. Driver broken Change driver A. Motor wire miss— Connect motor wire again connection E06—Usually B. Motor interval open Chang motor motor open circuit circuit Wrong display at too low C. Motor idling current, assemble motor and test A.
- Page 24 POWERMAX FITNESS (INDIA) PVT LIMITED 808, 8th floor, Lotus Trade Centre, New Link Road, Andheri West, Mumbai - 400053 Tel: +91-8080-206-206 Email: customersupport@powermaxfitness.net www.powermaxfitness.net...
Need help?
Do you have a question about the TDA-255 and is the answer not in the manual?
Questions and answers