Advertisement
Quick Links
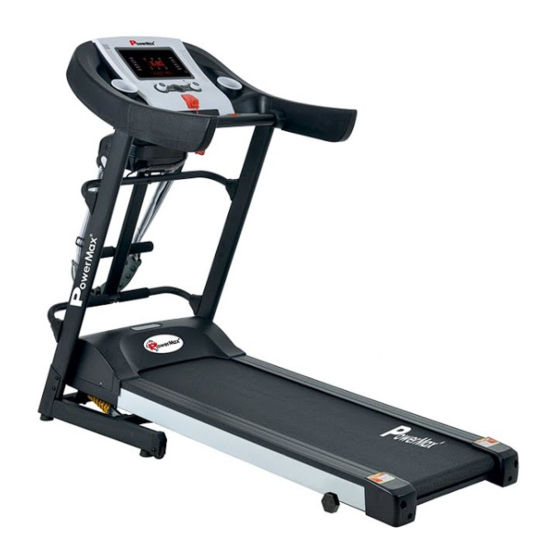
TDM-100M
Multi-Function Treadmill User Manual
OWNER'S MANUAL
Read all instructions carefully before using this product. Retain this owner's manual
for the future's reference. Product may be slightly different with photos, it is subject
to actual product. Thank you for purchasing the product.
Advertisement

Related Manuals for PowerMax TDM-100M


Summary of Contents for PowerMax TDM-100M
- Page 1 TDM-100M Multi-Function Treadmill User Manual OWNER’S MANUAL Read all instructions carefully before using this product. Retain this owner's manual for the future's reference. Product may be slightly different with photos, it is subject to actual product. Thank you for purchasing the product.
- Page 2 ROUTINE MAINTENANCE 1 YEAR LIMITED WARRANTY PowerMax Fitness warrants to the original purchaser that this product is free from defects in material and workmanship when used for the purpose intended, under the conditions that it has been installed and operated in accordance with PowerMax Fitness's Owner's Manual. PowerMax Fitness's obligation under this warranty is limited to replacing or repairing, free of charge, any parts which may prove to be defective under normal home use.
- Page 3 PRODUCT BRIEF 1.Multi-functional home use treadmill www.powermaxfitness.net...
- Page 4 Main parameters and parts list Main technical parameters Parameters Names Description Input power voltage AC220V(50~60Hz) Speed 0.8-14.8Km/h Running surface 120*430 mm Expand dimensions 1620*700*1200mm Functions (Option) Running, (Sit up, Dumbbell, Massager) Packing List Name Units Complete machine Sit up/dumbbells/massager (Option) Accessory Bag Frame of Multi-function (Option) Frame pipe of Massager (Option)
- Page 5 2. SECURITY PRECAUTIONS AND WARNINGS Tips: Before folding the treadmill, make sure that the gradient is "zero". Notice: Please read the instructions carefully before use. ❖ Indoor using and storing the treadmill, avoid dampness, and cannot be spilled by water. ❖...
- Page 6 ----Otherwise will lead to an electric shock, short circuit or fire. ❖ Don't damage or bent by force or reverse the power cord. Don’t place heavy objects on machine, don't clamp the power line. ----Otherwise will cause fire or get an electric shock. ❖...
- Page 7 ❖ This product is equipped with power plug with grounding conductor and plug. Completely insert the plug to standard socket. ❖ If the equipment grounding conductor’s connection is improper, it will cause electric shock. If you have doubts about whether your product is grounded correct or not, please entrust professional to check.
- Page 8 1. Use 5# inner hexagon wrench and M8*42(A) to lock washers and nuts through the column. Then fix the column on the base with screw M8*22(B) 2. Hold left& right columns, use 6# inner hexagon wrench to lock the console frame on the columns with screw M8*25.
- Page 9 4. Use 5# inner hexagon wrench, screw M8*42, nut M8 and Washer φ8 to lock the massage pipe on the Columns (Picture A). Then use the decorative covers to cover the screws (Picture B). (Install the massage pipe with foams under the one without the foam.) 5.
- Page 10 M8*15 7. Fix these two foams on the frame 8. Put safety key on the right position to make sure the treadmill starts manually Note: Safety Key is in red color. It is put in a plastic bag together with screws and tools. Please Place it on the yellow area of the console to start the treadmill.
- Page 11 Manual Incline Instructions Adjust the incline with incline wheel. Level 1 is the lowest level, and the incline increases as the number becomes bigger, level 6 is the highest level. Please make sure the two numbers of each sides are the same. For example: if it’s level 3 on left side, then it has to be level 3 on right side. Incline Wheel 4.
- Page 12 Unfold the treadmill: Kick the pressure rod, hold the running deck and then let the running deck to fall gradually. Kick this part to lower the running deck. Console Instructions Start-up: Normally start after 5 seconds of countdown. Amount of programs: 3 manual programs, 12 automatic programs, 1 FAT program. Safety lock function Disconnect the security lock, "E7"...
- Page 13 Voice + - key When connect with mobile phone, rotate the button to adjust the volume. Rotate to right to turn the volume up and rotate to left to turn the volume down. Speed + - key Use these keys to adjust the speed of the treadmill by 0.1 km/rotate, rotate to right to increase the speed and rotate to left to decrease the speed.
- Page 14 Automatic programs Each program is divided into 10 segments, and the running time of each segments is evenly divided. The time and speed distribution of each running program are as follows: Time Set time / 10 = time of each running segment Program SPEED SPEED...
- Page 15 Code Meaning of Error Messages Fault Code Failure Description Fault Handling Communication Abnormal: Possible Cause: when the power is on, the Check the cable connection between the console connection between lower and the control border to ensure that each core is controller and the console fully plugged in.
- Page 16 5. Routine Maintenance Warning: Before cleaning or maintaining products, please be sure the power plug of the treadmill is pulled out. Cleaning: Comprehensive cleaning will extend the using life of the electric treadmill. Remove dust periodically in order to keep the parts clean. Be sure to clean running belt with both sides of the exposed portion, which will reduce the accumulation of impurities.
- Page 17 then rotate the right adjusting bolt with 1/2 turn counter-clockwise. (picture A) Picture A Picture B Multi-wedge Belt Tension Adjusting When you use the treadmill for a long time, the multi-wedge belt becomes loose because of the abrasion, then you have to do some appropriate adjustment to facilitate the safe use. Judgment: the feeling of running with the occasional pause phenomenon, which indicating that the treadmill belt or multi-wedge belt are a little loose and further affirmation need to be made.
- Page 18 Applying Silicone Oil Step 1: Start the treadmill and make it run at a low speed (0.8 km/h). Step 2: Cut the top of the silicone oil bottle (picture 1) Step 3: Find the teardrop-shaped cover on left & right end caps (picture 2) Step 4: Open the teardrop-shaped cover (picture 3) Step 5: Drop silicon oil into oil guiding (Note: 1/4 of the bottle) (picture 4) Step 6: After applying the silicon oil, adjust the speed to 4-5 km/h, and run on it to make sure...
Need help?
Do you have a question about the TDM-100M and is the answer not in the manual?
Questions and answers