
Related Manuals for Smartgen HAT600P Series


Summary of Contents for Smartgen HAT600P Series
- Page 1 HAT600P SERIES (HAT600P/HAT600PB/HAT600PI/HAT600PBI/HAT600PS) ATS CONTROLLER USER MANUAL...
- Page 2 Smartgen Technology at the address above. Any reference to trademarked product names used within this publication is owned by their respective companies. SmartGen Technology reserves the right to change the contents of this document without prior notice. Table 1 Software Version...
- Page 3 Implies or indicate operator to operate rightly. NOTE Indicates wrong operation may lead to impair apparatus. CAUTION Indicates wrong operation may lead to death, critical personal harm or serious HAZARD property loss. HAT600P Series ATS Controller User Manual Page 3 of 58...
-
Page 4: Table Of Contents
14.3.1 S1 SYNC CLOSE .......................... 43 14.3.2 S2 SYNC CLOSE .......................... 44 14.3.3 MANUAL SYNC CLOSE ....................... 44 14.3.4 AUTO SYNC CLOSE ........................44 14.4 LOCAL MODE RUNNING ......................45 HAT600P Series ATS Controller User Manual Page 4 of 58... - Page 5 18.2.1 DC SUPPLY ..........................50 18.2.2 AC SUPPLY ..........................50 18.3 RS485 CONNECTION DESCRIPTION ..................51 19 TYPICAL APPLICATION WIRING DIAGRAM ..................51 20 INSTALLATION ..........................57 21 FAULT FINDING ..........................58 HAT600P Series ATS Controller User Manual Page 5 of 58...
-
Page 6: Overview
It combines digitalization, intelligence and networking. Automatic measurement and control reduces incorrect operation. It is an ideal option for dual power transfer. HAT600P Series Dual Power Synchronous ATS Controller is made by microprocessor as its core, which can accurately detect 2-way-3-phase voltage, make accurate judgment and output passive control switch for occurred abnormal voltages (over/under voltage, loss of phase, over/under frequency). -
Page 7: Naming Convention And Model Comparison
NOTE 1: The two fixed input ports are S1 breaker close signal input and S2 breaker close signal input. NOTE 2: The two fixed output ports are S1 breaker close output and S2 breaker close output. HAT600P Series ATS Controller User Manual Page 7 of 58... -
Page 8: Performance And Characteristics
ModBus-RTU; it can remote control genset start/stop, ATS close and open; — ETHERNET port, makes the controller has remote control, remote communication, remote HAT600P Series ATS Controller User Manual Page 8 of 58... -
Page 9: Specification
GND connected (B-) is active, low voltage 1.2VDC, high voltage 60VDC Input Digital Input 1-4 RS485 Port Isolated, half-duplex, 2400/4800/9600/19200 baud rate can be set, Modbus-RTU communication protocol, farthest communication distance 1000m HAT600P Series ATS Controller User Manual Page 9 of 58... - Page 10 Back Panel: IP20; Apply AC2.2kV voltage between high voltage terminal and low voltage Insulation Strength terminal and the leakage current is not more than 3mA within 1min. Weight HAT600P/HAT600PI: 0.7kg HAT600PB/HAT600PBI/HAT600PS: 0.8kg HAT600P Series ATS Controller User Manual Page 10 of 58...
-
Page 11: Measured And Display Data
Black Box Record ● ● ● AC Voltage Wave Distortion Rate ● ● ● and 3-21 Times Harmonic Analysis ● ● AC Current Wave Distortion Rate and 3-21 Times Harmonic Analysis HAT600P Series ATS Controller User Manual Page 11 of 58... -
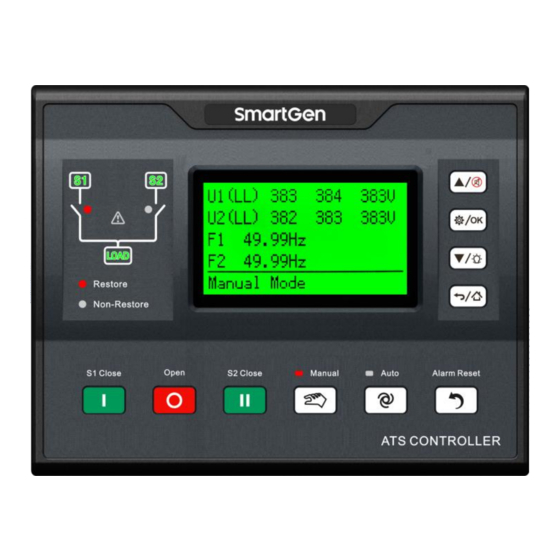
Page 12: Operating
Auto Trans./Non-Res. Lamp On: Current status is Auto Transfer/Non Restore. Manual Mode Indicator Lamp On: Current mode is Manual mode. Auto Mode Indicator Lamp On: Current mode is Auto mode. HAT600P Series ATS Controller User Manual Page 12 of 58... -
Page 13: Key Function Description
Press to return to the previous menu in parameter page while it returns to the first page in main screen; Return/Home Key Press longer and it immediately returns to the first page of controller main screen. HAT600P Series ATS Controller User Manual Page 13 of 58... -
Page 14: Lcd Display
Last Cont. Power Supply Hour: Minute: Second 8: 15: 32 Current page content and position, alarm status, indication Total _ _ _ _ _ _ _ information and action countdown. HAT600P Series ATS Controller User Manual Page 14 of 58... - Page 15 Alarm Event Sync Failure Alarm Type (Warning Alarm, Fault Alarm) Fault Alarm Alarm Event S2 Close Failure NOTE: Above is HAT600PS main screen display; HAT600PBI/HAT600PI/HAT600PB/HAT600P display contents are less than above. HAT600P Series ATS Controller User Manual Page 15 of 58...
-
Page 16: Status Description
Only active when system is "S1 Gen S2 Gen". S2 Genset Start Only active when system is "S1 Gen S2 Gen". Genset Start Genset start signal outputs. Genset Standby None genset signal outputs. HAT600P Series ATS Controller User Manual Page 16 of 58... - Page 17 Input port is configured to "Output Voltage Abnormal Warn", Abnormal and when the input is active, warning occurs. Input port is configured to “Busbar Voltage Abnormal Busbar Voltage Abnormal Warn”, and when the input is active, warning occurs. HAT600P Series ATS Controller User Manual Page 17 of 58...
- Page 18 When “panel button latched” input is active, it is the reminder information for pressing panel button (Auto key, Panel Button Latched Manual key, S1 Close key, S2 Close key, Open key, Alarm Reset key). HAT600P Series ATS Controller User Manual Page 18 of 58...
-
Page 19: Main Menu Interface
NOTE 1: Input password to enter parameter settings; default password "01234"; operator can change the password to prevent others changing controller configurations randomly. After change please remember clearly; If it is forgoten, please contact company personnel. HAT600P Series ATS Controller User Manual Page 19 of 58... -
Page 20: Genset Start/Stop Operation
(Modbus TCP/IP protocol control). Remote Stop: Disconnect the outputted genset start signal, which is to control genset stop. Remote Start: Control genset start signal output, which is to control genset start. HAT600P Series ATS Controller User Manual Page 20 of 58... -
Page 21: Start/Stop Genset In Auto Mode
The following conditions are required to do genset start/stop when system type is "S1-Gen S2-Gen". HAT600P Series ATS Controller User Manual Page 21 of 58... -
Page 22: Scheduled Gen Start
Monday to Friday, not run at 19:00 every day, lasting for 12 hours; Scheduled Not Work Daily: Not run at the same time every day can be set. NOTE: Schedule Not Work is prior to Schedule Start Operation. HAT600P Series ATS Controller User Manual Page 22 of 58... -
Page 23: Parameter Settings
Lower limit return value of voltage; it is 17 Return Value (0-200)% normal only when the value has exceeded the set value. 18 Rated Frequency (10.0-75.0)Hz 50.0 Rated frequency of AC system HAT600P Series ATS Controller User Manual Page 23 of 58... - Page 24 S1 open control is needed.) 2: PC Two-stage (For PC switch without neutral) 0: Warn Alarm Forced Open Action (0-1) 1: Fault Alarm 0: Disable Continually Close (0~1) 1: Enable HAT600P Series ATS Controller User Manual Page 24 of 58...
- Page 25 Min. AC supply voltage for switch; if it is ATS Power Low (0~200)% lower than this value, then switch Point cannot be transferred; 24 ATS Power High (0~400)% Max. AC supply voltage for switch; if it is HAT600P Series ATS Controller User Manual Page 25 of 58...
- Page 26 Schedule Load (0~1) 1: On Load 0: Monthly Schedule Period (0~2) 1: Weekly 2: Daily Bit0: January Bit1: February Bit2: March Schedule Monthly (1~4095) 4095 Bit3: April Bit4: May Bit5: June HAT600P Series ATS Controller User Manual Page 26 of 58...
- Page 27 (5~6000)A Current of S2 full load; S1 Max kW Rating (1~20000)kW Max. active power of S1 full load; S2 Max kW Rating (1~20000)kW Max. active power of S2 full load; HAT600P Series ATS Controller User Manual Page 27 of 58...
- Page 28 Active Type 1: Output (N/C) Digital Output 1 (0~92) ATS power L1 Digital Output 2 0: Output (N/O); (0~1) Active Type 1: Output (N/C) Digital Output 2 (0~92) ATS power N HAT600P Series ATS Controller User Manual Page 28 of 58...
- Page 29 Combined 4 or (0~92) Not Used Output 1 Contents Combined 4 or 0: Output (N/O); (0~1) Output 2 Active Type 1: Output (N/C) 34 Combined 4 or (0~92) Not Used HAT600P Series ATS Controller User Manual Page 29 of 58...
- Page 30 2: Even Parity 0: Enable COM Adj/Ctrl 1: Disable COM Control Communication Set (0~3) 2: Disable COM Adjust 3: DisableCOM Adj/Ctrl Date/Time Setting LCD Backlight Delay (1-3600)min Enlightened time for LCD backlight; HAT600P Series ATS Controller User Manual Page 30 of 58...
-
Page 31: Digital Input Port Function Description
Control NEL unload manually; it is needed to select auto reset NEL Trip Key button; NEL Return Key Control NEL to load again manually; it is needed to select auto reset HAT600P Series ATS Controller User Manual Page 31 of 58... - Page 32 Set the parallel mode as “manual auto parallel”, both manual and Manual Auto Parallel auto modes (auto restore) can be transferred in parallel. Only for HAT600PS. Reserved Reserved Reserved Reserved HAT600P Series ATS Controller User Manual Page 32 of 58...
-
Page 33: Digital Output Port Function Description
Control the S2 switch to open. Reserved Reserved NEL1 Trip Control Control NEL unload when output is active; used to control NEL unload and return (on load) when output is inactive; NEL2 Trip Control HAT600P Series ATS Controller User Manual Page 33 of 58... - Page 34 When parallel mode is active, the electrical interlock release Electrical Interlock Release will output. Only for HAT600PS. When S1 Mains and S2 Gen, S1 Gen and S2 Mains, unload Unload Output outputs when mains is offload. Reserved HAT600P Series ATS Controller User Manual Page 34 of 58...
-
Page 35: Defined Combination Output
T: Over current delay value (s) t: Timing multiplier IA: Current maximum current (L1/L2/L3) IT: Pre-set value of over current Input conditions: T= 36, IA= 550A, IT= 500A Output result: T= 3600s(1h) HAT600P Series ATS Controller User Manual Page 35 of 58... -
Page 36: Historical Records
Press to exit current detailed information check. Action Event 010/200 Record type, serial No./total record number; Closing S2 Record event; Load current; 136A Load active power and power factor; 1.00 HAT600P Series ATS Controller User Manual Page 36 of 58... -
Page 37: Black Box Records
Table 21 Action Events are Ones at Below Time Action Event Description Opening Opening in Auto mode; Closing S1 S1 close in Auto mode; Closing S2 S2 close in Auto mode; HAT600P Series ATS Controller User Manual Page 37 of 58... -
Page 38: Harmonic Analysis
Press and if load is disconnected, then S1 closes and load is supplied by S1. S2 Close Key Press and if load is disconnected, then S2 closes and load is supplied by S2. Open Key Press and load is disconnected. HAT600P Series ATS Controller User Manual Page 38 of 58... -
Page 39: Automatic Switch Operation
S1&S2 status, switch priority and Auto Trans./Restore status. The following illustrates the control logics by the example of "S1 Master", "S1 Mains S2 Gen". 14.2.1 AUTO TRANSFER AUTO RESTORE Fig. 6 Auto Trans./Restore Diagram HAT600P Series ATS Controller User Manual Page 39 of 58... -
Page 40: Auto Transfer Non Restore (Mutual Backup Active)
14.2.2 AUTO TRANSFER NON RESTORE (MUTUAL BACKUP ACTIVE) Fig. 7 Auto Transfer Non Restore Diagram (Mutual Backup Active) HAT600P Series ATS Controller User Manual Page 40 of 58... -
Page 41: Auto Transfer Non Restore (Mutual Backup Inactive)
NOTE: Master power (S1) close needs to transfer to manual mode by close operation key, otherwise, in auto mode switch only transfers at the position of open and backup power (S2). HAT600P Series ATS Controller User Manual Page 41 of 58... -
Page 42: Synchronizing Close
Fig. 6 Sync Transfer Diagram HAT600P Series ATS Controller User Manual Page 42 of 58... -
Page 43: S1 Sync Close
S1 starts to sync. close; t2: S1 close signal is active; t3: execute S2 open; t4: S2 close signal is inactive; t5: S2 open ends; Fig. 7 S1 Sync Close Procedure Oscillogram HAT600P Series ATS Controller User Manual Page 43 of 58... -
Page 44: S2 Sync Close
S1 and S2 may be in parallel. If system is S1 Mains S2 Mains, please do the locking on switch side to prevent S1 and S2 close at the same time. Otherwise,it may cause switch or lines burning or personal injury if it is serious. HAT600P Series ATS Controller User Manual Page 44 of 58... -
Page 45: Local Mode Running
N phase to line voltage. Change configurable output 2 based on the setting. Reset upper and lower limits of AC supply voltage based on rated voltage. Connecting method is as below: HAT600P Series ATS Controller User Manual Page 45 of 58... -
Page 46: Nel Control
NEL reconnection value, then the input is active; if it doesn’t, the input is deactivated. NOTE: When auto trip and auto reconnection are enabled, manual trip is still active. HAT600P Series ATS Controller User Manual Page 46 of 58... -
Page 47: Communication Configuration
17 COMMUNICATION CONFIGURATION 17.1 ILLUSTRATION HAT600P series controller has RS485 serial port, USB communication port, ETHERNET communication port. Among them RS485 and ETHERNET communication port are allowed to connect the local area network openly. They both use Modbus protocol via PC or system software of data collecting, which provides a simple and practical dual power switching management to factories, telecom, industrial and civil buildings, which achieves “remote control, remote measuring, remote communication”... -
Page 48: Terminal Description
Default: ATS power Volt-free relay contact output: Aux. output 2 Common of N output. capacity 250VAC16A For single phase, only connect S1 AC 3-phase 4 wire voltage input A1, N1 HAT600P Series ATS Controller User Manual Page 48 of 58... - Page 49 Monitor" is enabled; controller default is disabled; Able to connect PC to configure D form USB communication port parameters software upgrade; Only suitable ETHERNET Ethernet port Used for communication HAT600PBI/HAT600PS; HAT600P Series ATS Controller User Manual Page 49 of 58...
-
Page 50: Controller Power Supply Description
18.2 CONTROLLER POWER SUPPLY DESCRIPTION 18.2.1 DC SUPPLY HAT600P series controller are all DC supply fitted, with supply voltage range (8-35)VDC. Fig. 16 DC Supply 18.2.2 AC SUPPLY HAT600PB/HAT600PBI/HAT600PS controllers are AC supply fitted. Controllers are supplied by the AC sampling terminals of the two circuits. -
Page 51: Rs485 Connection Description
Table 23 Related Settings Part of Parameter Settings Switch Type Setting PC two-stage Aux. Output 1 ATS Power L Aux. Output 2 ATS Power N Aux. Output 6 Genset Start Output HAT600P Series ATS Controller User Manual Page 51 of 58... - Page 52 Table 24 Related Settings Part of Parameter Settings Switch Type Setting PC two-stage Aux. Output 1 ATS Power L Aux. Output 2 ATS Power N Aux. Output 6 Genset Start Output HAT600P Series ATS Controller User Manual Page 52 of 58...
- Page 53 Part of Parameter Settings Switch Type Setting PC three-stage Aux. Output 1 ATS Power L Aux. Output 2 ATS Power N Aux. Output 3 S1 Open Output Aux. Output 6 Genset Start Output HAT600P Series ATS Controller User Manual Page 53 of 58...
- Page 54 Aux. Output 1 ATS Power L Aux. Output 2 ATS Power N Aux. Output 3 S1 Open Output Aux. Output 4 S2 Open Output Aux. Output 6 Genset Start Output HAT600P Series ATS Controller User Manual Page 54 of 58...
- Page 55 Fig. 23 Contactor Application Diagram Table 27 Related Settings Part of Parameter Settings Switch Type Setting CB Class/CC Class Aux. Output 6 Genset Start Output Close Continue Output Enable Enable HAT600P Series ATS Controller User Manual Page 55 of 58...
- Page 56 Aux. Output 6 Genset Start Output NOTE 1: Above are HAT600P series function application diagrams, among which HAT600P, HAT600PB are not current sampling input, please neglect the current part of the diagrams. NOTE 2: Aux. Output 6 default setting is Genset Start Output (N/O), Aux. Output 6 only has N/C contact;...
-
Page 57: Installation
WARNING: Risk of electric shock. Do not remove the rear shell of the controller. There are no parts inside the controller for maintenance. WARNING: When there is current in the primary circuit of the CT, the secondary circuit of the CT is not allowed to open. HAT600P Series ATS Controller User Manual Page 57 of 58... -
Page 58: Fault Finding
Check ATS power settings and connection wires; Check system type settings; Genset start control Check output function settings and output types; abnormal Check start/stop function settings of all items. _________________________________ HAT600P Series ATS Controller User Manual Page 58 of 58...
Need help?
Do you have a question about the HAT600P Series and is the answer not in the manual?
Questions and answers