
Related Manuals for Sierra Wireless AirLink PinPoint X


Summary of Contents for Sierra Wireless AirLink PinPoint X
- Page 1 USAT Contact USATCORP.COM for more information or quantity pricing USATCORP.COM 1-888-550-8728 PinPoint X for Verizon User Guide 20070914 Rev 2.0...
- Page 2 PinPoint X for Verizon User Guide 20070914 Rev 2.0...
- Page 4 Note: Some airlines may permit the use of cellular phones while the aircraft is on the ground and the door is open. Sierra Wireless AirLink PinPoint X may be used at this time. The driver or operator of any vehicle should not operate the Sierra Wireless AirLink PinPoint X while in control of a vehicle.
- Page 5 5,490,165 5,504,773 5,506,8655,511,0735,535,2395,544,196 5,568,483 5,600,754 5,657,420 5,659,569 5,710,7845,778,338 Manufactured or sold by Sierra Wireless or its licensees under one or more patents licensed from InterDigital Group. Copyright © 2010 Sierra Wireless. All rights reserved. Trademarks ® ® AirCard and “Heart of the Wireless Machine ”...
- Page 6 Preface Post: Sierra Wireless America 39677 Eureka Drive Newark, CA 94560 Sierra Wireless 13811 Wireless Way Richmond, BC Canada V6V 3A4 Fax: 1-510-624-4299 1-604-231-1109 www.sierrawireless.com Web: Consult our website for up-to-date product descriptions, documentation, application notes, firmware upgrades, troubleshooting tips, and press releases: www.sierrawireless.com...
- Page 7 PinPoint X 1x/EV-DO 20070914...
-
Page 8: Table Of Contents
Contents Introduction to the PinPoint X ........1 ACEmanager . - Page 9 PinPoint X 1x/EV-DO Interface Port Pin-Outs ........13 Serial Port .
- Page 10 Contents Power Modes and Information ........45 Wiring the PinPoint X for .
- Page 11 PinPoint X 1x/EV-DO viii 20070914...
-
Page 12: Introduction To The Pinpoint X
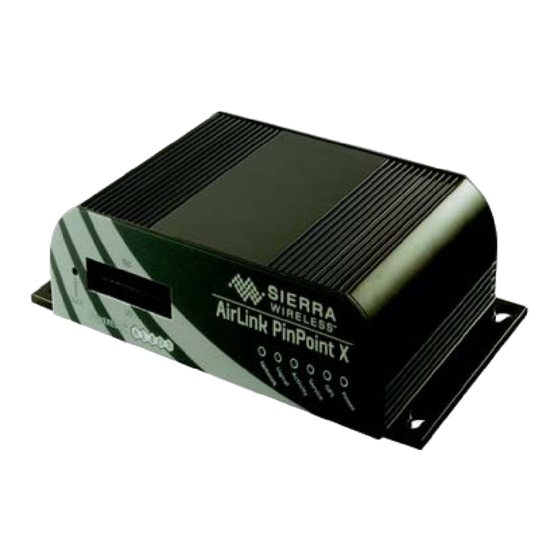
PinPoint X the perfect choice for a broad set of mobile enterprise, public safety, fleet management and AVL solutions. Figure 1-1: Sierra Wireless AirLink PinPoint X ALEOS, the embedded core technology of the Sierra Wireless AirLink products simplifies installation, operation and maintenance of any solution, and provides an always-on, always-aware intelligent connection for mission-critical applications. -
Page 13: Acemanager
ACEmanager), Windows-based applications (ACEview and Modem Doctor), and a web-hosted application (ACEnet). You can download the applications and their user guides from the Sierra Wireless AirLink Solutions web site: http:// www.sierrawireless.com/support. Contact your dealer or Sierra Wireless representative for any further information. -
Page 14: Simplified Deployment
Introduction to the PinPoint X Figure 1-4: ACEmanager Simplified Deployment ACEmanager provides the ability to remotely set up and configure your Sierra Wireless AirLink products. Remote device setup and configuration reduces the deployment timeline of your wireless solution and provides a quicker path to ROI. Templates allow you to easily configure devices in your fleet with identical settings, ensuring a simple, accurate deployment. -
Page 15: Modem Doctor
Modem Doctor and Modem Doctor USB is a troubleshooting and diagnostics utility. This utility will allow you to get a log file of the PinPoint X activity which you can then send to Sierra Wireless support or erase the current configuration completely. -
Page 16: Dynamic Vs. Static Ip Addresses
Introduction to the PinPoint X 3. When your PinPoint X has received its IP address from Verizon, a connection to the Internet or the cellular network is also available for computers or other devices connected directly to the PinPoint X. The PinPoint X will perform routing for all internet traffic to and from the computers or other end devicse. -
Page 17: Ev-Do
North America. To provide backward compatibility and seamless connections in a wider range of locations, Sierra Wireless EV-DO products your PinPoint X will fall back to 1x when EV-DO is not available. -
Page 18: Virtual Serial Port
This is achieved by using authentication algorithms and their outputs. The IPSec architecture model includes the Sierra Wireless AirLink gateway as a remote gateway at one end communicating, through a VPN tunnel, with a VPN gateway at the other end. -
Page 19: Gre
IP through the GRE tunnel. Applications Events Reporting Events Reporting is Sierra Wireless AirLink’s modem’s new software feature provided via ACEmanager, that allows the users to generate reports from the events that take place. Event Reporting Protocol is an intuitive embedded protocol, which automatically formats the messages based on an event trigger. -
Page 20: Documentation
Interpret the LEDs on the PinPoint X and the indicators in the AceView software. This User Guide is provided as a PDF (Portable Document Format) file on the installation CD or from the Sierra Wireless support website. Tools and Reference Documents User Guide... - Page 21 PinPoint X 1x/EV-DO 20070914...
-
Page 22: Specifications
2: Specifications • Interface Port Pin- Outs • Power Connector Features and Benefits • Embedded Intelligence • Low Power Consumption • High-Speed Processor • High-Speed 2-way Data • Multiple Interfaces, I/O Port • High-Sensitivity GPS Receiver • Persistent Network Connectivity •... -
Page 23: Standards/Approvals
PinPoint X 1x/EV-DO Standards/Approvals • Carrier specific approvals • • Industry Canada Host Interfaces • Ethernet: 10/100 Mbps RJ-45 • USB Type B • RS-232: DB-9 DCE (300-230400 baud) • I/O: 4 Digital, 4 Analog, 2 Relay • Antenna Connection: ·... -
Page 24: Interface Port Pin-Outs
Specifications Interface Port Pin-Outs Serial Port < - > GND (Ground) Unused < - DTR Data Terminal Ready) < - CTS (Clear to Send) < - Rx (Receive) - > RTS (Request to Send) - > Tx (Transmit) < - DSR (Data to Send) - >... -
Page 25: Power Connector
PinPoint X 1x/EV-DO Power Connector Ignition Sense (white) Not Used Ground (black) Power (red) Figure 2-3: Power Connector (not to scale) 20070914... -
Page 26: Activating Your Pinpoint X On Verizon
3: Activating your PinPoint X on Verizon • Automatic Activation • Setup Wizard • Activating Using AT Commands This chapter provides step-by-step directions for activating your PinPoint X on Verizon’s network. Automatic Activation One of the special features of your PinPoint X for Verizon is the ability to activate itself automatically. -
Page 27: Setup Wizard
PinPoint X 1x/EV-DO Setup Wizard You can find the Setup Wizard installation on the CD which came with your PinPoint X or on the Sierra Wireless website: http://www.sierrawireless.com/ support/AirLink/default.aspx.Use only the Setup Wizard for Verizon for best results. Note: The Setup Wizard 1. - Page 28 Activating your PinPoint X on Verizon Figure 3-2: Setup Wizard : Ethernet Connection/USB Connection Figure 3-3: Ethernet Port Tip: If the Setup Wizard is unable to detect the PinPoint X, check the green link LED on the Ethernet port of the modem to see if it is lit to indicate an Ethernet connection with your computer.
- Page 29 Choose the tasks you need from those displayed. Figure 3-5: Setup Wizard : Task Menu • Update ALEOS Firmware: Check the Sierra Wireless server for the latest ALEOS firmware. • Activate Modem: Configure your PinPoint X to connect on the Verizon network.
-
Page 30: Manual
Note: While checking for ALEOS Firmware updates, the Setup Wizard uses the Internet connection on your computer to connect to the Sierra Wireless server. Your PinPoint X is not connected to the wireless network for this process. If you are using Ethernet to activate... - Page 31 PinPoint X 1x/EV-DO Figure 3-7: Setup Wizard : MSL • MDN - The phone number of your cellular account. • MIN or MSID - The identification number for your cellular account. Figure 3-8: Setup Wizard MDN and MIN/MSID • Static IP - If you have a cellular account with a static IP address, check this box if it is displayed.
- Page 32 Activating your PinPoint X on Verizon Figure 3-9: Setup Wizard : Signal Test Note: If you did not need to enter any data, no settings will be displayed. Tip: If you have low signal, you may encounter difficulties activating your modem. Try a different location or a different antenna to increase your signal if it is -90 or lower (yellow to red bar).
- Page 33 PinPoint X 1x/EV-DO Figure 3-11: Setup Wizard: Connection Test Green checks in the boxes indicate the tests were successful and your PinPoint X is functioning properly. At this point your modem is configured and activated to work on the Verizon network. Note: These tests, depending on the strength of your signal, may take a few minutes.
- Page 34 Activating your PinPoint X on Verizon Figure 3-12: Setup Wizard : Primary and Secondardy HA • HA Shared Secret Password is used for both Home Agent’s. This may be filled in for you with a password created for your PinPoint X for the Verizon network.
- Page 35 PinPoint X 1x/EV-DO If you already have other modems installed on your computer, they will be listed on the Sierra Wireless AirLink Modem Installation screen. If you have other modems installed on your computer using the same serial port, they may conflict.
- Page 36 Select Add to create a new connection for the PinPoint X. Figure 3-17: Setup Wizard : DUN settings h. From the drop down menu, select Sierra Wireless modem. The defaults for the phone number, user name and password will already be entered.
-
Page 37: Activating Using At Commands
PinPoint X 1x/EV-DO Your modem is now ready to be used as a DUN device for any applications on your computer needing a network connection. If you have DUN installed for more than one modem, you will need to specify in your application which DUN to use. Unless it is the only DUN, your PinPoint X may not be the one your computer sees as a default. -
Page 38: Hardware Installation Of The Pinpoint X
4: Hardware Installation of the PinPoint X • Connecting to Power • Connecting to a Computer or other Device • Indicator Lights • Mounting Your PinPoint X should be mounted in a position that allows easy Note: During installation, access for the cables so they are not bent, constricted, in close please be sure that the cables are secure but do proximity to high amperage, or exposed to extreme temperatures. - Page 39 PinPoint X 1x/EV-DO Your PinPoint X will work with most cellular antennas with a TNC or SMA (diversity only) connectors. Connect the primary antenna or primary RF cable directly to the antenna connector on the back of the PinPoint X. When using a cable to an antenna placed away from the modem, minimize the length Tip: of your cable.
-
Page 40: Connecting To A Computer Or Other Device
Hardware Installation of the PinPoint X Your PinPoint X can be used with either DC or AC, with the appropriate power adapter. DC cables and AC adapters are available as optional accessories in addition to the one included with your PinPoint X. The DC power cable positive lead should be connected to the battery or power source positive terminal. -
Page 41: Indicator Lights
Your PinPoint X also has an I/O port with digital inputs, analog inputs, and relay outputs which can be connected to external devices. The I/O port can use an optional I/O harness available through Sierra Wireless. Indicator Lights When solid, PinPoint X indicates a successful connection. When your PinPoint X is connected to power and an antenna, there is a specific pattern to the lights to indicate its operation mode. -
Page 42: Light Patterns
Hardware Installation of the PinPoint X • Network - Indicates a successful connection to the cellular network with an IP address given and a channel acquired. • Signal - Light shows the strength of the signal and may be nearly solid (strong signal) or flashing (weaker signal). - Page 43 PinPoint X 1x/EV-DO • Configuration Reset - The LEDs will cycle left to right and then right to left 4 times. • Authentication Failure - The Network, Signal, and Activity LEDs blink every 2 seconds. • Data Retry - The Network, Signal, and Activity LEDs blink every 3 seconds. •...
-
Page 44: Mounting
Hardware Installation of the PinPoint X Mounting The integrated mounting with keyhole screw mounts on the PinPoint X will allow you to secure your modem nearly anywhere, quickly and easily, without the need for a separate bracket. 6.12”(155.4mm) .132”(3.3mm) 2.935” (74.5mm) .267”(6.78mm) 3.185”... - Page 45 PinPoint X 1x/EV-DO 20070914...
-
Page 46: Configuring The Pinpoint X
1. Choose a name and icon for your connection a. Choose a name for your connection, such as PinPoint X or Sierra Wireless AirLink Solutions. The name and icon are only for your own reference so you can find the connection at a later date. - Page 47 PinPoint X 1x/EV-DO Figure 5-1: Connect To b. Change or verify the settings: · Bits per Second: 115200 (default) · Data Bits: 8 · Parity: None · Stop Bits: 1 · Flow Control: Hardware. Figure 5-2: Port Settings If you have configured the PinPoint X for settings different than the defaults for Bits Tip: per Second, Data Bits, Parity, and/or Stop Bits, you will need to use your changed settings.
- Page 48 Configuring the PinPoint X 192.168.14.31 g. Select OK. 3. Connected Connecting on USB/net will prompt for password. Figure 5-3: HyperTerminal : TCP/IP connected Rev 2.0 Mar.10...
-
Page 49: At Command
PinPoint X 1x/EV-DO Figure 5-4: HyperTerminal : connected a. If you are prompted for a password, enter 12345 (default password). You will not be prompted for a password if you connect using a COM port. Tip: b. Type AT and press Enter. You should get a reply of “OK” or “0”. c. - Page 50 Configuring the PinPoint X • Optional parameters are denoted with square brackets [ ]. • AT Commands are not case sensitive. A capital “E” is the same as a lower- case “e”. • When you are using a terminal connection, if you enter a command which is recognized by the PinPoint X, it will respond with “OK”.
- Page 51 PinPoint X 1x/EV-DO 20070914...
-
Page 52: Inputs, Relay Outputs, And Power Status
6: Inputs, Relay Outputs, and Power Status • Capturing External Events The PinPoint X has special features for use in a mobile environment. • Power Modes and The PinPoint X can be configured to monitor the input, respond to Information specific types of events, and even trigger a digital output. -
Page 53: Digital Inputs
PinPoint X 1x/EV-DO Digital Inputs Figure 6-2: Digital Input Contact Closure By measuring contact closures on switches, the digital inputs can report a simple open or closed state. Each of the four digital inputs can be wired to the two ground signals via a switch. -
Page 54: Connecting Devices To The I/O Port
Inputs, Relay Outputs, and Power Status The relays are only capable of switching small loads. If you need a stronger signal, Tip: such as to open a door lock, you can connect the PinPoint X’s relay to a stronger solenoid relay which has enough power to cause the desired effect. - Page 55 PinPoint X 1x/EV-DO Figure 6-4: I/O Wiring Harness, AirLink part number 120-140-1014 Locking Tab V/Bl none G/Bl none Bl/W Bl/Br O/Bl none none O/R none none Bl/G Y/Bl Bl/R Figure 6-5: Color Corospondance to connection points Table 6-2: Wiring Color Corospondance 1.
-
Page 56: Analog Inputs
Inputs, Relay Outputs, and Power Status Analog Inputs Connect a wiring lead to an analog input (AIN) at 1, 3, 12 or 14, and the nearest ground at 2 or 13. Digital Inputs Connect a wiring lead to a digital input (DIN) at 9, 11, 20, or 22, and the nearest ground at 8, 10, 19, or 21, as applicable. -
Page 57: Wiring The Pinpoint X For
PinPoint X 1x/EV-DO Figure 6-6: ACEmanager : Low Power Wiring the PinPoint X for When the Standby Ignition Sense is enabled and the ignition sense connector is wired to your vehicle, the ignition sense will provide a link to the modem to enable it to enter a low-power using standby mode. -
Page 58: Regulatory Information
Warning: Changes or modifications to this device not expressly approved by Sierra Wireless could void the user's authority to operate this equipment. Industry Canada This Class A digital apparatus meets all requirements of the Canadian Interference Causing Equipment Regulations. -
Page 59: Antenna Considerations
RF radiation, the maximum antenna gain must not exceed 5 dBi in the Cellular band and 4 dBi in the PCS band. Sierra Wireless hereby declares that the PinPoint X devices conform to all the essential requirements of Directive 1999/5/EC. -
Page 60: Weee Notice
Regulatory Information The Declaration of Conformity made under Directive 1999/5/EC is available for viewing at the following location in the EU community. Sierra Wireless 39677 Eureka Drive Newark, CA 94560 The device is a Class A device for use in commercial environment. - Page 61 PinPoint X 1x/EV-DO 20070914...
Need help?
Do you have a question about the AirLink PinPoint X and is the answer not in the manual?
Questions and answers