Table of Contents
Advertisement
Quick Links
SR-GM14H
Introduction and Features
The SR-GM14H is a complete radio replacement kit for the installation of the Stinger HEIGH10
Silverado and GMC Sierra trucks. All modules, cables and adapters are included to retain important features of the factory system,
including: OnStar, front and rear park assist, warning chimes, factory reverse camera, steering wheel-mounted radio controls and
AM/FM reception. Plug & Play wiring harnesses allow for quick and easy installation without the need to cut or splice any wiring.
The display mounting panel allows flush mounting the 10 inch display without modifying/cutting any part of the vehicle's sub-dash.
Important Notes
We recommend reading this manual thoroughly to familiarize yourself
with the entire process prior to beginning the installation.
1. Does not retain the following factory features:
● Factory satellite radio
● Rear seat entertainment system (RSE)
● Steering wheel control backlighting
● Factory USB Ports
2. Not compatible with vehicles equipped with Bose amplified audio system.
3. Please make your vehicle settings selections before removing the factory radio for optimal installation time. Once the radio
has been removed, the vehicle settings which are normally selected through the factory radio can be accessed and changed
by downloading and installing the PAC Vehicle Settings program from http://www.pac-audio.com/firmware
4. The Voice button can be set to activate the factory OnStar function when pressed for longer than 1.5 seconds or given
the ability to control the aftermarket radio. This option can be found in the PAC Vehicle Settings program mentioned above in
note three. The default setting for this button is to control the factory OnStar. If this button is set to control the aftermarket radio,
OnStar can still be accessed by using the mirror controls.
Recommended Tools
Plastic Panel Tool
7mm Socket
10mm Socket
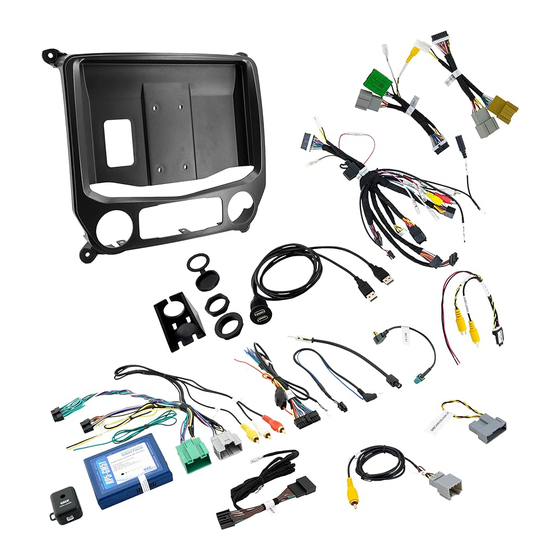
Included Components
1. HEIGH10 Display Mounting Panel
2. Dual USB Extension (SSUSB2)
3. AM / FM Antenna Adapter (BAA22)
4. Satellite Antenna Adapter (SAT-01)
5. Main Harness (SR-GM14H-HAR-A)
6. Vehicle Side Harness B (SR-GM14H-HAR-B)
7. Vehicle Side Harness C (SR-GM14H-HAR-C)
8. Radio Replacement Interface (RP5-GM51)
9. Steering Wheel Control Harness (GM5LIN-SW-HAR)
10. Factory Rear Camera Adapter (CAM-GM51)
11. IOB Display Harness (GM5CAM-DIS-HAR)
12. Chime Module (CMX)
13. Differential Video Adapter (RPA-VA1)
NOTE: Along with the SR-GM14H components,
additional hardware and wire harnesses from the
HEIGH10 (UN1810) kit will also be used in the
installation.
®
Pacific Accessory Corporation
Ratchet
Torx T15 Screwdriver
Small Flat-blade Screwdriver
© 2020 AAMP Global. All rights reserved. PAC is a Power Brand of AAMP Global.
Stinger HEIGH10 Radio Replacement Kit
for select 2014-2019 Silverado/Sierra Truck
Pick Tool
Wire Feeder
1
2
9
8
12
®
modular radio in Chevrolet
®
7
6
5
4
3
11
10
13
Rev: V1
Page 1
Date: 030121
Advertisement
Chapters
Table of Contents
Troubleshooting

Related Manuals for AAMP Global PAC SR-GM14H


Summary of Contents for AAMP Global PAC SR-GM14H
- Page 1 HEIGH10 (UN1810) kit will also be used in the installation. ® Rev: V1 © 2020 AAMP Global. All rights reserved. PAC is a Power Brand of AAMP Global. Page 1 Date: 030121 Pacific Accessory Corporation...
- Page 2 Stinger and radio. If adding Connection additional components, additional connections will be needed. ® Rev: V1 © 2020 AAMP Global. All rights reserved. PAC is a Power Brand of AAMP Global. Page 2 Date: 030121 Pacific Accessory Corporation...
- Page 3 Remove all connectors from the back of the panel. equipped. ® Rev: V1 © 2020 AAMP Global. All rights reserved. PAC is a Power Brand of AAMP Global. Page 3 Date: 030121 Pacific Accessory Corporation...
- Page 4 ® Rev: V1 © 2020 AAMP Global. All rights reserved. PAC is a Power Brand of AAMP Global. Page 4 Date: 030121 Pacific Accessory Corporation...
- Page 5 HMI Module; black module with harness from the HMI module. multiple colored plugs facing down. port from the backside. ® Rev: V1 © 2020 AAMP Global. All rights reserved. PAC is a Power Brand of AAMP Global. Page 5 Date: 030121 Pacific Accessory Corporation...
- Page 6 ® Rev: V1 © 2020 AAMP Global. All rights reserved. PAC is a Power Brand of AAMP Global. Page 6 Date: 030121 Pacific Accessory Corporation...
- Page 7 Route the USB cables up and out of the right side opening at the rear of the CD/DVD opening. ® Rev: V1 © 2020 AAMP Global. All rights reserved. PAC is a Power Brand of AAMP Global. Page 7 Date: 030121 Pacific Accessory Corporation...
- Page 8 HAR male end into the female the radio opening, securing with zip connector on the steering column. ties. ® Rev: V1 © 2020 AAMP Global. All rights reserved. PAC is a Power Brand of AAMP Global. Page 8 Date: 030121 Pacific Accessory Corporation...
- Page 9 A pillar panel and ensure the radio opening securing with zip ties. cable does not interfere or get pinched. ® Rev: V1 © 2020 AAMP Global. All rights reserved. PAC is a Power Brand of AAMP Global. Page 9 Date: 030121 Pacific Accessory Corporation...
- Page 10 Radio Select Dial on the side of other side of the RP5-GM51 the RP5-GM51 module. the RP5-GM51 to Number 4. module. ® Rev: V1 © 2020 AAMP Global. All rights reserved. PAC is a Power Brand of AAMP Global. Page 10 Date: 030121 Pacific Accessory Corporation...
- Page 11 2 pin CMX Chime connector on Main Harness. Connect REVERSE the Main Harness. CAMERA IN to REVERSE CAM. ® Rev: V1 © 2020 AAMP Global. All rights reserved. PAC is a Power Brand of AAMP Global. Page 11 Date: 030121 Pacific Accessory Corporation...
- Page 12 M4 x 10 screws from turn the panel over while holding the HEIGH10 hardware pack. the display in place. ® Rev: V1 © 2020 AAMP Global. All rights reserved. PAC is a Power Brand of AAMP Global. Page 12 Date: 030121 Pacific Accessory Corporation...
- Page 13 Radio M5x10 screws in the locations Module. shown. ® Rev: V1 © 2020 AAMP Global. All rights reserved. PAC is a Power Brand of AAMP Global. Page 13 Date: 030121 Pacific Accessory Corporation...
- Page 14 GPS antenna (2). Harness (2). connections to the HEIGH10 Radio Module. ® Rev: V1 © 2020 AAMP Global. All rights reserved. PAC is a Power Brand of AAMP Global. Page 14 Date: 030121 Pacific Accessory Corporation...
- Page 15 RP5 interface to the top of the this panel as it is put in place. radio module. ® Rev: V1 © 2020 AAMP Global. All rights reserved. PAC is a Power Brand of AAMP Global. Page 15 Date: 030121 Pacific Accessory Corporation...
- Page 16 To update the HEIGH10 radio firmware and PAC Application APK firmware, refer to the HEIGH10 product page: www.stingerelectronics.com/products/heigh10 ® Rev: V1 © 2020 AAMP Global. All rights reserved. PAC is a Power Brand of AAMP Global. Page 16 Date: 030121 Pacific Accessory Corporation...
- Page 17 LED is blinking red in order to perform the reset. This reset will restore all settings to factory defaults. Technical Support Email: support@PAC-audio.com Phone: 866-931-8021 International: 727-592-5991 ® Rev: V1 © 2020 AAMP Global. All rights reserved. PAC is a Power Brand of AAMP Global. Page 17 Date: 030121 Pacific Accessory Corporation...
- Page 18 PN: UN1810 ® -INCH MODULAR MULTIMEDIA DISPLAY SYSTEM USER GUIDE...
-
Page 19: Table Of Contents
If you do not Display Off......25 agree, please discontinue use and contact Stinger is a Power Brand of AAMP Global STINGER. This product is intended for off-road 15500 Lightwave Drive, Suite 202 use and passenger use only. -
Page 20: The Basics
THE BASICS Internal Reset Microphone Button Home Button Voice Button Jump to the Home Menu Launches voice control Tune/Track Down Button Tune/Track Up Button Media control Previous, Back, Seek Media control Next, Forward, Seek Press & hold function in select sources Press &... -
Page 21: Getting Started
GETTING STARTED SELECTING A SOURCE To select a source, press the HOME Information Bar Source/Info Time button. The HOME MENU displays all Sources, along with Settings, Audio, Display and Camera options. SOURCES that are not currently available are grayed out. QUICK TIP There are multiple ways to scroll... -
Page 22: Am/Fm Radio
AM/FM RADIO Bluetooth PHONE Press the HOME BUTTON > Radio to select the Radio Press the HOME BUTTON > Phone to select the Phone Station Presets - To assign a preset, ST Indicator - Indicates when current Number Pad - Touch to launch Device Info - Displays the name of go to desired station, press and hold radio station is in Stereo. -
Page 23: Pairing A Device
Bluetooth PHONE Bluetooth PHONE Pairing a Device Select Pair when prompted. Select Settings from the Phone main menu to go to BT Device Settings. Confirm Key Code on device and select Pair on device. Select Devices on the BT Device settings page. -
Page 24: Contacts/Call Log
Bluetooth PHONE Bluetooth MUSIC Search Contacts Contacts While a device is paired, Contacts can be accessed by selecting Contacts from the Phone main menu. It may take several minutes to load all contacts. When a contact is selected from the list, all associated numbers (Home/Work/ Mobile) will be displayed on the left side of the screen. -
Page 25: Siriusxm
SiriusXM Satelite Radio SiriusXM Satelite Radio ® (OPTIONAL) Only SiriusXM brings you more of what you love to listen to, all in one place. Get over 140 channels, including commercial-free music plus the best sports, news, talk, comedy and entertainment. Welcome to the world of satellite radio. A SiriusXM Vehicle Tuner and Subscription are required. -
Page 26: Siriusxm Replay
SiriusXM Satelite Radio SiriusXM Satelite Radio Return to SiriusXM main screen SiriusXM Replay™ Channels [CH] Replay allows you to pause, rewind Displays a list of availble SiriusXM and replay up to 1 hour of live SiriusXM channels in numerical order. Swipe Satellite Radio. -
Page 27: Usb Media
SiriusXM Satelite Radio USB Media Parental Control Keyboard Icon The SiriusXM Parental Control feature allows you to prevent access to inappropriate mature content for a younger listener. When enabled, the Parental Control feature requires you to enter a passscode to access the channels that are rated as Mature Channels. -
Page 28: Apple Carplay
Android Auto Apple CarPlay ® Set up Andriod Auto Set up Apple CarPlay CarPlay Home Make sure your phone is running Android You can use Apple CarPlay to get 5.0 (Lollipop) or later. Download the directions, make calls, send and receive Android Auto app from Google Play on messages, and more. -
Page 29: Ipod
iPod HDMI INPUT ® Press the HOME BUTTON > HDMI to switch to the HDMI input. Track Detail View The HDMI input can be used for an external DVD player, streaming sticks, media players, smartphone mirroring. You can only view HDMI content with the vehicle in Park and the parking brake ON. -
Page 30: Cameras
iGO NAVIGATION CAMERAS (OPTIONAL) Press the HOME BUTTON > Cameras To access the optional Navigation, press the NAVIGATION BUTTON on to access Cameras the side of the display or press the If there are optional cameras installed, HOME BUTTON > Navigation you may view them at anytime using the camera selection bar at the bottom of The User Manual for iGO Navigation can be... -
Page 31: Settings
SETTINGS SETTINGS EXIT current screen Press the HOME BUTTON > Settings Settings > System Settings > Apple CarPlay to access the Settings main menu. Device Mode [OFF-CarPlay-iPod] Determines how iPhone will be used when Clock plugged into USB port. OFF is charging only. System Settings Mic Gain [LOW-MED-HIGH] Illumination... - Page 32 SETTINGS SETTINGS Settings > Background Settings > Camera Settings Allows you to change the background Cam1-4 Label image. Touch image thumbnail to [REAR-OUTSIDE-AUX-INSIDE-BED-TRAILER] select. You can upload up to 3 of your Allows custom labeling for muliple cameras own images. To upload an image(s), Cam 1-3 Trigger [ON-OFF] copy images onto a USB thumb drive Set individual camera triggers ON/OFF...
-
Page 33: Equalizer
SOUND SETTINGS SOUND SETTINGS Sound Settings > Equalizer Selecting Equalizer from the Audio Menu Bar will bring up the 15 band graphic equalizer and presets. Frequency adjustments can be made by touching and sliding the frequency sliders up/down. Once the desired sound is acheived, it can be saved as a Preset. -
Page 34: Crossover
SOUND SETTINGS SOUND SETTINGS Sound Settings > Crossover Sound Settings > Time Correction Graphical representation of crossover Select milliseconds or inches Slope, Frequency and Level. Selecting Crossover from the Audio Selecting Time Correction from the Audio Menu Bar will access the internal Menu Bar will access the Time Correction electronic variable crossover. -
Page 35: Toslink
SOUND SETTINGS Reset Button Settings > Sound Settings > Advanced Settings Selecting Advanced Settings from The Reset Button is located on the the Audio Settings screen will access lower right hand corner of the display. the following settings: To reset the unit the power must be on, use a paper clip or similar to push the Defeat [ON-OFF] reset button for 2 seconds and release. -
Page 36: Trouble Shooting
TROUBLE SHOOTING TROUBLE SHOOTING General SiriusXM Satellite Radio SiriusXM Satellite Radio (cont) Apple CarPlay Black Screen with Audio Check Antenna Subscription Updated Apple CarPlay will not start/launch Touch the screen anywhere as it may have The radio has detected a fault with the The radio has detected a change in your - Ensure you are using a Apple certified been turned off, see page 25. -
Page 37: Specifications
SPECIFICATIONS SPECIFICATIONS AUDIO/VIDEO FORMATS GENERAL AUDIO (CONT) HDMI INPUT Operating Voltage: 9.0VDC to 18VDC Subwoofer Preout Supported HDMI Resolutions: AUDIO Grounding system; Negative Ground LPF: 25Hz/40Hz/63Hz/80Hz/100Hz/160Hz/250H 640*480p, 720*480p, 1280*720p, Max current consumption: 10A fused Slope: 6dB, 12dB, 18dB 1920*1080i, 1920*1080p MPEG-1 Audio Layer-3 (.mp3) Gain: -14dB to 7dB (1dB/step) FLAC (.flac) - Page 38 FEATURES -Inch 1024 x 600 HD Digital Touchscreen with 16.7M colors Apple CarPlay ® Google Android Auto ™ SiriusXM-Ready with Replay ® (SiriusXM Connect Vehicle Tuner and Subscription required) AM/FM Radio - PTY / RT information High power 4 x 50W (peak) built-in amplifier 4V 6ch RCA audio outputs with subwoofer control Toslink (Optical) Variable Audio Output 15 Band Adjustable EQ with 6 user presets...
-
Page 39: Stingerelectronics.com
® ® INSTALLATION GUIDE 10-INCH MODULAR MULTIMEDIA DISPLAY SYSTEM MODEL NUMBER: UN1810 Copyright © 2020 StingerElectronics.com... - Page 40 Stinger is a Power Brand of AAMP Global its product. If you do not agree, please discontinue use 15500 Lightwave Drive, Suite 202 and contact STINGER.
-
Page 41: Parts List
Parts List Hardware Guide DESCRIPTION PART NO M4 X 6 M4 X 10 M4 X 12 M4 X 14 M4 X 18 Touch Panel Display UN1810-D Radio Module UN1810-M Mounting Brackets / Hardware Plastic Dash Mounting Bracket Display Mounting Clamp #10 X 3/8 M5 X 10 PSE-1000... -
Page 42: Pre-Assembly
Display Assembly Pre-Assembly The display can be installed Flat or with a Horizontal Angle towards the driver. For flat mounting, M4 X 6 attach the Clamp Assembly (1) to the display using M4 X 14 screws (FIG. A). If a horizontal angle Optional is desired, insert the Angle Plate (2) in between the clamp and display and replace 2 of the M4 X Cable Channel... - Page 43 Using a Double DIN Dash Kit: Radio chassis mounts to the brackets attached to the kit main frame FIG. E Display Adjustment & Mounting: 4. Determine the desired position of the display: a. Display can be vertical or tilted up (FIG. E) b.
- Page 44 Using a Double DIN Dash Kit: Radio chassis mounts to the kit brackets in the sub-dash, not to the kit main frame FIG. J Display Adjustment & Mounting: 4. Attach the display to the mounting bracket assembly by hooking bottom spring hook and 1.
- Page 45 Using Factory Radio Brackets: Radio chassis mounts to the factory brackets in the sub-dash FIG. O Display Adjustment & Mounting: 1. Use all 8 kit mounting screws to attach the radio module & plastic mounting bracket assembly to the 4. Attach the display to the mounting bracket factory brackets.
- Page 46 Using a Single DIN ISO Mountable Dash Kit: Radio chassis mounts separately into the sub-dash FIG. T Display Adjustment & Mounting: 4. Determine the desired position of the display: 1. Install the dash kit brackets to the main frame. a. Display can be vertical or tilted up (FIG. T) b.
-
Page 47: Final Assembly
Final Assembly Wiring and Connections BOOT ASSEMBLY PLASTIC "TAB" HAS TO GO INTO A NOTCH (DISPLAY UNIT NOT SHOWN) If needed, attach the rubber boot to the display clamp assembly by aligning BOOT ASSEMBLY HOOKS the notch on the top edge as shown, AT 5 SPOTS (RUBBER BOOT NOT SHOWN) and hook the boot to the clamp at 5... - Page 48 Wiring and Connections Wiring and Connections 24 Pin AV / Rear Camera Harness 16 Pin Power / Speaker Harness Audio/Video Inputs & Outputs / Rear Camera Video Input / Resistive Steering Wheel Control Inputs Connect radio power and speaker connections to a vehicle specific harness To program SWC, go to SETTINGS >...
-
Page 49: Dimensions
Wiring and Connections Dimensions (in) 6 Pin SWI / IR Harness 3.5mm Input for optional Steering Wheel Control Interface (PAC Audio SWI-CP2 is recommended for full compatibility and advanced features. Visit PAC-Audio.com) 9.73 0.80 ORANGE Steering Wheel Control Input External IR input EXTERNAL IR BLACK 4 Pin Microphone / Camera Audio Harness... -
Page 50: Troubleshooting
Troubleshooting Upgrades/Options General SiriusXM Satellite Radio SiriusXM Satellite Radio (cont) Navigation SD Card Black Screen with Audio Check Antenna Memory End Navigation Ready Touch the screen anywhere as it may have The radio has detected a fault with the This message will display when the been turned off. - Page 51 ® ® NOTES: StingerElectronics.com IG-UN1810-UI REV.120420 IG-UN1810-UI REV.120420 Copyright © 2020...
Need help?
Do you have a question about the PAC SR-GM14H and is the answer not in the manual?
Questions and answers