Table of Contents
Advertisement
Quick Links
0101-9031-0
Genius II
Quick Start Guide
Revision B, December 2015
Temescal, a division of Ferrotec (USA) Corporation
4569-C Las Positas Road, Livermore, CA 94551
Tel: 1-800-522-1215; Fax: 925-449-4096
Ferrotec GmbH
Seerosenstr. 1, 72669 Unterensingen,
AG Stuttgart, Germany
Tel.: +49 7022 9270 0
+49 7022 9270 10
Advertisement
Table of Contents

Summary of Contents for ferrotec Genius II
- Page 1 0101-9031-0 Genius II Quick Start Guide Revision B, December 2015 Temescal, a division of Ferrotec (USA) Corporation 4569-C Las Positas Road, Livermore, CA 94551 Tel: 1-800-522-1215; Fax: 925-449-4096 Ferrotec GmbH Seerosenstr. 1, 72669 Unterensingen, AG Stuttgart, Germany Tel.: +49 7022 9270 0...
- Page 2 Rev. Description Application/Reason for Change Date Approved By First released version of document. Applies to all Genius II units sold after Dec. November 2015 2015 Correct internal cross-references on pp. 7 Applies to all Genius II units sold after Dec.
-
Page 3: Table Of Contents
1.1 Contents of Genius II Kits ................1 1.2 Basic Hardware Installation ................1 1.3 Making Cable Connections ................2 1.4 Connecting the AC Power Cable and Powering Up the Genius II ...... 9 1.5 Configuring the Control Modules ..............10 List of Illustrations... - Page 4 Use of the Genius II controller other that in combination with this group of devices is not allowed. The Genius II is intended solely for the control of this group of devices. Use of the Genius II for any other purpose requires the approval of the manufacturer.
- Page 5 Warns of dangerous actions situations that could result in severe injury or death. Avoid such actions and situations. C A U T I O N Warns of actions that could lead to damage to the Genius II or other equipment associated with the evaporation system. Avoid such actions. Genius II Quick Start Guide...
- Page 6 The safety instructions contained in it must be obeyed. If the deposition controller is resold, the instruction handbook must always be delivered along with it. 01010-9031-0, Rev. B Genius II Quick Start Guide...
- Page 7 If a fault occurs during this time period the manufacturer guarantees free of charge repair in regards of parts and labor time. Warranty exclusions Damages caused by improper or not intended use or unauthorized alterations into the Genius II are excluded from this warranty. Genius II Quick Start Guide...
- Page 8 01010-9031-0, Rev. B Genius II Quick Start Guide...
-
Page 9: Genius Ii Quick Start Guide
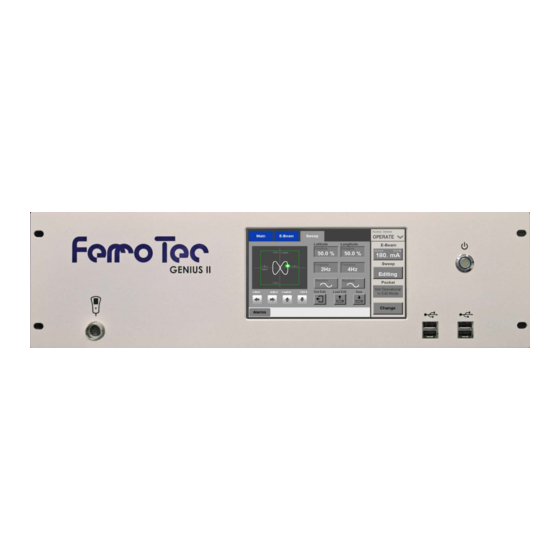
19-inch rack. Plug the connector on the end of the remote controller’s cable into the port indicated in Figure 1. Figure 1 Genius II Front Panel, Showing Connections Port for Hand Held Remote Controller On/Off Button Connection Port for Hand Held Remote controller 0101-9031-0, Rev. -
Page 10: Making Cable Connections
Making Cable Connections 1.3.1 Cabling Overview Section 1.3.2 describes how to connect the Genius II to the components it controls and to the required interlock switches. For instructions on making connections between the Genius II and a PLC-based system controller, see section 1.3.3. - Page 11 Figure 4. NOTE To ensure equipment and personnel safety, these interlock switch connections are required in all Genius II installations. Optionally, Pin A4 may be connected to an additional user-defined interlock, as shown in Error! Reference source not found.. Connect Pins A2 and B2 on rear panel connector X105 to the poles of a normally-closed safety switch mounted on the product chamber door.
-
Page 12: Figure 3 Genius Ii Cabling Diagram
1.3 Making Cable Connections 1.3.2 Basic Cabling Procedure Figure 3 Genius II Cabling Diagram Genius II Quick Start Guide 0101-9031-0, Rev. B... - Page 13 1.3.2 Basic Cabling Procedure 1.3 Making Cable Connections 0101-9031-0, Rev. B Genius II Quick Start Guide...
-
Page 14: Figure 4 Connections To Be Made Via Rear Panel Connector X110
Genius II rear-panel connector X111 to the BNC connector on the deposition controller rear panel which outputs the emission current request. If you are connecting the Genius II to either an Inficon XTC/3S or an XTC/3M, connect the BNC connector to the XTC’s SOURCE 1 connector. -
Page 15: Figure 5 Sample Circuit Supplying Beam On And Beam Off Inputs Via X110 Pins 5 And 6
Input 4: Status of auxiliary interlock (1 = OK); connect to optional user-defined interlock switch. Input 5: BEAM ON input (Positive slope). Within the Genius II, this input, when true, switches on the HV and the gun. Connect Pin A5 to a user-determined output from the higher-level controller. For example, if you are using the Genius II in a system equipped with an XTC/3M deposition controller, you can create a circuit similar to that shown in Figure 5, which illustrates the use of the XTC/3M’s IN LAYER output to provide both the BEAM ON... -
Page 16: Figure 6 Connections To Rear Panel Connector X119, Configuration #1
Figures 6 and 7. Table 2 provides functional descriptions of the I/Os exchanged via connector X119. Figure 6 Connections to Rear Panel Connector X119, Configuration #1 Figure 7 Connections to Rear Panel Connector X119, Configuration #2 Genius II Quick Start Guide 0101-9031-0, Rev. B... -
Page 17: Connecting The Ac Power Cable And Powering Up The Genius Ii
Step Action Make sure that the rear-panel On/Off switch (see Figure 8) is in the Off position. Figure 8 Genius II Input Power Cable Receptacle and Rear Panel On/Off Switch On/Off Switch Receptacle for Input Power Cable Plug the unit’s power cable into the rear-panel input power receptacle and into an appropriate source of AC power. -
Page 18: 1.5 Configuring The Control Modules
1.5.1 Configuring All Module Control Modules for Remote Control Step Action When the Genius II is first booted up, the main controller screen displays the Start screen (see Figure 9). To put the unit into Configuration Mode, touch this screen’s Configuration button. The unit will then display the Configuration>Main screen (see Figure 10). -
Page 19: Figure 11 Configuration>Main Screen After User Configures All Control Modules As Remote I/O
Touch the kV Set button to display a numeric keypad. b) Use that keypad to enter the desired default value. c) Touch Enter to close the keypad. The value you entered will then appear on the kV Set button. 0101-9031-0, Rev. B Genius II Quick Start Guide... -
Page 20: Figure 13 Config>Turret Screen At Initial Boot-Up
1.5.3 Configuring the Turret Control Module Overview of the Config>Turret Screen Figure 13 shows the Configuration>Turret screen as it appears when the Genius II is first booted up. Figure 13 Config>Turret Screen at Initial Boot-Up The features on this screen enable the user to configure the essential turret-related parameters, including: •... -
Page 21: Figure 14 Config>Turret Screen After User Alters Rotation, Seek Speed, And Index Speed
Figure 14 Config>Turret Screen After User Alters Rotation, Seek Speed, and Index Speed Touch the Activate Motor button. The Config>Turret screen will now appear as shown in Figure 15, with 1 displayed on the Pocket button. 0101-9031-0, Rev. B Genius II Quick Start Guide... -
Page 22: Figure 15 Config>Turret Screen After Turret Configuration Procedure Is Completed
The Config>Sweep screen enables the user to set the limits for the beam position interlocks. Figure 16 shows this screen as it appears when the Genius II is first booted up. Figure 16 Config>Sweep Screen, Beam Position Limits Unconfigured, Initial State... -
Page 23: Figure 17 Config>Sweep Screen, Beam Position Limits Unconfigured, Beam Switched On
Pick up the remote controller and view the beam through the viewport. If the remote controller’s Menu 1 is not selected, press its Menu button until its screen appears as shown in Figure 18. 0101-9031-0, Rev. B Genius II Quick Start Guide... -
Page 24: Figure 18 Remote Controller In Config Mode With Menu 1 Selected And Beam On At 5
Figure 18 Remote Controller in Config Mode with Menu 1 Selected and Beam on at 5%, Touch the remote controller’s Pos Adjust button. The remote controller’s screen will then appear as shown in Figure 19. Genius II Quick Start Guide 0101-9031-0, Rev. B... -
Page 25: Figure 19 Remote Controller, Beam On @ 5%, Config Mode, Menu 1 And Pos Adjust Selected
With Menu 2 displayed, press the Set –Lat button to set the –Latitude beam position limit at this position. The screen will then appear as shown in Figure 20, with a white dashed line indicating the limit you have just set. 0101-9031-0, Rev. B Genius II Quick Start Guide... -
Page 26: Figure 20 Remote Controller In Config Mode With Menu 2 Selected, User Setting The -Lat Position Limit
When the beam is at the position desired for the +longitude limit, press the Set +Long button. Use the joystick to move the beam to the position desired for the –Longitude beam position limit. Genius II Quick Start Guide 0101-9031-0, Rev. B... -
Page 27: Figure 21 Config>Sweep Screen After All Four Limits Are Set
Figure 22. That illustration shows the Config>Sweep screen as it appears after configuration of the Sweep Control module is completed. However, you can exit from Configuration mode from any Configuration Mode screen. 0101-9031-0, Rev. B Genius II Quick Start Guide... -
Page 28: Figure 22 Config>Sweep Screen, Configuration Completed, Auxiliary Menu Displayed
Figure 23 User Exiting Configuration Mode, Mode Select Popup Displayed To exit from Configuration Mode and save your changes, touch any active button on this popup. The Genius II will then enter the selected mode. The unit is now ready for normal system operation.
Need help?
Do you have a question about the Genius II and is the answer not in the manual?
Questions and answers