
Related Manuals for NetComm NTC-5000 Series


Summary of Contents for NetComm NTC-5000 Series
- Page 1 NETCOMM CALLDIRECT SERIES Industrial HSPA Ethernet Router NTC-5000 SERIES NTC-5908 NTC-5909 NTC-5900 USER GUIDE...
- Page 2 Copyright©2011 NetComm Limited. All rights reserved. The information contained herein is proprietary to NetComm Limited. No part of this document may be translated, transcribed, reproduced, in any form, or by any means without prior written consent of NetComm Limited NOTE: This document is subject to change without notice.
-
Page 3: Table Of Contents
NetComm CallDirect Series - NTC-5000 Series Table of Contents Introduction ������������������������������������������������������������������������������������������������������������������������������������������������������������������������������������������������5 1.1 Overview .............................................5 1.2 Features ............................................5 1.3 Hardware Overview ........................................6 Configuring your Router �����������������������������������������������������������������������������������������������������������������������������������������������������������������������������9 2.1 Inserting the SIM card .........................................9 2.2 Setting up the cellular router ......................................9 2.3 Preparing your computer ......................................10 2.4 Accessing your router’s configuration pages ................................10... - Page 4 Introduction...
-
Page 5: Introduction
1.1 Overview An NTC-5000 series router allows you to build wide area networks utilising the superior speeds supported by 3G UMTS networks. Employing an embedded 3G modem module, the router offers downlink speeds of up to 7.2Mbps and uplink speeds of up to 5.76Mbps. -
Page 6: Hardware Overview
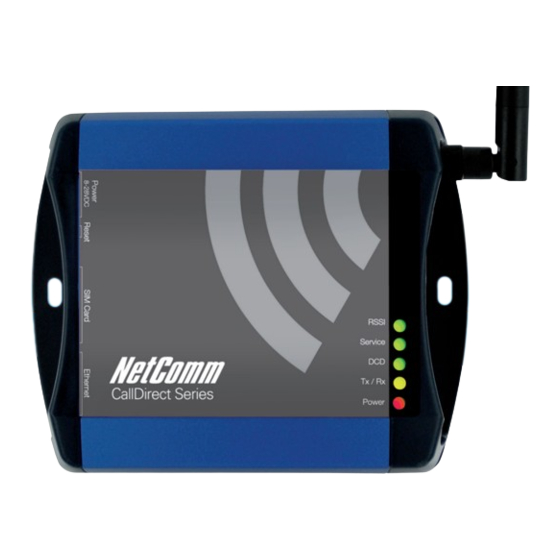
This green LED shows Received Signal Strength. There are three possible states that the RSSI LED can operate in, based upon signal level. Solid ON Strong:Indicates the RSSI level is -86dbm Flashing once per second Medium: Indicates the RSSI level is -110dbm and -86dbm Poor: Indicates the RSSI level is less than -110dbm NTC-5000 Series User Guide YML5000 www.netcomm.com.au... - Page 7 NetComm CallDirect Series - NTC-5000 Series 1�3�2 Overview of the router Interfaces Main Antenna Socket 5 Indicator LEDs Ethernet Port Reset Button SIM Card Reader Locking Power Terminal Block Field Desciption Antenna Socket 5 Indicator LEDs Indicates the connection strength, service type, data traffic, data carrier connection and...
- Page 8 Configure...
-
Page 9: Configuring Your Router
NetComm CallDirect Series - NTC-5000 Series Configuring your Router You will need the following hardware components to set up the router: Power supply (8-28VDC) Ethernet cable Laptop or PC Active SIM card 2.1 Inserting the SIM card Press the SIM ‘Eject’ button to eject SIM card bay. Make sure the SIM card is inserted correctly by inserting the SIM with the gold side... -
Page 10: Preparing Your Computer
To login to the router in admin manager mode, please use the following default login details. http://192�168�1�1 USERNAME: admin PASSWORD: admin NOTE – Whenever you make changes, please refresh your web page to prevent errors occurring due to caching. NTC-5000 Series User Guide YML5000 www.netcomm.com.au... -
Page 11: Unlocking The Sim
NetComm CallDirect Series - NTC-5000 Series Below illustrates the steps required to access the router’s web browser configuration: Open your web browser (e.g. Internet Explorer/Firefox/Safari) and navigate to http://192.168.1.1/ Click Login and type “admin” (without quotes) in the Username and Password fields. Then click on Submit. - Page 12 Your carrier will issue you a PUK code to enable you to unlock the SIM and enter a new PIN code. Enter the new PIN and PUK codes, click Save. If you have entered the PUK correctly you should see the following message: NTC-5000 Series User Guide YML5000 www.netcomm.com.au...
- Page 13 NetComm CallDirect Series - NTC-5000 Series Now click on the ”Status” menu item at the top left-hand side of the page. It should reflect the screenshot below and show a SIM Status of ‘SIM OK’: 2�5�2 The ‘Remember PIN’ feature This feature allows the router to automatically send the PIN to the SIM each time the SIM asks for it (usually at power up).
- Page 14 Band / Provider Selection...
-
Page 15: Band / Provider Selection
NetComm CallDirect Series - NTC-5000 Series Band / Provider Selection 3.1 Locking to a specific band You may want to lock the router to a specific band. To do this, click on the “Internet Settings” menu followed by “WWAN (3G)“ and then the “Band / Provider”... - Page 16 Connection...
-
Page 17: How To Establish A Connection To The Cellular Network
NetComm CallDirect Series - NTC-5000 Series How to Establish a Connection to the Cellular Network This section describes how to set up the router to initiate a WWAN connection. There are 2 different ways to set up a WWAN connection via PPP: Initiating the PPP Connection directly from the router (most common). -
Page 18: How To Establish A Connection Using The Router In Transparent Pppoe Mode
This facility is particularly useful if you have more than one PPPoE router or modem on a single Ethernet network. Finally click “Save” to save your settings and enable PPPoE. NTC-5000 Series User Guide YML5000 www.netcomm.com.au... - Page 19 Ethernet Related Commands...
-
Page 20: Ethernet Related Commands
Upon enabling DNS Masquerade, you will notice that the DNS1 address is automatically set to the IP address of the Ethernet port. DNS addresses are then automatically assigned by the connection to the network. NTC-5000 Series User Guide YML5000 www.netcomm.com.au... -
Page 21: How To Configure Your Device's Ip Address Manually (No Dhcp)
NetComm CallDirect Series - NTC-5000 Series 5.3.1 How to configure static DHCP assignments This facility is available by clicking on the “Internet Settings” menu followed by “LAN“ and then the “DHCP” menu item on the right. You may assign a particular IP address to a specific device every time that device makes a DHCP request as follows: Click “Add”... - Page 22 Router Configuration...
-
Page 23: Routing Configuration
NetComm CallDirect Series - NTC-5000 Series Routing Configuration 6.1 Configuring Static Routes This facility is available by clicking on the “Internet Settings” menu followed by “Routing” and then the “Static” menu item on the right. Some routes are added by default by the router on initialisation such as the Ethernet subnet route for routing to a device on the Ethernet subnet. -
Page 24: How To Configure Rip
NOTE: Configuring VRRP changes the MAC address of the Ethernet port and therefore if you want to resume with the web configuration you must use the new IP address (VRRP IP) or on a command prompt type: arp –d <ip address> (i.e arp –d 192.168.1.1) to clear the arp cache.(old MAC address). NTC-5000 Series User Guide YML5000... -
Page 25: Nat Configuration
NetComm CallDirect Series - NTC-5000 Series 6.4 NAT configuration This facility is available by clicking on the “Internet Settings” menu followed by “Routing“ and then the “NAT” menu item on the right. The router is in NAT mode by default. - Page 26 Services Features...
-
Page 27: Services Features
NetComm CallDirect Series - NTC-5000 Series Services Features 7.1 How to configure the dynamic DNS client This facility is available by clicking on the “Services” menu followed by the “DDNS” menu item on the right. Dynamic DNS provides a method for the router to update an external name server with the current WAN IP address. -
Page 28: How To Configure A Periodic Reset Timer
The router can be configured to automatically reboot after a periodic interval specified in minutes. While this is not necessary, it does ensure that in the case of remote installations, it will reboot the router if some anomaly occurs. The default value is 0 which disables the Periodic Reset Timer. The maximum value is 65535 minutes. NTC-5000 Series User Guide YML5000 www.netcomm.com.au... - Page 29 System Features...
-
Page 30: System Features
Please note: It is not necessary to change the password if you only wish to change the port in use. Simply leave the password fields blank. The IP address below is an example only, yours will be different. http://10�10�10�10:8080 Username admin Password admin NTC-5000 Series User Guide YML5000 www.netcomm.com.au... -
Page 31: To Save A Copy Of The Routers Configuration
This facility is available by clicking on the “System” menu followed by “Load / Save“ and then the “Upload” menu item on the right. Click on the ”Browse” button and browse to where the upgrade file is located on your PC/laptop Click “Upload” to upload NTC-5000 series router firmware YML5000 NTC-5000 User Guide www.netcomm.com.au... - Page 32 Troubleshooting...
-
Page 33: Troubleshooting
NetComm CallDirect Series - NTC-5000 Series Troubleshooting 9.1Viewing the system log This facility is available by clicking on the “System” menu followed by “Log“. The System Log enables you to troubleshoot any issues you may be experiencing with your router. - Page 34 If a SIM was installed correctly this may indicate that the SIM has been removed or inserted whilst the unit is powered up. In this case you must reboot the unit. To reboot the router, click on the “System” menu followed by “Reboot“. Clicking the Reboot button on this page will reboot the router. NTC-5000 Series User Guide YML5000 www.netcomm.com.au...
- Page 35 Specifications...
-
Page 36: Specifications
White/Orange TX - Orange/White RX + White/Green Blue/White White/Blue RX - Green/White White/Brown Brown/White NOTE: The Ethernet port on the router supports Auto MDI/MDIX, you may use a straight through or cross-over Ethernet cable. NTC-5000 Series User Guide YML5000 www.netcomm.com.au... - Page 37 Appendix...
-
Page 38: Legal & Regulatory Information
(3) The power supply that is provided with this unit is only intended for use with this product. Do not use this power supply with any other product or do not use any other power supply that is not approved for use with this product by NetComm. Failure to do so may cause damage to this product, fire or result in personal injury. - Page 39 NetComm CallDirect Series - NTC-5000 Series Product Warranty NetComm NTC-5000 series products have a standard 12 months warranty from date of purchase. The warranty is granted on the following conditions: This warranty extends to the original purchaser (you) and is not transferable;...
- Page 40 NOTE: NetComm Technical Support for this product only covers the basic installation and features outlined in the Quick Start Guide. For further information regarding the advanced features of this product, please refer to the configuring sections in the User Guide or contact a Network Specialist.
Need help?
Do you have a question about the NTC-5000 Series and is the answer not in the manual?
Questions and answers