
Related Manuals for MKS 252D


Summary of Contents for MKS 252D
- Page 1 (217) 352-9330 | Click HERE Find the MKS Instruments 252A-1-VPO at our website:...
- Page 2 118703-P1 Rev A, 8/96 MKS Type 252D Exhaust Valve Controller Artisan Technology Group - Quality Instrumentation ... Guaranteed | (888) 88-SOURCE | www.artisantg.com...
- Page 3 All rights reserved. No part of this work may be reproduced or transmitted in any form or by any means, electronic or mechanical, including photocopying and recording, or by any information storage or retrieval system, except as may be expressly permitted in writing by MKS Instruments, Inc.
-
Page 4: Table Of Contents
Table of Contents Table of Contents Safety Procedures and Precautions..................1 Chapter One: General Information..................5 Introduction ....................... 5 How This Manual is Organized.................. 7 Customer Support ...................... 7 Chapter Two: Installation ...................... 9 How To Unpack the Type 252 Unit................9 Unpacking Checklist .................. - Page 5 Table of Contents Selection......................31 Interconnections.....................32 How To Use the Process Limit Option................33 Controls......................33 Interconnections.....................34 How To Use the Reverse Limit Switch Option ............35 Chapter Five: Maintenance and Troubleshooting..............37 General Information ....................37 Maintenance.......................37 Alignment Procedure ..................37 Troubleshooting ......................40 Appendix A: Product Specifications..................43 Appendix B: Model Code Explanation ...................45 Model Code........................45 How To Order a Type 252 Unit ..................46...
- Page 6 List of Figures List of Tables List of Figures Figure 1: Standard Pressure Control Setup................13 Figure 2: 253 Valve Connected in Parallel with an Isolation Valve ........... 13 Figure 3: Front Panel Controls....................21 Figure 4: Rear Panel Controls....................23 Figure 5: Process Limit Set Point Control .................
- Page 7 List of Figures List of Tables Artisan Technology Group - Quality Instrumentation ... Guaranteed | (888) 88-SOURCE | www.artisantg.com...
-
Page 8: Safety Procedures And Precautions
DO NOT SUBSTITUTE PARTS OR MODIFY INSTRUMENT Do not install substitute parts or perform any unauthorized modification to the instrument. Return the instrument to an MKS Calibration and Service Center for service and repair to ensure that all safety features are maintained. - Page 9 Safety Procedures and Precautions USE THE PROPER POWER SOURCE This product is intended to operate from a power source that does not apply more than 250 Volts RMS between the supply conductors, or between either of the supply conductors and ground. A protective ground connection by way of the grounding conductor in the power cord is essential for safe operation.
- Page 10 Safety Procedures and Precautions Definitions of WARNING, CAUTION, and NOTE messages used throughout the manual. Warning The WARNING sign denotes a hazard. It calls attention to a procedure, practice, condition, or the like, which, if not correctly performed or adhered to, could result in injury to personnel.
- Page 11 Safety Procedures and Precautions This page intentionally left blank. Artisan Technology Group - Quality Instrumentation ... Guaranteed | (888) 88-SOURCE | www.artisantg.com...
-
Page 12: Chapter One: General Information
The MKS Type 252D Exhaust Valve Controller controls a stepper motor powered exhaust valve (MKS Type 253) to maintain a constant pressure in a vacuum system by varying the pumping speed. The 252 controller can provide a ±15 VDC output and will accept pressure inputs from a variety of transducers. - Page 13 Introduction Chapter One: General Information The 252 controller takes the DC pressure transducer signal, compares it to the set point, and positions the valve so that it will drive the actual pressure to the set pressure. The 252 controller contains the three modes of control action found in most current industrial controllers: proportional, derivative, and integral.
-
Page 14: How This Manual Is Organized
Calibration and Service Center before shipping. The ERA Number expedites handling and ensures proper servicing of your instrument. Please refer to the inside of the back cover of this manual for a list of MKS Calibration and Service Centers. Warning All returns to MKS Instruments must be free of harmful, corrosive, radioactive, or toxic materials. - Page 15 Customer Support Chapter One: General Information This page intentionally left blank. Artisan Technology Group - Quality Instrumentation ... Guaranteed | (888) 88-SOURCE | www.artisantg.com...
-
Page 16: Chapter Two: Installation
Chapter Two: Installation How To Unpack the Type 252 Unit MKS has carefully packed the Type 252 unit so that it will reach you in perfect operating order. Upon receiving the unit, however, you should check for defects, cracks, broken connectors, etc., to be certain that damage has not occurred during shipment. - Page 17 Connects the 252 unit to a Type 120 transducer with a separate input power connector • Valve Cable: CB252-16-10 Connects the 252D unit to a 253B valve • Valve Adapter Cable: CB252-17-1 Replaces a 252A-C unit with a 252D unit...
-
Page 18: Setup
Chapter Two: Installation Setup Setup System Design The standard one inch 253 valve has a maximum conductance of 150 liters/sec. and a minimum controllable conductance of about 0.15 liters/sec. Within this range of about 1000 to 1, the 252 controller can provide excellent control if the other system parameters allow. Plumbing should be as short in length and as large in diameter as possible. -
Page 19: Mounting Instructions
No special precautions are needed to protect the unit from ordinary mechanical shock and vibration. A rack mounting kit (RM-6) is available from MKS for single or dual unit rack mounting. -
Page 20: Figure 1: Standard Pressure Control Setup
Chapter Two: Installation Setup Figure 1: Standard Pressure Control Setup Figure 2: 253 Valve Connected in Parallel with an Isolation Valve Artisan Technology Group - Quality Instrumentation ... Guaranteed | (888) 88-SOURCE | www.artisantg.com... -
Page 21: Cables
Setup Chapter Two: Installation Cables Note 1. Metal, braided, shielded cables are required to meet CE Mark certification. 2. To order metal, braided, shielded cables, add an “S” after the cable type designation. For example, to order a standard cable to connect the 252 controller to a Type 627 transducer, use part number CB258-1-10;... -
Page 22: Table 1: Valve Connector Pinout
Use the following cable(s) to make the connection: • CB252-16-10: This interface cable connects the 252D controller to a Type 253B valve • This adapter cable allows you to replace a Type 252A-C... -
Page 23: Table 2: Transducer Connector Pinout
Setup Chapter Two: Installation Input Connector This 14-pin Amphenol connector allows you to connect the 252 controller to a transducer. It provides ±15V power and accepts the input pressure signal from the transducer. Input Connector Pinout Assignment + Pressure Input Reserved Reserved Reserved... -
Page 24: Table 3: Interface Connector Pinout
Chapter Two: Installation Setup Interface Connector This 14-pin Amphenol connector provides access to the miscellaneous outputs, ±15V power, and external inputs to the 252 controller. Interface Connector Pinout Assignment (+) Ext. Set Point Reserved Digital Ground (Common for Open, Close and Set Point selection) Open (Connect to Pin 3 to open valve) Close... - Page 25 Setup Chapter Two: Installation This page intentionally left blank. Artisan Technology Group - Quality Instrumentation ... Guaranteed | (888) 88-SOURCE | www.artisantg.com...
-
Page 26: Chapter Three: Overview
Chapter Three: Overview General Information Chapter Three: Overview General Information The Type 252 controller and 253 valve comprise a high performance exhaust control system. With the use of a suitable pressure transducer, pressure can be repeatedly held to less than 0.1% of full scale. -
Page 27: Stepping Drive Motor
Stepping Motor Drive Chapter Three: Overview Stepping Motor Drive The direction of the stepping motor is determined by whichever pair of drivers change state, as shown in Table 4. Four-Step Sequence Step ↓ ↑ For CW rotation follow steps 1, 2, 3, 4, etc. For CCW rotation follow steps 4, 3, 2, 1 etc. -
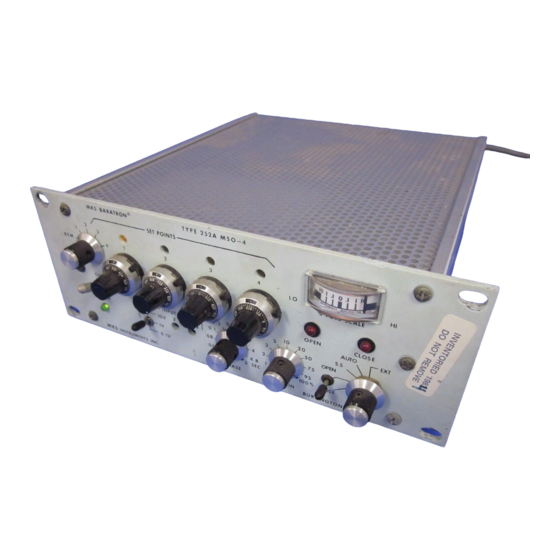
Page 28: Front Panel Controls
Chapter Three: Overview Front Panel Controls Front Panel Controls Figure 3: Front Panel Controls 1. ON/POWER - Controls the AC power to the 252 controller. The LED indicator below it indicates when the power is on, that is, the plug is in and the fuse is alive. 2. - Page 29 Front Panel Controls Chapter Three: Overview 7. GAIN - The GAIN setting determines the overall gain of the controller and should be as high as possible without making the system unstable. The higher the gain, the smaller the dead band. If some overshoot is tolerable, better control (less dead band) can be achieved.
-
Page 30: Rear Panel Controls
Use cable CB252-16-10 to connect the valve and controller. Note If you are installing the 252D controller into an existing system that uses the old (hex) connector cables, an adapter cable is required. Use adapter cable CB252-17-1 to replace a Type 252A-C controller with the Type 252D controller. - Page 31 Rear Panel Controls Chapter Three: Overview This page intentionally left blank. Artisan Technology Group - Quality Instrumentation ... Guaranteed | (888) 88-SOURCE | www.artisantg.com...
-
Page 32: Chapter Four: Operation
Chapter Four: Operation How To Setup the Controller Chapter Four: Operation How To Setup the Controller Before plugging in the AC line cord, turn the power switch OFF and perform the following steps: 1. Ensure that the voltage selector on the rear panel is in the proper position and that the fuse has the proper rating. -
Page 33: How To Tune-Up The Controller
How To Tune-Up the Controller Chapter Four: Operation How To Tune-Up the Controller Turning the Valve Mode Switch (VMS) to S.S. (Soft Start), AUTO, or EXT puts the 252 controller into the Automatic control mode. The exhaust valve will be driven to maintain pressure at the set point value. -
Page 34: How To Use The Normal/Reverse Switch
Chapter Four: Operation How To Use the Normal/Reverse Switch How To Use the Normal/Reverse Switch Most applications will require that when the pressure is greater than the set point, the valve should be driven OPEN to return the pressure to the proper value. This is “normal” operation and assumes that the output of the pressure transducer increases positively for increasing pressure. -
Page 35: Advisory
How To Use External Control Chapter Four: Operation How To Use Set Point Control The set point voltage may be taken from the front panel control(s) or an external voltage. The standard 252 controller has a single front panel set point control. When the INT/EXT switch (refer to Figure 3, page 21) is in the INT position, the 252 controller will control to a pressure equal to the percentage of the front panel set point times the pressure transducer range. -
Page 36: How To Use The Valve Position Option
Chapter Four: Operation How To Use the Valve Position Option How To Use the Valve Position Option The Valve Position Option (VPO) provides a front panel meter readout of the valve position (0 to 100%) and an analog (0 to 10 Volts) signal on the rear panel. These outputs provide you and the controller with an up-to-date readout of the valve position. -
Page 37: Table 5: Valve Position Option Pinout
How To Use the Valve Position Option Chapter Four: Operation Valve Position Option Pinout Interface Connector Standard Unit Multiple Set Point MSO, VPO, and VPO and PLO with VPO Option (MSO) Process Limit and VPO Option (PLO) (+) Ext. Set Point VPO (+10 V) VPO (+10 V) (+) Ext. -
Page 38: How To Use The Multiple Set Point Option
Chapter Four: Operation How To Use the Multiple Set Point Option How To Use the Multiple Set Point Option The Multiple Set Point Option (MSO) provides up to four front panel set point pots which can be selected either from the front panel, or remotely. When selected, each set point pot provides a precision reference for the controller which maintains the control pressure (or flow) at the preset level. -
Page 39: Interconnections
How To Use the Multiple Set Point Option Chapter Four: Operation Interconnections The remote set point select lines are brought out on the Interface connector and are listed in Table 6. The digital ground should be connected to the circuit ground of the digital instrument that is selecting the set points. -
Page 40: How To Use The Process Limit Option
Chapter Four: Operation How To Use the Process Limit Option How To Use the Process Limit Option The Process Limit Option (PLO) provides a logic signal (+5V) and a relay closure when the controller error deviates from zero by more than the process limit. The process limit can be set by an internal control to any range from ±0.5 to ±100%. -
Page 41: Interconnections
How To Use the Process Limit Option Chapter Four: Operation Interconnections Since there are a limited number of spare pins on the Interface connector, the exact pinout will depend on which options are installed. Some examples are listed Table 7. Process Limit Option Pinout Interface Connector... -
Page 42: How To Use The Reverse Limit Switch Option
Chapter Four: Operation How To Use the Reverse Limit Switch Option How To Use the Reverse Limit Switch Option The Reverse Limit Switch Option (RLSO) is incorporated in the 252 controller to provide for valves that have limit switches which are closed when the valve is in the center of it’s operating range. - Page 43 How To Use the Reverse Limit Switch Option Chapter Four: Operation This page intentionally left blank. Artisan Technology Group - Quality Instrumentation ... Guaranteed | (888) 88-SOURCE | www.artisantg.com...
-
Page 44: Chapter Five: Maintenance And Troubleshooting
Instruments immediately. If it is necessary to return the unit to MKS, obtain an ERA number (Equipment Return Authorization Number) from a MKS Service Center before shipping. Please refer to the inside back cover of this manual for a list of MKS Calibration and Service Centers. Maintenance... - Page 45 Maintenance Chapter Five: Maintenance and Troubleshooting Connections 1. Connect the input source to the Input connector Pins 1 and 8 (Pin 8 should also be connected to Pin 12). 2. Connect the 253 valve to the VALVE connector. 3. Verify that the controls are in the following positions: FRONT PANEL Set Point Pot CCW (000)
-
Page 46: Table 8: Test Point Voltages
Chapter Five: Maintenance and Troubleshooting Maintenance Test Point Voltages Condition Test Point Voltage Control (+) 15 V + 15.00 ±.05 R132 Supply Jumper - 15.00 ±.05 R129 (-) 15 V Supply Jumper Input = 0.000V TPB-8 0.000 Zero (R16) Set point = 000 TPB-7 0.000 S.P. -
Page 47: Troubleshooting
Troubleshooting Chapter Five: Maintenance and Troubleshooting Troubleshooting To locate the cause of trouble, follow steps 1, 2, and 3 in sequence. 1. Check for obvious problems such as power off, open fuse, defective line cord, input power failure, or loose connections. 2. -
Page 48: Table 9: Troubleshooting Chart
Chapter Five: Maintenance and Troubleshooting Troubleshooting Troubleshooting Chart Symptom Checks and Probable Causes Error Meter shows oscillation or noise a. Check that input flow is steady. b. Check that pressure transducer has a steady output (vibration isolation may be required). c. - Page 49 Troubleshooting Chapter Five: Maintenance and Troubleshooting This page intentionally left blank. Artisan Technology Group - Quality Instrumentation ... Guaranteed | (888) 88-SOURCE | www.artisantg.com...
-
Page 50: Appendix A: Product Specifications
Appendix A: Product Specifications Appendix A: Product Specifications EMC Directive 89/336/EEC CE Mark Compliance External Input Commands CLOSE and OPEN - TTL compatible (5V, 4.7K pull-up) Input activated by a LO signal (0 to +1 Volt) (activating both stops the valve) External Set Point Signal 0 to 5 VDC analog (40K load impedence) - Page 51 Appendix A: Product Specifications This page intentionally left blank. Artisan Technology Group - Quality Instrumentation ... Guaranteed | (888) 88-SOURCE | www.artisantg.com...
-
Page 52: Appendix B: Model Code Explanation
Type Number (####) This designates the model number of the instrument. The controller is identified as the Type 252D. Number of Set Point Controls (X) Three types of set point control (multiple set point option) are available, designated by a single number code. -
Page 53: How To Order A Type 252 Unit
How To Order a Type 252 Unit To order the Type 252 controller with one set point and no options, the product code is: 252D-1 To order the Type 252 controller with four set point control and the PLO option, the product code... -
Page 54: Index
Index Index Power requirements, 11 Connections input, 24 Returning the product, 7, 9 interface, 17, 23 valve, 15 Customer support, 7 Safety procedures and precautions, 1 Set point control, 28 Setup Installation interconnections, 12 checklist, 9 mounting, 12 power requirements, 11 system design, 11 transducers, 12 valve installation, 12...
Need help?
Do you have a question about the 252D and is the answer not in the manual?
Questions and answers